Unlocking the secrets of Classic Chinese Takeout Sesame Chicken invites you to dive into a dish that has become synonymous with comforting evenings and the unmistakable aroma of Chinese-American cuisine. Originating from mid-20th century Chinese-American culinary innovation, this beloved recipe marries crispy fried chicken pieces with a glossy, sweet-savory sesame sauce that dances on the palate.Unlike its traditional Chinese counterparts,sesame chicken evolved in North America to suit local preferences,combining rich textures and harmonious layers of flavor that have as captivated millions.
Prep and Cook Time
- Planning: 20 minutes
- Cooking: 15 minutes
- Total: 35 minutes
Yield
Serves 4 generously with steamed rice or noodles
Difficulty Level
Medium – Ideal for home cooks eager to master frying and balancing complex sauces
Essential Ingredients and Techniques for Authentic Sesame Chicken
- 1 ½ lbs boneless, skinless chicken thighs, cut into bite-sized chunks (thighs stay juicy)
- ½ cup cornstarch for a light, crispy coating
- ½ cup all-purpose flour, sifted
- 1 large egg, beaten for binding
- 2 tablespoons toasted sesame oil, for nutty fragrance
- ¼ cup soy sauce (preferably light soy for balance)
- 3 tablespoons rice vinegar for subtle acidity
- ¼ cup hoisin sauce, adding earthy sweetness
- ⅓ cup granulated sugar to achieve classic caramelized notes
- ½ cup chicken broth or water
- 2 teaspoons freshly grated ginger for warmth
- 2 cloves garlic, minced for aromatic depth
- 2 tablespoons sesame seeds, toasted to garnish
- Chopped scallions for fresh contrast
- Vegetable oil (for frying) – enough for deep frying (~3 cups)
Decoding the Flavor Profile Unique to Classic sesame Chicken
The magic of classic sesame chicken lies in the interplay between sweet, savory, and mildly tangy notes, brought alive by umami-rich soy, warm ginger, and the sweetness of sugar balanced by rice vinegar’s brightness. Toasted sesame oil and seeds impart a distinct nutty aroma,while the crisp chicken contrast with the slightly sticky glaze creates an irresistible mouthfeel. Each element works harmoniously, crafting a flavor profile that’s both familiar and exciting.
Instructions
- Prepare the chicken: Pat dry the chicken pieces to ensure a crisp crust. in a medium bowl, whisk the beaten egg with a splash of water.
- Make the coating: Combine cornstarch and all-purpose flour in a shallow dish. Dredge each piece of chicken first in the egg wash, then toss thoroughly in the dry mixture until coated evenly. Shake off excess.
- Heat the oil: Fill a deep skillet or wok with vegetable oil to about 2 inches deep. heat to 350°F (175°C) using a thermometer for precision.
- Fry the chicken: working in batches,fry chicken until golden brown and crisp,about 4-5 minutes per batch. Avoid overcrowding to maintain temperature. Transfer to a paper towel-lined tray to drain excess oil.
- Prepare the sauce: In a saucepan over medium heat, warm sesame oil. Sauté ginger and garlic until fragrant, about 30 seconds. Add soy sauce, rice vinegar, hoisin sauce, sugar, and chicken broth. Stir continuously until sugar dissolves and the sauce begins to gently bubble.
- Thicken the sauce: Mix 1 tablespoon cornstarch with 2 tablespoons cold water to create a slurry. Slowly pour into the sauce while stirring. Cook until thickened to a glossy consistency, about 2 minutes.
- Toss chicken in sauce: Add fried chicken to the pan, tossing gently to coat each piece evenly without breaking the crust.
- Finish and garnish: Sprinkle toasted sesame seeds and chopped scallions over the chicken before serving.
Tips and Tricks to Perfecting Sesame chicken at Home
- Chicken choice: Use thighs instead of breasts to achieve juicy, tender bites. Chicken breasts tend to dry out during frying.
- Oil temperature matters: A consistent 350°F is key for a crisp exterior. Use a thermometer and adjust heat to keep it steady.
- Coating balance: Keep the flour-to-cornstarch ratio to ensure the crust is light yet sturdy enough to hold the sauce.
- Sauce texture: The slurry must be added gradually to prevent lumps, and the sauce should be thick but pourable.
- Make ahead: Chicken can be fried and kept warm on a rack in a low oven (200°F) while the sauce is prepared.
- Option garnishes: Toasted chopped almonds or crushed red pepper flakes can add delightful texture and heat.
Serving Suggestions
Plate the sesame chicken over a bed of steamed jasmine rice or fried rice to soak up the luscious sauce. Pair with sautéed bok choy or steamed broccoli for a fresh, vibrant contrast. A side of pickled cucumbers or a crisp Asian slaw brightens the palate. Finish with a wedge of lime to add an optional zesty twist and elevate the dish’s vibrancy.

| Nutritional Data | Per Serving |
|---|---|
| Calories | 520 kcal |
| Protein | 35 g |
| Carbohydrates | 45 g |
| Fat | 18 g |
For those intrigued by other classic Chinese-American dishes, explore our related post on Perfecting General Tso’s Chicken at Home. Enhance your culinary repertoire and keep the flavors authentic yet approachable.
further insights into Chinese-American cuisine history and ingredient origins can be found at Smithsonian Magazine, a trusted resource for food culture exploration.
Q&A
Q&A: Unlocking the Secrets of classic Chinese Takeout Sesame Chicken
Q1: What makes classic Chinese takeout sesame chicken so irresistibly delicious?
A1: It’s all about the perfect harmony of crispy, tender chicken enveloped in a glossy, sweet-savory sauce, topped with toasty sesame seeds. The magic lies in the balance-a light, crunchy coating that doesn’t overshadow the juicy meat, paired with a sauce that dances between caramelized sugar and umami-rich soy, finished with that signature nutty crunch.
Q2: How do restaurants achieve that perfectly crispy texture without it getting soggy?
A2: The secret is in the batter and frying technique. Most takeouts use a light coating of cornstarch or a cornstarch-flour blend, sometimes even double-dipping the chicken pieces for extra crunch. The chicken is then fried twice-first at a lower temperature to cook through, then hotter to get a golden, crisp shell. This two-step frying locks in moisture while ensuring crispiness that holds up under the sauce.
Q3: What are the main ingredients in the classic sesame sauce?
A3: The sauce typically combines soy sauce, sugar or honey, rice vinegar for a mild tang, garlic, and a hint of ginger. Toasted sesame oil and roasted sesame seeds are essential for depth and that unmistakable nutty aroma. Some recipes add a splash of hoisin sauce for complexity or a touch of chili for subtle warmth.
Q4: Can homemade sesame chicken taste as authentic as takeout?
A4: Absolutely! With fresh ingredients and a keen eye on technique, homemade sesame chicken can rival-or even surpass-takeout. The key is timing: prepare the sauce quickly to keep it glossy, fry the chicken in small batches for even crisping, and toast your sesame seeds fresh for the richest flavor.
Q5: Is there a healthier twist to classic sesame chicken without losing its signature taste?
A5: Yes! Swap deep frying for oven-baking or air-frying to cut down on oil. Use a light, crispy coating like panko mixed with crushed sesame seeds to maintain crunch.For the sauce,try reducing sugar or substituting with natural sweeteners like maple syrup or agave,and incorporate fresh ginger and garlic to enhance flavor without extra calories.
Q6: Why do sesame seeds play such an vital role on top?
A6: Sesame seeds are more then just garnish-they add a pleasant crunch and a toasted, nutty note that complements the sweet-savory sauce. Plus, their aroma acts as a sensory primer, making each bite more flavorful and memorable.
Q7: Can sesame chicken be customized to suit different tastes or dietary needs?
A7: Definitely! For spice lovers, toss in crushed red pepper flakes or a dash of chili oil. Vegetarians can use crispy tofu or cauliflower rather of chicken, maintaining that irresistible texture. Gluten-free versions are simple too-just substitute soy sauce with tamari and ensure the coating uses gluten-free starches.
Q8: What’s the best way to serve sesame chicken to replicate that classic takeout experience at home?
A8: serve it piping hot over steamed jasmine rice with a side of steamed broccoli or snap peas. Don’t forget the extra sprinkle of toasted sesame seeds and chopped green onions for freshness. Pair it with classic sides like egg rolls or hot and sour soup to complete the nostalgic feast.
Unlocking the secrets of sesame chicken reveals a beautiful blend of culinary craft and simple ingredient magic-a dish that’s both comforting and exciting, capturing the heart of Chinese takeout culture one crunchy, saucy bite at a time.
final Thoughts
As we close the lid on this flavorful journey into the heart of classic Chinese takeout sesame chicken, it’s clear that this beloved dish is more than just a sweet, sticky delight-it’s a harmonious blend of tradition, technique, and taste. From the careful balance of savory marinade to the perfect golden crispiness and that signature glossy sesame glaze, every bite tells a story rooted in culinary craftsmanship. So next time you unwrap that familiar takeout container, you’ll savor not just the comforting flavors, but the rich heritage and secrets that make sesame chicken a timeless favorite enjoyed around the world.
Unlocking the secrets and surprising uses of green tomatoes reveals their untapped nutritional riches and culinary versatility. These firm, tangy fruits are packed with vitamins A and C, potassium, and antioxidants that support immune health and digestion. Their crisp texture and tart flavor make them an ideal ingredient to creatively elevate your dishes, all while harnessing the medicinal benefits science has started to validate.
Prep and Cook Time
Readiness: 15 minutes | Cooking: 20 minutes | Total: 35 minutes
Yield
Serves 4 as a vibrant appetizer or side dish
Difficulty Level
Medium – approachable even for intermediate cooks looking to experiment with fresh flavors
Ingredients
- 4 medium green tomatoes, sliced into 1/4-inch thick rounds
- 1 cup all-purpose flour, sifted
- 1/2 cup cornmeal
- 1 teaspoon smoked paprika
- 1 teaspoon garlic powder
- 1/2 teaspoon sea salt
- 1/2 teaspoon black pepper, freshly ground
- 2 large eggs, beaten
- 1/2 cup buttermilk
- Olive oil or vegetable oil for frying
- Fresh parsley for garnish
- Lemon wedges for serving
Instructions
- Prepare the dredging stations: In one shallow bowl, mix the sifted all-purpose flour, cornmeal, smoked paprika, garlic powder, salt, and black pepper. In a second bowl, whisk together the eggs and buttermilk until smooth.
- Coat the tomato slices: Dip each green tomato slice first into the flour mixture, ensuring even coverage. Shake off excess flour, then dunk it into the egg-buttermilk blend. return it to the flour mix for a double coating-this double dredge creates a satisfyingly crispy crust.
- Heat the oil: Pour about 1/4 inch of oil into a large skillet over medium heat. Test by dropping a pinch of flour into the oil-it should sizzle promptly.
- Fry the tomatoes: Carefully place coated slices into the hot oil. Fry in batches to avoid crowding. Cook until golden brown and crispy, about 3-4 minutes per side. Use tongs to flip gently, and keep the oil temperature steady to prevent burning.
- Drain and rest: Transfer fried green tomatoes to a wire rack placed over a baking sheet or onto paper towels to drain excess oil. This keeps them crisp rather than soggy.
- Garnish and serve: Sprinkle freshly chopped parsley and a light squeeze of lemon juice over the warm tomatoes before plating. This mellows the tartness while brightening the dish.
Chef’s Notes
- For a gluten-free version, substitute the all-purpose flour and cornmeal with a blend of rice flour and chickpea flour.
- Experiment with spice blends like Cajun seasoning or smoked chili powder in the dredge for extra punch.
- Make-ahead tip: Coat the tomato slices and refrigerate them uncooked for up to 2 hours to prep ahead. Fry just before serving for fresh crispiness.
- If you prefer baked over fried, arrange coated tomato slices on a parchment-lined baking sheet and roast at 425°F for 15-18 minutes, flipping halfway.
Serving Suggestions
These golden-crisped green tomatoes are stunning when served with a cool, creamy dipping sauce such as a tangy buttermilk ranch or garlic aioli. Pair them alongside grilled meats or stacked between slices of crusty artisan bread with fresh lettuce and bacon for a vegetarian-amiable BLT twist. Garnish with microgreens or edible flowers for an elegant presentation perfect for entertaining.

| Nutrient | Amount per Serving |
|---|---|
| Calories | 210 kcal |
| Protein | 6 g |
| Carbohydrates | 26 g |
| Fat | 9 g |
For more ways to incorporate green tomatoes into your seasonal cooking, check out our Creative Green Tomato Recipes. To dive deeper into the science behind the medicinal benefits of green tomatoes, the national Center for Biotechnology Information provides extensive research validating their antioxidant properties.
Q&A
Q&A: Unlocking the Secrets and Surprising Uses of Green Tomatoes
Q1: What exactly are green tomatoes?
A1: Green tomatoes are simply unripe tomatoes that haven’t turned red (or yellow, pink, depending on the variety) yet. Their firm texture and tart flavor make them a versatile ingredient, rather than a sign of an underripe mistake. These vibrant fruits are packed with all the tomato goodness but come with a zesty twist!
Q2: Are green tomatoes safe to eat raw?
A2: Yes, green tomatoes are safe to eat raw, but their tartness and firmness can be quite intense straight from the vine. Manny prefer to cook or pickle them, which mellows the sharpness and brings out a lovely complexity. If you do snack on them fresh, try sprinkling a pinch of salt or a drizzle of honey to balance the flavors.
Q3: What are some surprising culinary uses for green tomatoes?
A3: Beyond the classic fried green tomatoes, these underdog beauties can star in chutneys, relishes, salsas, and even tangy green tomato jams. Their firm texture holds up wonderfully in stews and casseroles, adding brightness and body. Some chefs even roast or grill them for an unexpected smoky twist, or blend them into smoothies for a tangy kick!
Q4: Can green tomatoes be used for natural home remedies or household hacks?
A4: Absolutely! Folk wisdom suggests green tomatoes can soothe minor skin irritations and rashes due to their slightly acidic nature. Some gardeners swear by using them to deter pests or ripen other fruits nearby. While anecdotal, these uses highlight the green tomato’s versatility beyond the kitchen.
Q5: How do green tomatoes compare nutritionally to ripe ones?
A5: Green tomatoes contain slightly less sugar and more acidity than their ripe counterparts, giving them a lower glycemic index. They’re rich in vitamin C, antioxidants like tomatine, and dietary fiber. The higher level of tomatine-a compound that diminishes as tomatoes ripen-has been studied for potential health benefits, including antimicrobial and anti-inflammatory properties.
Q6: Any tips for selecting and storing green tomatoes?
A6: Look for firm, unblemished green tomatoes with a glossy skin. Avoid any that feel mushy or show signs of spoilage. Stored in a cool, dry place, green tomatoes can last several weeks. If you want to slow down ripening, keep them away from ethylene-producing fruits like bananas and apples.
Q7: Why have green tomatoes gained a cult following recently?
A7: In an age where sustainability and reducing food waste are increasingly valued, green tomatoes offer a delicious way to use what might otherwise be discarded. Their unique flavor profile also appeals to adventurous cooks eager to experiment. Plus, their nostalgic charm and Southern roots-immortalized in fried green tomatoes-give them a story as rich as their taste.
Unlocking the secrets of green tomatoes reveals a world of tangy, creative possibilities. So next time you spot those emerald gems at the market, don’t pass them by-get ready to surprise your palate!
In Summary
As we close the chapter on green tomatoes, it’s clear they are far more than just an unripe fruit waiting in the wings. From tangy pickles that spark nostalgia to vibrant sauces that add a fresh twist to familiar dishes, green tomatoes invite us to explore a world of flavors and possibilities often overlooked. Whether you’re a curious cook or a seasoned gardener, embracing these tart treasures can unlock new culinary adventures and lasting delights.
So next time you spot those radiant green orbs on the vine, remember-they hold a secret waiting to be unveiled, transforming simple meals into surprising sensations. Dive in, experiment, and let green tomatoes redefine your kitchen creativity.
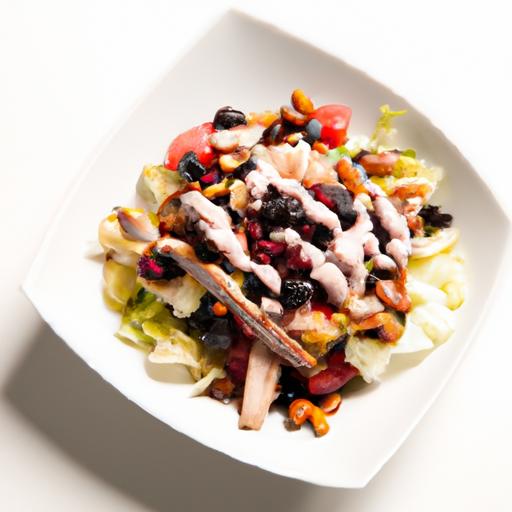
Seeds of Life offer a fascinating gateway into nature’s pantry, embodying concentrated nutrition packed into tiny edible gems. Harnessing seed nutrition for optimal health and wellness is not only a culinary adventure but a tribute to ancient traditions and cutting-edge science. Inspired by a lifelong passion for food that heals and fuels, this recipe celebrates the astonishing biology behind these nutrient powerhouses through a vibrant, wholesome Sprouted Seed Salad bowl that awakens the palate and revitalizes the body.

Prep and Cook Time
Readiness: 20 minutes (excluding sprouting time)
Cook Time: 10 minutes
Total Time: 30 minutes + sprouting
Yield
Serves 4 as a nourishing main or 6 as a light side
difficulty Level
Easy to Medium – perfect for culinary explorers eager to deepen their relationship with seed nutrition
Ingredients
- ½ cup mixed seeds (a blend of organic mung beans, alfalfa, and lentils), sprouted
- 1 cup quinoa, rinsed and cooked
- 1 medium cucumber, diced
- 1 ripe avocado, cubed
- 1 large carrot, julienned
- ½ cup cherry tomatoes, halved
- ¼ cup fresh parsley, finely chopped
- 2 tbsp extra virgin olive oil
- 1 tbsp freshly squeezed lemon juice
- 1 tsp raw honey or maple syrup (optional)
- Salt and freshly ground black pepper, to taste
- 1 tbsp toasted pumpkin seeds (for garnish)
- 1 tbsp toasted sesame seeds (for garnish)
instructions
- Sprout the seeds: Soak your mixed seeds in filtered water overnight (8-12 hours). Drain and rinse twice a day until tiny shoots appear (usually 2-3 days). Keep in a cool, well-ventilated place away from direct sunlight.
- Cook the quinoa: In a medium pot, combine rinsed quinoa with 2 cups of water. bring to a boil, then simmer covered for 15 minutes or until fluffy. Let cool to room temperature.
- Prepare the vegetables: Dice cucumber, cube avocado (squeeze a little lemon juice to prevent browning),julienne carrot, and halve cherry tomatoes. Chop parsley finely for freshness.
- Make the dressing: In a small bowl, whisk together olive oil, lemon juice, raw honey, salt, and pepper until emulsified and vibrant.
- Assemble the salad: In a large mixing bowl, combine the sprouted seeds, cooked quinoa, and all the prepared vegetables. Drizzle the dressing over the salad and toss gently but thoroughly to coat every bite.
- Garnish and serve: Sprinkle toasted pumpkin and sesame seeds on top for a contrasting crunch and nutty aroma. Serve promptly or chilled for later enjoyment.
Tips for Success
- Seed sprouting: Use high-quality organic seeds specifically labeled for sprouting to avoid contamination. Freshness is key to vibrant growth.
- Variations: Swap quinoa for couscous or bulgur for different textures. Add fresh herbs like mint or basil to elevate flavors.
- Make-ahead: Sprout seeds and cook quinoa up to 2 days in advance. Store separately, then toss with fresh veggies and dressing before serving for optimal texture.
- Nutrition boost: Incorporate a handful of toasted nuts such as walnuts or almonds for extra protein and crunch.
- Storage: Prepare without avocado if storing overnight; add avocado just before serving to prevent sogginess and browning.
Serving Suggestions
This seed-powered salad shines as a vibrant lunch packed with color and texture. serve inside crisp lettuce leaves for an inviting wrap experiance or alongside grilled chicken or fish for a balanced, nutrient-dense meal. Garnish with edible flowers or microgreens for a beautiful finishing touch. A light drizzle of tangy tahini or a dollop of creamy Greek yogurt elevates creaminess and richness.

| Nutrient | per serving |
|---|---|
| Calories | 320 |
| Protein | 12g |
| Carbohydrates | 35g |
| Fat | 12g |
| Fiber | 8g |
For those interested in expanding their knowledge about seed nutrition and sprouting, this comprehensive guide on sprouting seeds offers exceptional insights. Additionally, the National Geographic article provides an authoritative look into the biology and sustainability of seeds worldwide.
Q&A
Q&A: Seeds of Life – Unlocking Nature’s Tiny Powerhouses
Q1: What exactly makes seeds the “tiny powerhouses” of nature?
A1: At first glance, seeds may seem small and simple, but they are bustling hubs of potential energy and life. Inside each seed lies a meticulously packed blueprint – the embryo – along with stored nutrients that fuel its first steps toward becoming a thriving plant. Their ability to remain dormant yet viable for months, sometimes centuries, showcases nature’s remarkable engineering, making seeds true powerhouses of regeneration and resilience.
Q2: How do seeds manage to stay alive during long periods of dormancy?
A2: Seeds are master survivalists. They enter a state called dormancy, a suspended animation where metabolic activities slow to a bare minimum. Protective seed coats guard against moisture loss, pests, and environmental hazards. Some seeds even produce natural antifreeze proteins or antioxidants, helping them endure extreme temperatures and oxidative stress until conditions are just right for germination.
Q3: Why is seed diversity so crucial for ecosystems and agriculture?
A3: Seed diversity is nature’s insurance policy. A wide variety of seeds supports resilient ecosystems by offering plants multiple ways to adapt to changing environments, diseases, and pests. for agriculture, it means food security and the potential to breed crops that can withstand droughts, floods, or new pests - all vital as our climate shifts. Preserving seed diversity keeps evolutionary options open and future harvests abundant.
Q4: Can seeds teach us anything beyond biology?
A4: Absolutely! Seeds embody profound lessons about patience, potential, and transformation. They remind us that greatness often begins small and unseen, requiring nurturing and the right conditions to flourish. Seeds also inspire innovation, from biodegradable packaging to new medicines derived from ancient plants. In essence, they’re tiny storytellers of nature’s genius and resilience.
Q5: How are scientists unlocking the secrets within seeds today?
A5: Modern science is diving deep into seeds’ mysteries using genetic sequencing, advanced imaging, and biochemistry. Researchers study how seeds control growth, store energy, and respond to stress at the molecular level. This knowledge helps improve crop yields, develop drought-resistant varieties, and preserve endangered species. in labs worldwide, seeds are unlocking new frontiers in sustainability and biotechnology.
Q6: What can ordinary peopel do to honor and protect seeds?
A6: Everyone can become a guardian of seeds! Planting heirloom varieties, supporting seed banks, and cultivating native plants in your garden all contribute. Simple acts like saving seeds from your harvest, participating in seed swaps, or advocating for biodiversity-pleasant policies help maintain the vital genetic library stored within seeds. After all, preserving these tiny powerhouses protects the entire web of life for generations to come.
Future Outlook
As we close the chapter on these remarkable “Seeds of Life,” it’s clear that within their tiny frames lies an extraordinary blueprint for growth, resilience, and renewal. Far more than mere specks scattered by the wind, seeds are nature’s profound promise-a testament to life’s enduring cycle and the awe-inspiring power encoded in the smallest forms. By unlocking their mysteries, we not only deepen our understanding of the natural world but also uncover new pathways to sustain our planet and nourish generations to come. In every seed lies a story waiting to sprout, a spark of life poised to transform the earth, reminding us that sometimes, the smallest things hold the greatest power.

Barely bread, crafted from ancient barley varieties, offers an amazing way to nourish your body with sustained energy and time-tested nutrition. This wholesome loaf beckons from centuries past-its nutty aroma and chewy texture awakening the senses while delivering a powerful punch of fiber, vitamins, and minerals that modern grains simply can’t match. Drawing inspiration from customary baking methods, this recipe will guide you to master the art of creating a stunning barley bread that transforms everyday meals into healthful feasts.

 This homemade barley bread is a rustic, nutritious choice for wholesome meals and cozy kitchen moments.
Prep and Cook Time
- Planning: 20 minutes
- Proofing: 1 hour 30 minutes
- Baking: 35 minutes
- Total: 2 hours 25 minutes
Yield
One medium loaf, serving 8 slices
Difficulty Level
Medium – Perfect for bakers ready to experiment with ancient grains and unleash rich, layered flavors.
Ingredients
- 1 ¾ cups ancient barley flour (milled from hulless barley)
- 1 ¼ cups bread flour, sifted
- 1 ¼ cups warm water (about 110°F)
- 2 tsp active dry yeast
- 2 tbsp honey or maple syrup
- 1 tbsp olive oil, plus extra for greasing
- 1 tsp sea salt
- 2 tbsp toasted barley flakes (optional, for topping)
Instructions
- activate the yeast: In a small bowl, stir the warm water with honey and yeast. Allow it to sit for about 10 minutes until it becomes frothy, indicating the yeast is alive and ready.
- Combine dry ingredients: In a large mixing bowl,whisk together the barley flour,bread flour,and sea salt. This creates the perfect foundation for your barley bread’s unique texture.
- Mix dough: Gradually pour the frothy yeast mixture and olive oil into the dry ingredients. stir with a wooden spoon or dough hook attachment until a rough dough forms.
- knead: Transfer the dough to a floured surface. Knead for 8-10 minutes until smooth and elastic. Barley’s lower gluten can make the dough softer, so use gentle but consistent pressure.
- First rise: Lightly oil a large bowl and place the dough inside,turning it once to coat with oil. Cover with a clean kitchen towel and let it rise in a warm spot for 1 hour or until doubled in size.
- Shape the loaf: Punch down the risen dough to release air bubbles. Shape it into a tight oval or round loaf. Place it on a parchment-lined baking sheet or greased bread pan.
- Second rise: Cover the dough loosely and let it rest for another 30 minutes. in this time, preheat your oven to 425°F (220°C).
- Prepare for baking: lightly brush the loaf with water and sprinkle toasted barley flakes on top for a rustic, nutty crust with extra crunch and visual appeal.
- Bake: Place the loaf in the oven and bake for 30-35 minutes, rotating halfway. The bread is done when the crust is golden brown and sounds hollow when tapped.
- Cool: Transfer the barley bread to a wire rack to cool fully before slicing-this ensures the crumb sets beautifully, locking in flavor and texture.
Tips for Success
- Using a mix of barley flour with bread flour balances density and elasticity; pure barley flour can led to crumbly bread due to low gluten.
- For a deeper flavor, replace honey with molasses or dark maple syrup.
- Make ahead: this barley bread freezes well. Slice before freezing for convenient, speedy use.
- Dust your work surface with barley flour during kneading to keep the dough manageable and avoid sticking.
- Experiment by adding herbs like rosemary or thyme into the dough for herbal undertones.
Serving Suggestions
This barely bread pairs beautifully with creamy cheeses or a vibrant spread of avocado and roasted tomatoes. For a heartier meal, try it toasted alongside a bowl of hearty vegetable soup or a chickpea stew. Garnish with a drizzle of extra virgin olive oil and a sprinkle of flaky sea salt to elevate its natural nuttiness. For breakfast, slather with almond butter and sliced bananas for a sustained energy boost that stays with you through the morning.

| Nutrient | Per Slice (Approx.) |
|---|---|
| Calories | 110 kcal |
| Protein | 4 g |
| Carbohydrates | 22 g |
| Fat | 1.2 g |
| Dietary Fiber | 3.5 g |
Discover more ways to explore ancient grains and their remarkable benefits with our Ancient Grain Salads guide and dive deeper into the health science of barley through this complete nutritional overview.
Q&A
Q&A: Barely bread – Unlocking the Hidden Power of Ancient Grains
Q1: what is Barely Bread, and how does it differ from regular bread?
A1: Barely Bread is a creative twist on the humble loaf, crafted primarily from barley-a resilient ancient grain that has nourished civilizations for millennia. Unlike typical wheat bread, Barely Bread leverages barley’s unique nutrient profile, offering a nuttier flavor, denser texture, and a host of health benefits often lost in modern refined grains. It’s more than just bread; it’s a connection to heritage and health.
Q2: Why focus on barley as an ancient grain?
A2: Barley is one of the earliest cultivated grains, with roots tracing back over 10,000 years. Rich in fiber,antioxidants,vitamins,and minerals,barley offers a nutritional powerhouse frequently enough overlooked in today’s grain-dominated world. Its slow-release carbohydrates help maintain steady energy levels, making it a smart choice for those seeking sustained vitality. Embracing barley is like rediscovering an age-old superfood hiding in plain sight.
Q3: How does Barely Bread contribute to modern health trends?
A3: Barely Bread aligns beautifully with contemporary demands for whole, minimally processed foods. It’s high in beta-glucan-a type of soluble fiber known to support heart health and regulate blood sugar. This bread supports digestive well-being, keeps you full longer, and helps reduce cholesterol levels. For those navigating gluten sensitivities,barley can sometimes be a gentler choice to wheat (though it still contains gluten). In essence, Barely Bread seamlessly blends tradition with today’s wellness ideals.
Q4: What does Barely Bread taste like, and how can it be enjoyed?
A4: Expect a warm, slightly sweet, and earthy flavor profile with a satisfying chew. Its hearty density makes it perfect for rustic sandwiches, toasted with a drizzle of honey, or paired with robust cheeses and savory spreads. Barely Bread invites culinary creativity-whether you’re crafting a nourishing breakfast or an adventurous dinner, it’s a canvas for both simplicity and indulgence.
Q5: Is Barely bread easy to make at home?
A5: Absolutely! While barley has a different gluten structure than wheat, basic Barely Bread recipes accommodate this by blending barley flour with wheat or using special techniques like longer fermentation times. Many artisan bakers appreciate the challenge, as it results in a loaf with character and complexity. With a bit of patience, anyone can unlock the ancient grain’s magic in their own kitchen.
Q6: Why should consumers embrace ancient grains like barley today?
A6: In a world dominated by quick fixes and processed foods, ancient grains offer a powerful reminder: the best nourishment often lies in nature’s original recipes. They carry the wisdom of countless generations and ecosystems, encouraging biodiversity, sustainable farming, and balanced nutrition. Choosing Barely Bread is a small but meaningful step toward honoring tradition while investing in your personal health and the planet’s future.
Ready to rediscover bread as it once was-wholesome, nourishing, and deeply rooted in history? Barely Bread opens a door to that world, one flavorful slice at a time.
In Conclusion
As we peel back the layers of history and nutrition, Barely Bread emerges not just as a humble staple but as a gateway to the ancient wisdom locked within grains.These time-honored kernels carry more than just flavor-they hold the promise of resilience, nourishment, and a connection to the past that modern diets often overlook. By embracing Barely Bread, we don’t merely enjoy a loaf; we invite a story of sustainability, health, and heritage to our tables. So next time you reach for a slice, remember: you’re savoring a piece of history, unlocking the hidden power of ancient grains one bite at a time.

Unlocking the secrets to perfectly smoky BBQ ribs starts with selecting the ideal cut and preparing your meat for maximum depth of flavor. The journey from raw ribs to tender, fall-off-the-bone perfection begins with understanding the nuances of each rib type and how they respond to spice, smoke, and heat.

Prep and Cook Time
- Readiness: 20 minutes (plus 4-12 hours marinating time)
- Cooking: 5-6 hours slow-smoking
Yield
- serves 4-6 hungry BBQ lovers
Difficulty Level
- Medium – requires patience and attention to smoker management
Ingredients
- 2 racks of pork baby back ribs (about 2.5 pounds total),membrane removed
- 1/4 cup yellow mustard (for an even dry rub base)
- Dry Rub:
- 2 tbsp brown sugar, packed
- 1 tbsp smoked paprika
- 1 tbsp kosher salt
- 2 tsp black pepper, freshly ground
- 1 tsp garlic powder
- 1 tsp onion powder
- 1/2 tsp cayenne pepper (optional for heat)
- Marinade:
- 1/2 cup apple cider vinegar
- 1/4 cup apple juice
- 2 tbsp Worcestershire sauce
- 2 cloves garlic, minced
- 1 tsp liquid smoke (optional for extra smokiness)
- Wood chips or chunks: preferably hickory or applewood
- BBQ sauce (optional, for finishing glaze)
Instructions
- Prepare the ribs: Start by carefully removing the thin membrane on the bone side of the ribs-this step ensures flavors penetrate deeply and the ribs become tender.
- Apply a thin layer of yellow mustard: This acts as the perfect glue to hold the dry rub in place without overpowering the meat’s natural flavor.
- Mix the dry rub ingredients in a bowl until well combined.
- Generously coat both sides of each rack with the dry rub, patting it in to ensure every nook is covered.
- Place ribs in a large resealable bag or airtight container, pour in the marinade, and refrigerate for at least 4 hours or overnight to infuse deep smoky and tangy notes.
- Preheat your smoker to maintain a steady 225°F (107°C). Select your wood chips-hickory lends a robust, nutty char, while applewood imparts a sweeter, fruitier smoke. Soak wood chips in water for 30 minutes before use to slow burn.
- Remove ribs from marinade and discard excess liquid. Place ribs bone side down on the smoker grate; insert a water pan beneath to maintain moisture.
- Smoke ribs for 3 hours, spraying them gently every hour with a 50/50 mix of apple juice and apple cider vinegar to keep them moist and build tenderness.
- Wrap the ribs tightly in foil with a splash of marinade or apple juice, then return to the smoker for another 1.5 to 2 hours. This step-the “Texas Crutch”-locks in moisture, helping break down connective tissue for that ultimate fall-off-the-bone texture.
- Unwrap and place ribs directly on the smoker grate for an additional 30-45 minutes, allowing the crust (bark) to firm up. If you prefer, brush with your favorite BBQ sauce during this phase for a glossy, caramelized finish.
- Remove ribs, rest for 10 minutes, then slice between the bones and serve.
Tips for Success
- Choosing the right cut: Baby back ribs cook faster and are leaner, while St. Louis-style spare ribs are meatier and more indulgent-choose based on your taste and time.
- Dry rub adjustments: Feel free to add ground coffee or cocoa powder for deeper flavor complexity.
- Wood selection tips: Fruitwoods (apple, cherry) offer a mellow smoke, perfect for beginners, while hickory and mesquite furnish a more intense bite.
- Temperature control: Keeping your smoker steady below 230°F prevents drying while allowing collagen breakdown.
- Make-ahead: Fully prepare ribs 24 hours in advance, refrigerate, then smoke on the day of serving for minimal fuss.
Serving Suggestions
Present these sumptuous ribs alongside classic BBQ sides like tangy coleslaw, buttery cornbread, and pickled jalapeños. Garnish with fresh chopped parsley or thin lemon wedges to cut through the richness. For a modern twist, offer a smoky peach BBQ sauce dip or a chipotle-lime crema alongside.
| Nutritional Information (per serving) | Calories | Protein | Carbs | Fat |
|---|---|---|---|---|
| Smoky BBQ Ribs | 450 kcal | 35 g | 6 g | 30 g |
Explore more smoking techniques in our Ultimate Meat Smoking Guide and deepen your expertise. For a scientific backbone on slow-cooking and meat chemistry, visit the Serious Eats deep dive on low and slow BBQ.

Q&A
Q&A: unlocking the Secrets to Perfectly Smoky BBQ Ribs Every Time
Q1: What makes ribs truly “smoky” and how can I achieve that flavor at home?
A1: The heart of that irresistible smoky flavor lies in the slow dance between wood smoke and succulent meat. To capture it at home, choose hardwoods like hickory, apple, or cherry, each delivering unique flavor notes. Soak your wood chips briefly, then add them to a low, steady heat source. Maintain a temperature around 225°F (107°C) and let the smoke infuse gently over several hours. Patience is your secret ingredient.
Q2: Should I use spare ribs or baby back ribs for the best BBQ experience?
A2: Both have their charms. Baby back ribs are leaner, cook a bit faster, and offer a tender bite prized by many. Spare ribs pack more fat and connective tissue, translating to a richer, juicier chew if cooked properly. Ultimately, your choice depends on whether you prefer a lighter or heartier rib experience. Either way, the smoking method remains your trusty guide.
Q3: What’s the ideal seasoning strategy for smoky ribs?
A3: Think of your rub as the ribs’ flavorful coat of armor. Start with a balance of salt, sugar, and spices like paprika, black pepper, garlic powder, and a hint of cayenne for warmth. The sugar helps caramelize, creating that crusty bark, while salt enhances flavor and juiciness. Apply generously and let the ribs rest, wrapped or uncovered, for at least an hour to let the magic begin.
Q4: How long should I smoke ribs, and how do I know when they’re done?
A4: Smoking ribs is a journey, not a race.Typically,4 to 6 hours at a low and steady temperature will do. But don’t just watch the clock-touch and appearance speak volumes. The meat should pull back from the bones about a quarter-inch, and a gentle bend test (ribs drooping slightly without snapping) signals tender perfection. Internal temperature around 195°F (90°C) ensures collagen melts into luscious juiciness.
Q5: Can I foil-wrap my ribs during smoking, and why would I want to?
A5: Absolutely! Known as the “Texas Crutch,” wrapping ribs mid-smoke helps lock in moisture, speeds up cooking, and softens the meat further. Before wrapping, you can add a splash of apple juice, beer, or your favorite sauce to steam the ribs inside the foil pouch. It’s like an aromatherapy spa session for your ribs-resulting in tender, juicy bites with a smoky glow.
Q6: How important is the resting phase after smoking?
A6: Resting is where the smoke settles and juices redistribute, transforming good ribs into great ones. Let your ribs rest wrapped loosely in foil or butcher paper for about 15-30 minutes after the smoke session. This respite ensures every bite bursts with smoky tenderness rather than dry toughness.
Q7: Any tips for the perfect finishing touch on smoky BBQ ribs?
A7: The finale is yours to orchestrate. A light brush of your favorite BBQ sauce in the last 30 minutes of smoking adds a sticky, glossy layer without overpowering the smoke. Alternatively, enjoy your ribs naked to savor that pure smoky essence. Pair with a crunchy slaw, tangy pickles, and a cold drink-because the perfect ribs deserve a perfect encore.
Unlock these secrets, and every rib on your grill will tell a smoky story worth savoring!
Insights and Conclusions
As the smoke curls around your ribs and the rich aroma fills the air, you’ll know that mastering the art of perfectly smoky BBQ ribs isn’t just a lucky accident – it’s a deliciously deliberate craft. With the right blend of patience, technique, and a touch of culinary intuition, you can unlock the secrets that turn simple ribs into a mouthwatering masterpiece every single time. So fire up your smoker, embrace the process, and get ready to savor smoky ribs that tell a story of flavor, tradition, and a little bit of magic. Your taste buds-and your guests-will thank you.

Unlocking the fresh flavor of Costco’s Quinoa Salad delight is not just about savoring a meal-it’s about embracing a nourishing experience that combines convenience with culinary creativity. Join us as we dive into what makes this salad a standout favorite, exploring its ingredients, taste profile, and the perfect ways to enjoy it straight from the warehouse to your table.
Unlocking the Fresh Flavor of Costco’s Quinoa Salad Delight
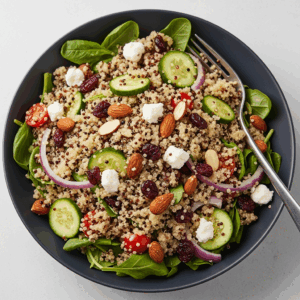
Unlocking the fresh flavor of Costco’s quinoa salad delight reveals more than just a wholesome side dish-it’s an exploration into the harmony of unique ingredients that transform this salad into a vibrant, nutritious, and crave-worthy experience. This salad’s brilliance lies in the bright pops of cranberries, toasted almonds, and tangy feta, paired masterfully with fluffy quinoa and crisp vegetables, creating a balance of textures and tastes that dance delightfully on the palate.
prep and Cook Time
- Preparation: 15 minutes
- Cooking: 15 minutes
- Total Time: 30 minutes
yield
Serves 6 as a hearty side or light main dish
Difficulty Level
Easy
Ingredients
- 1 ½ cups quinoa, rinsed thoroughly
- 3 cups water or low-sodium vegetable broth
- 1 cup dried tart cranberries
- 1 cup slivered almonds, toasted
- 1 cup crumbled feta cheese
- 1 large English cucumber, peeled and diced
- 1 cup cherry tomatoes, halved
- ½ cup finely chopped red onion
- ¼ cup fresh parsley, chopped
- ¼ cup fresh mint leaves, chiffonade
- Juice of 2 lemons
- ¼ cup extra-virgin olive oil
- 1 teaspoon honey
- Salt and freshly ground black pepper, to taste
Instructions
- Cook the Quinoa: In a medium saucepan, bring 3 cups of water or broth to a boil.Add rinsed quinoa, reduce heat to low, cover, and simmer for 15 minutes, or until the liquid is absorbed and quinoa is fluffy. Fluff with a fork and allow it to cool completely. Tip: Spread quinoa on a sheet pan to cool quicker and prevent clumping.
- Toast the Almonds: While quinoa cools,heat a dry skillet over medium heat. Add slivered almonds and toast until golden and fragrant, about 4 minutes. Stir frequently to avoid burning. Remove from heat and cool.
- prepare the Vegetables: Dice the cucumber, halve the cherry tomatoes, and finely chop the red onion, parsley, and mint. The fresh herbs impart aromatic brightness that elevates the quinoa salad.
- Make the Dressing: In a small bowl, whisk together lemon juice, olive oil, honey, salt, and pepper until emulsified. Adjust seasoning to taste. The honey balances acidity, creating a luscious and vibrant dressing.
- Combine All Ingredients: in a large mixing bowl, gently toss cooled quinoa, cranberries, toasted almonds, feta, cucumber, tomatoes, onion, parsley, and mint. Pour the dressing over the salad and toss again to coat everything evenly.
- Chill and Rest: Cover and refrigerate for at least 30 minutes to allow flavors to meld. Before serving, give it a gentle stir and adjust seasoning if needed.
Tips for Success
- Quinoa Texture: For a fluffier texture, rinse quinoa well under cold water before cooking to remove natural bitterness. Allow it to cool completely before mixing to keep the salad fresh and light.
- Ingredient Variations: Swap dried cranberries with pomegranate seeds for a juicy burst or use walnuts rather of almonds for a richer crunch.
- Make Ahead: Prepare the quinoa and dressing a day in advance, then toss with fresh ingredients just before serving to preserve crispness and freshness.
- Dressing Tips: Whisk the dressing vigorously to create a creamy texture that clings beautifully to quinoa and vegetables.
- Storage: Store leftovers in an airtight container in the refrigerator for up to 3 days. Keep garnishes like feta or almonds separate if possible to avoid sogginess.
Serving Suggestions
Present this vibrant quinoa salad in a large, shallow bowl to showcase its colorful ingredients. Garnish with a few fresh mint leaves and a sprinkling of extra toasted almonds for added texture. This salad pairs exquisitely with grilled chicken, fresh seafood, or as a standalone light lunch. For an irresistible twist, serve on a bed of mixed baby greens or in whole-wheat pita pockets for handheld delight.

| Nutrient | Per Serving (1/6th) |
|---|---|
| Calories | 280 |
| Protein | 8g |
| Carbohydrates | 32g |
| Fat | 12g |
Mastering the Art of Pairing Flavors for an Elevated Salad Experience
Unlocking the fresh flavor of Costco’s quinoa salad delight is an art form in balancing sweetness, crunch, freshness, and creaminess.The tart cranberries introduce a fruity tang that contrasts beautifully with the creamy feta, while the almonds provide a nutty crunch that keeps every bite captivating. Fresh herbs like mint and parsley brighten the palate, tying all elements together.Embracing these flavor pairings in your homemade salad ensures an elevated and memorable dining experience.
Tips for storing and Serving to Preserve Freshness and Texture
Proper storage is essential when unlocking the fresh flavor of Costco’s quinoa salad delight at home. keep the salad chilled in an airtight container and add crunchy elements like nuts or cheese just before serving to maintain texture. Avoid overmixed dressings; rather, toss lightly to preserve the integrity of each ingredient. When serving, allow the salad to reach room temperature for about 10 minutes-this enhances the flavors without sacrificing freshness.
Creative Ways to Customize Your Quinoa Salad Delight at Home
Unlocking the fresh flavor of Costco’s quinoa salad delight is just the foundation. Customize your bowl by mixing in roasted sweet potatoes, diced avocado, or even a handful of baby kale. For a protein boost,grilled shrimp or chickpeas make excellent additions. Experiment with dressings too – swapping lemon for orange juice or adding a touch of harissa can introduce exciting new flavor profiles. This salad’s versatility invites endless creativity, making it perfect for any season or occasion.
For more inspiration on grain-based salads, explore our feature on Ultimate Grain Salad Guide. For quinoa nutritional insights,visit ChooseMyPlate.gov.
Q&A
Q&A: Unlocking the Fresh Flavor of Costco’s Quinoa Salad Delight
Q1: What makes Costco’s Quinoa Salad Delight stand out from other quinoa salads?
A1: Costco’s Quinoa Salad Delight is a vibrant medley that masterfully balances earthy quinoa with crisp veggies, tangy dressings, and subtle herbs. What sets it apart is the perfect harmony between fresh ingredients and wholesome nutrition – delivering a salad that’s as flavorful as it is satisfying. Plus, the generous portions make it ideal for sharing or savoring over multiple meals.
Q2: Which ingredients are key to the fresh flavor profile of this quinoa salad?
A2: The star ingredient,of course,is the fluffy,nutty quinoa,which acts as a protein-packed canvas. Complementing it are crunchy cucumbers,juicy cherry tomatoes,vibrant bell peppers,and a bright,zesty lemon vinaigrette. Fresh herbs like parsley or cilantro add an aromatic touch, while a hint of garlic or a dash of olive oil elevates every bite.
Q3: Is Costco’s Quinoa Salad Delight suitable for special diets?
A3: Absolutely! This salad is naturally gluten-free and vegan, making it a fantastic option for those with dietary restrictions or preferences.It’s a nutrient-dense meal that’s both plant-based and hearty, perfect for anyone looking to fuel their body with clean, wholesome ingredients.
Q4: How can one best enjoy or serve this quinoa salad?
A4: This salad shines best when served chilled or at room temperature, making it incredibly versatile. Enjoy it as a refreshing lunch on its own,pair it with grilled chicken or fish for a heartier meal,or use it as a vibrant side dish at your next gathering. for a creative twist, stuff it into whole-grain pita pockets or serve it atop a bed of greens.
Q5: What storage tips help maintain the salad’s fresh flavor?
A5: To keep that fresh,crisp taste intact,store the salad in an airtight container in the refrigerator. if the salad includes a dressing, consider keeping it separate until eating to avoid sogginess. It stays fresh and flavorful for up to 3 days, making it a perfect grab-and-go option for busy lifestyles.
Q6: Why is quinoa such a popular choice among health-conscious shoppers?
A6: Quinoa is a nutritional powerhouse-it’s a complete protein containing all nine essential amino acids, rich in fiber, vitamins, and minerals. Its unique texture and mild flavor make it incredibly adaptable in dishes like this salad. Costco’s Quinoa Salad Delight harnesses these benefits, offering convenience without compromising on health or taste.Q7: Where in costco can shoppers typically find the Quinoa Salad Delight?
A7: You’ll usually find it ready-to-eat in Costco’s refrigerated deli section alongside other fresh salads and prepared foods. It’s a quick grab for those on-the-go or anyone seeking a nutritious homemade-style meal without the prep work.
Unlocking the fresh flavor of Costco’s Quinoa Salad delight means discovering a delicious balance of health,convenience,and vibrant taste - perfect for pop-open freshness anytime you crave wholesome goodness!
The Conclusion
As you close the chapter on Costco’s Quinoa Salad Delight,one thing is clear: this vibrant,nutrient-packed dish is more than just a convenient option-it’s a fresh flavor experience waiting to be uncovered. Whether you’re seeking a wholesome lunch, a colorful side, or a guilt-free snack, this salad effortlessly brings together taste and health in every forkful. So next time you stroll through those warehouse aisles, don’t just pass by-unlock the delicious potential of quinoa and savor the delightful freshness that Costco has perfected. Your taste buds (and your body) will thank you.
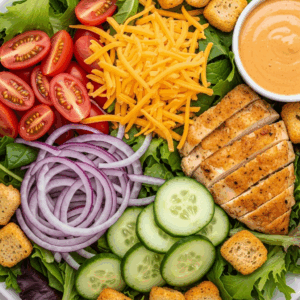
Unlocking the fresh flavors of Zaxby’s signature salads reveals a vibrant blend of premium ingredients and crisp textures. With hand-picked greens and zesty dressings, these salads offer an irresistible, fresh taste you can easily recreate at home.

Prep and Cook Time
- Preparation: 15 minutes
- Assembly: 10 minutes
- Total Time: 25 minutes
Yield
Serves 4 generous portions
Difficulty Level
Easy – Perfect for a speedy, fresh meal
Ingredients
- 6 cups mixed greens (iceberg lettuce, romaine, baby spinach, arugula),washed and spun dry
- 1 cup grape tomatoes, halved
- 1/2 cup shredded sharp cheddar cheese
- 1/4 cup thinly sliced red onion
- 1/2 cup sliced cucumbers, peeled if desired
- 1/2 cup croutons (homemade or store-bought, seasoned with garlic and herbs)
- 2 skinless, boneless chicken breasts (optional, grilled or fried for protein)
- For the Zaxby’s signature dressing:
- 1/3 cup mayonnaise
- 2 tablespoons apple cider vinegar
- 1 tablespoon honey
- 1 teaspoon Dijon mustard
- 1/2 teaspoon smoked paprika
- Salt and freshly ground black pepper, to taste
Instructions
- Prepare the chicken, if using: Grill or pan-fry chicken breasts seasoned with salt, pepper, and a hint of smoked paprika. Slice thinly once cooked and rested.
- Make the dressing: In a medium bowl, whisk together mayonnaise, apple cider vinegar, honey, Dijon mustard, and smoked paprika. Season with salt and pepper to achieve a tangy-sweet balance. Adjust vinegar or honey slightly to taste.
- Assemble the greens: In a large salad bowl, combine the mixed greens, halved grape tomatoes, sliced cucumber, and red onion. Toss gently to mix the colors and textures.
- Add cheese and croutons: Sprinkle shredded sharp cheddar and crunchy croutons over the salad for bursts of flavor and crunch.
- Top with protein: Arrange sliced chicken breast over the salad for a satisfying, hearty touch.
- Dress and serve: Drizzle your freshly whisked signature dressing evenly over the salad and toss lightly to coat, preserving the fresh crunch.
- Final touches: Garnish with extra cracked black pepper or a few fresh herbs like chopped parsley or chives for a pop of color and aroma.
Tips for Success: Mastering the Art of Freshness
- Use crisp, cold greens to maintain texture; try rinsing your greens in ice water and drying thoroughly with a salad spinner.
- Prep dressings fresh and add just before serving to keep leaves from wilting.
- Customize texture with additions like toasted nuts (pecans or almonds) for extra crunch or creamy avocado slices to balance tang.
- Substitute proteins easily-try blackened shrimp, smoked turkey, or chickpeas for a vegetarian twist.
- Make-ahead option: Keep ingredients separately chilled and combine quickly before serving to maintain peak freshness.
Serving Suggestions to Elevate Your Salad Experience
Present your Zaxby’s inspired creation in a wide, shallow wooden bowl or a crisp white ceramic plate to highlight the vibrant colors and textures. A side of warm, crusty garlic bread or sweet potato fries complements the tangy dressing perfectly, bridging cooling freshness with hearty satisfaction.
For an elegant finish, drizzle a little extra virgin olive oil over the top and sprinkle finely grated Parmesan or crumbled feta for a salty punch. Pair your salad with a crisp iced tea or a bright citrus-infused sparkling water to cleanse the palette between bites.
| Nutrient | Per Serving |
|---|---|
| Calories | 350 kcal |
| Protein | 28 g |
| Carbohydrates | 15 g |
| Fat | 18 g |

Expand your fresh salad repertoire by exploring our top homemade dressing recipes that complement these fresh flavors beautifully. For scientific insights into the health benefits of fresh ingredients, visit Healthline’s guide on leafy greens.
Q&A
Q&A: Unlocking the Fresh Flavors of Zaxby’s Signature Salads
Q1: What makes Zaxby’s salads stand out from other fast-casual options?
A1: Zaxby’s salads are a vibrant celebration of freshness and bold flavors. unlike typical fast-food salads, each one balances crisp greens, hand-breaded chicken, and their signature dressings to create a mouthwatering harmony. The emphasis on quality ingredients and creative flavor combinations transforms a simple salad into a flavorful feast.
Q2: What are the key components that give Zaxby’s salads their unique taste?
A2: It all starts with the greens-fresh, crunchy lettuce blends that provide a crisp foundation. then comes the protein: tender, juicy chicken prepared in a variety of ways, from crispy fingers to grilled strips. Toppings like shredded cheddar, ripe tomatoes, bacon bits, and crunchy fried onions add layers of texture and flavor. Of course, Zaxby’s signature dressings-Tangy Zesty, Ranch, or Blue Cheese-tie everything together with irresistible zest.
Q3: How does zaxby’s ensure the freshness of their salads?
A3: Zaxby’s takes freshness seriously, sourcing quality produce and preparing each salad to order. salads come assembled with care, ensuring that the greens stay crisp and the toppings retain their vibrant colors and textures. Salads aren’t pre-made hours in advance; they’re crafted fresh with every order, offering customers a garden-fresh experience every time.
Q4: Can you customize your Zaxby’s salad to fit specific tastes or dietary preferences?
A4: Absolutely! Zaxby’s offers customers full freedom to tailor their salads. Whether you want to swap crispy chicken for grilled, go light on cheese, or skip the bacon, the team is happy to accommodate. Plus, their variety of dressings and add-ons means you can amp up flavor or keep things light and simple, making each salad truly your own.
Q5: what is the best way to enjoy a Zaxby’s salad to unlock its full flavor potential?
A5: For the ultimate taste adventure, start by mixing the salad gently to evenly distribute the toppings and dressing. Take a bite that combines several elements-crisp lettuce, juicy chicken, a touch of cheese, and a drizzle of Tangy Zesty or Blue Cheese dressing. Pair it with a refreshing iced tea or lemonade to complement the meal’s fresh flavors. The contrast between crisp, creamy, and savory elements is where the magic happens.
Q6: Are Zaxby’s salads suitable for those watching their calorie intake?
A6: Yes, many of Zaxby’s salads are great choices for those mindful of calories. Selecting grilled chicken over fried reduces fat content, and opting for lighter dressings or using them sparingly helps keep calories in check. The natural volume and fiber from fresh vegetables also help you feel full and satisfied without overdoing calories.
Q7: Which Zaxby’s salad is a must-try for first-timers?
A7: The “Zaxby’s Big cobb” is a top pick-it encapsulates everything great about their salads. Featuring hand-breaded chicken, hard-boiled eggs, bacon, cheddar cheese, and fresh greens, all topped with your choice of signature dressing, it’s a flavor-packed introduction that delights both the eyes and the palate.
Q8: How does Zaxby’s innovate with salad flavors and ingredients?
A8: Zaxby’s is always experimenting to excite taste buds-from introducing new dressings inspired by Southern classics to offering seasonal toppings that add fresh twists. They listen to customer favorites while pushing boundaries by blending comfort with creativity, ensuring their salads stay fresh, fun, and flavorful.
Unlocking the fresh flavors of Zaxby’s signature salads means embracing a combination of quality, customization, and a dash of culinary flair. Each bite invites you to enjoy a uniquely satisfying salad experience that’s anything but ordinary.
Wrapping Up
As you’ve discovered, Zaxby’s signature salads are more than just a meal-they’re a vibrant celebration of fresh, handpicked ingredients paired with bold, flavorful dressings that awaken your palate with every bite. Whether you’re craving the crisp crunch of garden-fresh veggies or the savory satisfaction of perfectly seasoned toppings, these salads unlock a world of taste that redefines what a quick, convenient meal can be. So next time hunger calls, remember: a deliciously fresh experience is waiting to be savored at Zaxby’s, ready to brighten your day one forkful at a time.
Barely bread revives ancient grain traditions with barley, spelt, and einkorn, offering rich, hearty flavors. Barely bread reconnects us with nourishing simplicity and a healthier, timeless staple.
Barely bread offers a unique taste of ancient grains, blending heritage with modern wellness. This barely bread captures barley’s nutty essence with a moist crumb and hearty crust, perfect for any meal. Honor barley’s rich history and nutrition by baking a loaf that’s both wholesome and irresistible, this barely bread recipe embraces simplicity and depth in every bite.

Prep and Cook time
Readiness: 20 minutes Rising: 1 hour 30 minutes Baking: 35 minutes
Yield
One generous 9×5 inch loaf (10-12 slices)
Difficulty Level
Medium – ideal for those comfortable with yeast baking and eager to experiment with ancient grains.
Ingredients
- 2 cups barley flour, finely milled (not pearled)
- 1 cup bread flour, sifted
- 1 ½ teaspoons active dry yeast
- 1 ¼ cups warm water (about 105°F / 40°C)
- 1 tablespoon honey or maple syrup
- 1 teaspoon fine sea salt
- 2 tablespoons olive oil, plus extra for greasing
- optional: 1 tablespoon toasted sunflower seeds or chopped walnuts for topping
Instructions
- Activate the yeast: In a small bowl, combine the warm water, honey, and yeast. Stir gently and let rest for 5-8 minutes until foamy. This confirms the yeast is alive and ready.
- Mix the dry ingredients: In a large mixing bowl, whisk together barley flour, bread flour, and sea salt, ensuring even distribution for consistent rising.
- Combine wet and dry: Create a well in the flour mixture. Pour in the activated yeast mixture and 2 tablespoons olive oil. Stir with a wooden spoon until the dough begins to form a shaggy ball.
- Knead the dough: Transfer dough to a lightly floured surface and knead for about 8-10 minutes until smooth and elastic. Barley flour has less gluten, so the dough will be softer than typical wheat dough but should hold together well.
- First rise: Lightly oil a large bowl and place the dough inside. Cover with a damp cloth or plastic wrap. Let the dough rise in a warm, draft-free area for 1 hour or until doubled in size.
- Shape the loaf: Gently punch down the dough to release excess air. Shape into a tight loaf and place into a well-greased 9×5 inch bread pan. Optionally, sprinkle the top with toasted sunflower seeds or walnuts, pressing lightly.
- Second rise: Cover and let the loaf rise for another 30 minutes until it puffs up to just above the pan’s edge.
- Bake: Preheat your oven to 375°F (190°C). Bake the loaf for 30-35 minutes until golden brown and it sounds hollow when tapped on the bottom.
- Cool: remove from the oven and transfer the loaf onto a wire rack. Allow it to cool completely before slicing-this step is crucial for perfect texture and slicing ease.
Chef’s Notes & Tips for Success
- Flour substitution: Bread flour balances barley’s low gluten. For a softer crumb, substitute up to 50% bread flour with whole wheat flour.
- Hydration: Barley flour absorbs water differently-adjust water slightly if dough feels too sticky or dry.
- Flavor variations: Add 1 teaspoon ground cinnamon or a pinch of rosemary for a subtle aromatic twist.
- Make-ahead: prepare dough the night before, refrigerate after the first rise, then bake fresh in the morning for a delightful breakfast treat.
- Storage: Keep the loaf in a bread box or wrapped loosely in a linen towel to maintain crustiness for up to 3 days.
Serving Suggestions
The barely bread loaf shines best when complemented with fresh, wholesome toppings. Toast thick slices and spread with creamy avocado mash, smoked salmon, and a squeeze of lemon for a nutrient-packed brunch. It also pairs wonderfully with hearty soups or stews, where its dense, nutty crumb soaks up broths beautifully. For a simple snack, slather a slice with rich almond butter and a drizzle of honey, then sprinkle with chia seeds for a crunchy finish. Garnish plates with fresh herbs like thyme or dill to elevate visual appeal and freshness.
| Nutrient | Per slice (1 of 12) |
|---|---|
| Calories | 130 kcal |
| Protein | 4 g |
| Carbohydrates | 24 g |
| Fat | 2.5 g |

to dive deeper into ancient grains and their culinary magic, explore our related guide on incorporating ancient grains. For extensive scientific insight on barley’s health benefits, visit Healthline’s detailed article.
Q&A
Q&A: barely Bread – Unlocking the Power of Ancient Grain Loaves
Q: What exactly is Barely Bread?
A: Barely bread is a humble yet mighty loaf crafted primarily from barley, one of the world’s oldest cultivated grains. Unlike modern wheat breads, Barely Bread celebrates the rustic, nutty flavors and dense textures of ancient grains – reconnecting us to centuries of grain-growing wisdom and wholesome nourishment.
Q: Why choose barley over more common grains like wheat or rye?
A: Barley boasts a unique nutritional profile rich in dietary fiber, vitamins, and minerals. Its beta-glucan content helps regulate blood sugar and lower cholesterol, making Barely Bread a heart-pleasant and digestive ally. plus, barley’s ancient roots bring depth and character to every slice – a true taste of history.
Q: How does the baking process differ from regular bread?
A: Baking with barley requires a gentle, patient approach. The grains absorb more water and produce less gluten, so the dough is stickier and denser than wheat doughs. Bakers often blend barley with a bit of wheat or millet to achieve the perfect crumb. The key is embracing the rustic, hearty nature of the loaf rather of forcing it into a fluffy mold.
Q: Can Barely Bread fit into modern diets, like gluten-sensitive or low-carb lifestyles?
A: While barley does contain gluten, some people with mild sensitivities find it easier to digest than highly processed wheat. However, it’s not suitable for those with celiac disease. As for low-carb diets, barley is higher in carbs but balanced by a slower glycemic index, offering sustained energy without sharp blood sugar spikes.
Q: What are some creative ways to enjoy Barely Bread?
A: Barely Bread shines in both sweet and savory roles. Try it toasted with honey and goat cheese for a simple delight or paired with smoky roasted vegetables and hummus for a hearty lunch. Its dense texture also makes an excellent base for stuffing or as cubes in a rustic bread salad.
Q: How does Barely Bread connect us to ancient food traditions?
A: Each loaf is like a portable time capsule, linking us back to agrarian societies that thrived on barley’s versatility. By baking and savoring Barely Bread, we honor centuries of farming, harvesting, and communal sharing – reminding us that sometimes, the oldest foods hold the freshest stories.
Q: Where can one find Barely Bread?
A: Artisan bakers and health food stores are increasingly embracing ancient grains, so look for Barely Bread in farmers’ markets or specialty bakeries. For the adventurous, baking at home using barley flour and conventional recipes can be a rewarding journey into culinary history.
Unlock the power of barley – and let each loaf of Barely Bread be your gateway to ancient nourishment and modern wellness!
To Conclude
As we peel back the crusty layers of Barely Bread, it becomes clear that these ancient grain loaves are far more than just a nod to culinary history-they are a bridge connecting us to the earth’s earliest harvests and time-honored traditions. Unlocking their power means embracing a simplicity that channels rich flavors, nutritional depth, and sustainable practices long forgotten by modern baking. Whether you’re a passionate foodie, a health-conscious eater, or a curious explorer of ancestral foods, Barely Bread invites you to savor the past with every bite and rediscover the timeless magic kneaded into each loaf. In the humble grain lies a story of resilience, connection, and nourishment-one loaf at a time.

Unlocking flavor in beef stew seasoning is an art that transforms simple ingredients into a deeply satisfying dish. The secret is choosing a spice blend that balances warmth, sweetness, and savory notes, enhanced by herbs and umami boosters. This creates a flavor symphony that keeps you coming back for more.

Prep and Cook Time
- Planning: 25 minutes
- Cooking: 2 hours 15 minutes
- Total: 2 hours 40 minutes
Yield
- Serves 6 generous portions
Difficulty Level
- Medium – Great for cooks ready to explore seasoning layers and slow cooking
Ingredients
- 2 lbs beef chuck, cut into 1.5-inch cubes
- 1 cup all-purpose flour, sifted
- 3 tbsp olive oil, divided
- 1 large yellow onion, finely chopped
- 3 cloves garlic, minced
- 1 cup dry red wine (optional but recommended)
- 4 cups beef broth, preferably low-sodium
- 2 medium carrots, cut into chunks
- 2 medium parsnips, peeled and chopped
- 2 tbsp tomato paste
- 1 tbsp brown sugar
- 1 tsp smoked paprika
- 1 tsp ground cumin
- 1 tsp dried thyme
- 1/2 tsp ground cinnamon
- 1/4 tsp cayenne pepper (optional for subtle heat)
- 2 fresh bay leaves
- 1 tbsp fresh rosemary, chopped
- 1 cup cremini mushrooms, halved
- 2 tsp soy sauce (for umami enhancement)
- Salt and freshly ground black pepper, to taste
- Fresh parsley for garnish
Instructions
- Prepare the beef: Toss the beef cubes in the sifted flour until fully coated, shaking off excess. This creates a gorgeous crust and helps thicken the stew later.
- Brown the meat: Heat 2 tablespoons olive oil in a large heavy-bottomed pot over medium-high heat. Sauté beef cubes in batches until golden brown on all sides, about 6 minutes per batch. Transfer to a plate.
- Sauté veggies and aromatics: Add remaining 1 tablespoon olive oil to the pot. Sauté chopped onion and garlic until translucent and fragrant, about 4 minutes. Stir in the tomato paste and cook another 2 minutes to deepen its sweetness.
- Build spice layers: Sprinkle in smoked paprika, cumin, cinnamon, dried thyme, and cayenne. Stir well to toast the spices gently until their aroma fills the kitchen, around 1 minute.
- Deglaze: Pour in the red wine, scraping up browned bits from the bottom. Let it reduce by half, about 5 minutes, concentrating flavor.
- Simmer the stew: Return beef and any juices to pot. Add beef broth, brown sugar, bay leaves, soy sauce, and chopped rosemary. Bring to a gentle boil, then reduce heat and simmer, covered, for 1 hour 30 minutes, stirring occasionally.
- Add vegetables: Stir in carrots, parsnips, and mushrooms. Continue simmering uncovered for another 45 minutes until beef is fork-tender and vegetables are cooked through.
- Final seasoning: Remove bay leaves, taste the stew, and season generously with salt and pepper. Adjust sweetness or acidity with a splash of vinegar or honey if desired.
- Rest and Garnish: Let the stew rest for 10 minutes off heat. Serve garnished with chopped fresh parsley for a burst of freshness.
Tips for Success
- For the best deep and rich flavor, brown your meat in batches and don’t rush this step; it develops your stew’s foundation.
- Balance is key: the brown sugar gently rounds out the acidity, while the tomato paste provides body and umami.
- fresh herbs like rosemary and parsley add vibrancy,but dried thyme infuses an earthy depth that holds up to long cooking.
- Add mushrooms and soy sauce near the end to unlock umami without overpowering the stew.
- Make ahead: this stew tastes even better the next day after flavors meld overnight-reheat gently.
- For a gluten-free version, substitute all-purpose flour with cornstarch or almond flour for coating the beef.
Serving Suggestions
Serve your richly seasoned beef stew over a bed of creamy mashed potatoes or buttery egg noodles to soak up every drop of sauce. A crusty artisan bread on the side invites sweeping the bowl clean. For an extra pop, garnish with a sprinkle of fresh parsley or a few thin lemon zest strips, offering a subtle brightness that counterbalances the stew’s hearty depth.
| Nutrient | Per Serving |
|---|---|
| Calories | 420 kcal |
| Protein | 38 g |
| Carbohydrates | 18 g |
| Fat | 20 g |
Explore more tips on enhancing hearty meals with spices in our extensive guide to spice blends. For deeper understanding of umami, check out this Serious Eats article on umami.

Q&A
Q&A: Unlocking Flavor – The Ultimate Guide to Beef Stew Seasoning
Q1: Why is seasoning so crucial for beef stew?
A1: Think of seasoning as the soul of your beef stew-it transforms humble ingredients into a symphony of taste. Without the right balance, even the best beef and fresh veggies can fall flat. Seasoning enhances natural flavors, builds depth, and invites every spoonful to dance on your palate.
Q2: What are the cornerstone spices and herbs for a classic beef stew?
A2: The foundation usually includes aromatic bay leaves, earthy thyme, and robust rosemary. Ground black pepper and a pinch of salt are essential players too. These staples work in harmony to infuse the stew with warmth and complexity while highlighting the meat’s richness.
Q3: Can I get creative with unconventional seasonings?
A3: Absolutely! While tradition holds power, don’t shy away from surprises. Add a dash of smoked paprika for a subtle fire, a hint of cinnamon for warmth, or even a splash of soy sauce to introduce umami depth. Your stew is a blank canvas-season boldly and thoughtfully.
Q4: How can I balance seasoning so the stew isn’t too salty or bland?
A4: Patience and layering are key. Season gradually: start with a little salt and pepper, then taste as your stew simmers and flavors meld. Remember, you can always add more, but you can’t take it out. Fresh herbs added at the end can brighten flavors without overpowering.
Q5: What role do aromatics like garlic and onions play in seasoning?
A5: Aromatics act like flavor architects-they build the stew’s savory backbone. Garlic adds pungent richness, while onions lend sweetness and depth as they caramelize. Together, they create a fragrant foundation that welcomes spices to flourish.
Q6: Should I season the beef before cooking, during simmering, or both?
A6: Both! Seasoning the beef before browning encourages a flavorful crust through the Maillard reaction, locking in savory notes. As the stew simmers, seasoning layers develop and mingle, elevating the broth and tender meat into a cohesive masterpiece.
Q7: How can I infuse my beef stew with freshness without overpowering the flavors?
A7: Fresh herbs like parsley, chives, or tarragon added right before serving provide that final pop of brightness. A squeeze of lemon juice or a splash of vinegar can also cut through richness, balancing the stew with subtle acidity-think of it as a breath of fresh air in each bowl.
Q8: Are there any tips for seasoning beef stew when using store-bought broth or stock?
A8: Since store-bought broths can vary in saltiness and flavor intensity, start seasoning lightly and adjust as you go. Amplify with fresh herbs and spices to personalize the flavor. Sometimes adding a small pinch of sugar or a splash of wine can round out the stew wonderfully.
Q9: Can seasoning techniques change depending on the cooking method?
A9: Definitely. Slow cookers benefit from ingredients that steadily release flavor over hours-think whole garlic cloves and sprigs of herbs. Stovetop stews allow for more frequent tasting and tweaking, so you can refine seasoning in real-time. Pressure cookers concentrate flavors quickly, so seasoning must be precise to avoid overpowering.
Q10: What’s the final secret to “unlocking” extraordinary beef stew flavor?
A10: Time and love. Flavor blossoms when ingredients have space and patience to merge-slow simmering is your best friend. season with intention, taste often, and let your instincts guide you. Each adjustment brings you closer to that soul-warming, unforgettable stew that feels like a hug in a bowl.
Key Takeaways
As the final simmer settles and your kitchen fills with the rich, mouthwatering aroma of a perfectly seasoned beef stew, you’ll realize that seasoning isn’t just a step in cooking-it’s the heart and soul of flavor. Unlocking the secrets to the ultimate beef stew seasoning transforms a humble pot into a culinary masterpiece, inviting warmth, depth, and character to every bite. Armed with this guide, your stew will no longer be just a meal but an experience-layered, comforting, and unforgettable. So go ahead, experiment with those herbs and spices, trust your taste buds, and let your stew tell its flavorful story, one spoonful at a time.
Unlocking Nature’s Sweetness: The Power of Dried Fruit reveals a remarkable secret-dried fruit is not just a convenient snack, but a nutritional powerhouse that elevates your culinary creations with intense natural sweetness and concentrated nutrients. Through the ancient art of drying, fruits like apricots, figs, and dates transform into vibrant gems that burst with flavor and offer essential vitamins, minerals, and antioxidants in a compact form. Whether you’re seeking a healthy boost or a gourmet twist, understanding how drying enhances fruits unlocks endless possibilities to enrich your daily diet deliciously and nutritiously.
Prep and Cook Time
Preparation: 10 minutes
Cooking/Assembly: 15 minutes
Total Time: 25 minutes
Yield
Makes approximately 8 snack servings
Difficulty Level
Easy – perfect for beginners and seasoned cooks alike
Ingredients
- 1 cup assorted dried fruit (such as apricots, cherries, figs, and golden raisins), roughly chopped
- 1/2 cup raw almonds, toasted
- 1/4 cup pumpkin seeds
- 2 tbsp chia seeds
- 1/3 cup rolled oats
- 1/4 cup natural almond butter or peanut butter
- 2 tbsp honey or maple syrup for a vegan option
- 1/2 tsp ground cinnamon
- 1/4 tsp sea salt
- 1 tsp vanilla extract
Instructions
- Toast the nuts and oats: Preheat a skillet over medium heat. Add the almonds and rolled oats, tossing frequently. Sauté until golden brown, about 5 minutes, stirring occasionally to prevent sticking. Set aside to cool.
- Prepare the dried fruit: Place the chopped dried fruit in a bowl. If pieces are too tough, soak in warm water for 5 minutes to soften, then drain thoroughly-this will release their natural juices, enhancing flavor and pliability.
- Mix the binding ingredients: In a separate bowl, whisk together the almond butter, honey (or maple syrup), vanilla extract, ground cinnamon, and sea salt until smooth and creamy.
- Combine dry and wet ingredients: Add the toasted almonds, oats, pumpkin seeds, chia seeds, and dried fruit to the almond butter mixture. Stir well with a sturdy spatula until all ingredients are evenly coated and start to stick together.
- Form the bars or balls: Line a square dish with parchment paper. Transfer the mixture into the dish and press firmly into an even layer using the back of a spoon or your hands. Alternatively, refrigerate for 20 minutes, then roll into bite-sized balls.
- Chill and set: Place in the refrigerator for at least 1 hour to allow the bars to firm up and the flavors to meld beautifully.
- Serve or store: Cut into bars or store the balls in an airtight container in the fridge for up to two weeks.
Tips for Success
- Choosing dried fruit: opt for unsweetened and unsulfured varieties to preserve natural flavor and nutrition. Organic options are preferable for reducing chemical residues.
- Flavor variations: Add a pinch of nutmeg or cardamom for aromatic depth. Swap almonds for walnuts or cashews to explore different textures and tastes.
- Handling stickiness: If the mixture feels too dry to hold together, gently warm your nut butter or add a teaspoon more honey or maple syrup.
- Make-ahead benefits: These bars or balls are ideal meal-prep snacks that only improve in flavor after a day of chilling.
Serving Suggestions
Enjoy these nutrient-dense treats as a quick breakfast on the go, a midday energy booster, or a wholesome dessert alternative. Presentation-wise, serve on a rustic wooden board garnished with fresh mint leaves and a dusting of cinnamon powder for vibrant color contrast. pair with herbal tea or a chilled glass of almond milk for a satisfyingly balanced snack experience.

Nutrition Data (Per Serving)
| Calories | Protein | Carbohydrates | Fat |
|---|---|---|---|
| 180 kcal | 5 g | 22 g | 8 g |
For more on the benefits of dried fruits and creative recipes, check out our comprehensive guide to dried fruit nutrition.To dive deeper into the science of drying and preservation, explore resources at the USDA Food Safety and Inspection Service.
Q&A
Unlocking Nature’s Sweetness: The Power of Dried Fruit
Q&A
Q1: What makes dried fruit such a powerful snack compared to fresh fruit?
A1: Dried fruit is nature’s candy-concentrated, portable, and packed with naturally occurring sugars that give a sweet energy boost. By removing water, the sweetness intensifies, and essential nutrients become more accessible in a compact form. It’s like nature’s sugar crystal, carrying all the benefits of fresh fruit but with a longer shelf life and a satisfying chew.
Q2: How does drying affect the nutritional value of fruit?
A2: Drying fruit removes moisture but preserves most vitamins, minerals, and fiber-making dried fruit a nutrient-dense treasure. Some vitamins, like vitamin C, may diminish slightly, but antioxidants often become more concentrated. Plus, the fiber content remains high, supporting digestion and sustained energy release.
Q3: Can dried fruit help satisfy sweet cravings in a healthier way?
A3: Absolutely! When the sweet tooth calls, dried fruit offers a guilt-free alternative to processed snacks. Its natural sugars come bundled with fiber and micronutrients, which help moderate blood sugar spikes. Think of it as a sweet hug from Mother Nature, delivering pleasure and nourishment without artificial additives.
Q4: Are there any considerations to keep in mind when choosing or consuming dried fruit?
A4: Yes, moderation is key. As dried fruit is calorie-dense, it’s easy to overindulge. Also, some commercial varieties add extra sugar or preservatives, so reading labels is wise. Opting for unsweetened, organic options ensures you reap pure natural benefits. Hydration is notable, too-the concentrated sugars can draw water in your digestion, so drink plenty of fluids.
Q5: how can dried fruit be incorporated creatively into daily diets?
A5: The possibilities are endless! Toss dried berries into morning oatmeal for bursts of flavor, sprinkle chopped apricots over salads for a sweet surprise, or blend figs into smoothies for natural sweetness. They also shine as toppings on yogurt, in trail mixes, or even rehydrated for baking. Dried fruit transforms everyday meals into vibrant, nutrient-rich experiences.
Q6: What environmental benefits does dried fruit offer?
A6: Since dried fruit is lightweight and shelf-stable, it reduces food waste and lowers transportation emissions compared to fresh produce. It’s a sustainable way to enjoy seasonal fruits year-round while minimizing packaging and refrigeration needs-giving both your body and the planet a sweet treat.
Q7: Why has dried fruit been cherished across cultures and ages?
A7: For millennia, drying fruit was a natural preservation method, turning the fleeting sweetness of harvest into enduring nourishment. Across ancient trade routes and family kitchens, dried fruit has symbolized vitality, celebration, and resilience-qualities that continue to resonate in today’s health-conscious world.
By unlocking dried fruit’s concentrated sweetness and robust nutrition, we tap into a timeless powerhouse of nature-both a delicious indulgence and a smart, sustainable choice. So next time hunger strikes, reach for dried fruit and savor the sweet wisdom harvested through ages.
Final Thoughts
As we’ve journeyed through the vibrant world of dried fruit, it’s clear that these natural gems offer far more than just a sweet escape. They carry the essence of sun-ripened harvests, concentrated into chewy bites that nourish the body and delight the senses. Whether sprinkled on your morning oatmeal or savored as a mindful snack, dried fruits unlock nature’s sweetness in the most accessible, nutrient-packed form. Embracing them is not just a treat; it’s a step toward harnessing the enduring power of nature’s bounty-preserved, portable, and perfectly poised to sweeten life’s moments anytime, anywhere.
