
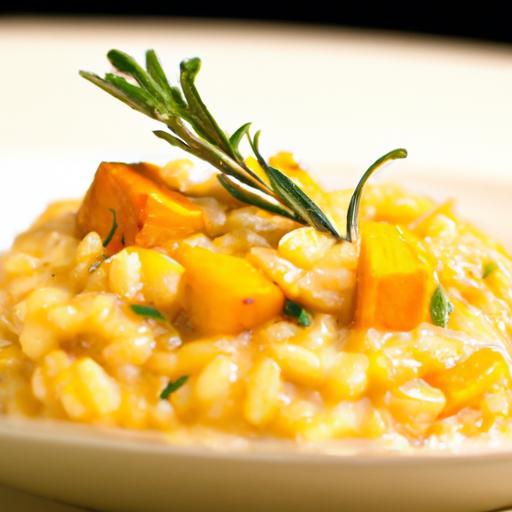
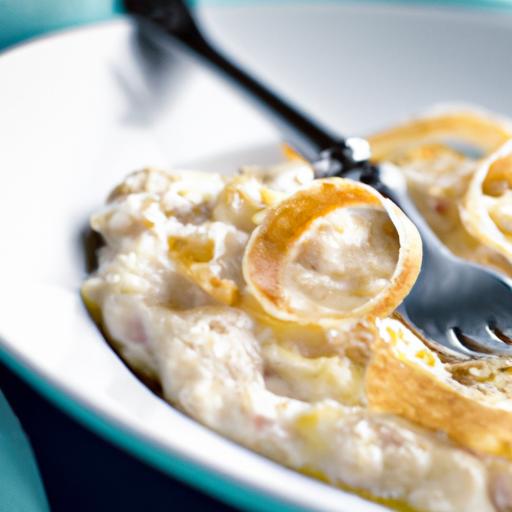
Creamy Butternut Squash Risotto: A Fall Flavor Delight
Creamy Butternut Squash Risotto gently captures the essence of autumn in every luscious spoonful. This iconic Italian dish, lovingly prepared with tender cubes of squash and velvety Arborio rice, offers a symphony of textures and flavors that transform simple ingredients into an unforgettable seasonal masterpiece. Inspired by cozy evenings in my grandmother’s kitchen, where the sweet earthiness of roasted squash blended seamlessly with the rich creaminess of risotto, this recipe invites both novice and seasoned cooks to savor a bowl of warmth and comfort.
Prep and Cook Time
- Preparation: 15 minutes
- Cooking: 40 minutes
- Total Time: 55 minutes
Yield
Serves 4 generous portions
Difficulty Level
Medium – ideal for anyone agreeable with stovetop cooking and stirring techniques
Ingredients
- 1 ½ cups Arborio rice
- 4 cups low-sodium vegetable broth, kept warm
- 2 cups peeled and diced butternut squash (about 1 medium squash)
- 1 small onion, finely chopped
- 2 cloves garlic, minced
- ½ cup dry white wine (such as Pinot Grigio)
- 3 tbsp unsalted butter
- 2 tbsp extra-virgin olive oil
- ½ cup freshly grated Parmesan cheese
- Salt and freshly ground black pepper, to taste
- 1 tbsp fresh sage, finely chopped
- 1 tbsp fresh thyme leaves
- Optional garnish: toasted pumpkin seeds
Instructions
- Prepare the butternut squash: In a medium saucepan, heat 1 tbsp olive oil over medium heat. Add the diced butternut squash, season lightly with salt, and sauté until just tender and beginning to caramelize, about 8 minutes. Remove from heat and set aside.
- Sauté aromatics: In a large heavy-bottomed pan, warm 1 tbsp olive oil and 1 tbsp butter over medium heat. Add finely chopped onion and cook until translucent, about 5 minutes. Stir in minced garlic and cook for 1 more minute until fragrant.
- Toast the rice: Add Arborio rice to the pan, stirring constantly to coat the grains with butter and oil. Toast until grains become translucent at the edges, about 2 minutes, which helps release their starch for a creamy texture.
- Deglaze with wine: Pour in the dry white wine and stir until mostly absorbed, approximately 3 minutes. This adds a subtle acidity that balances the squash’s natural sweetness.
- Add warm broth gradually: Begin adding the vegetable broth one ladle at a time, stirring frequently. Allow each addition to absorb before adding the next. This gradual cooking releases starches, creating that signature creaminess of risotto. Continue for 25-30 minutes until rice is tender but still with a slight bite.
- Incorporate squash and herbs: Stir the sautéed butternut squash, fresh sage, and thyme into the risotto gently, allowing the herbs to infuse their earthy aromas. Cook for an additional 2-3 minutes to meld flavors.
- Finish with butter and cheese: Remove the pan from heat. Stir in the remaining 2 tbsp butter and grated Parmesan cheese until melted and glossy. Season with salt and freshly ground pepper to taste.
- Rest and serve: Let the risotto rest for 2 minutes before serving, allowing the texture to settle into perfect creaminess.
Tips for Success
- For the creamiest risotto, maintain a steady, gentle simmer with your broth and stir regularly to release the rice’s starches without breaking the grains.
- Use fresh herbs like sage and thyme last to preserve their vibrant flavor and avoid bitterness.
- To save time, roast the butternut squash ahead with olive oil and sea salt at 400°F (200°C) for 25 minutes; add it during the final stages of risotto cooking.
- For a dairy-free option, substitute butter with vegan margarine and Parmesan with nutritional yeast or a vegan cheese blend.
- If the risotto thickens too much upon resting, gently stir in a splash of warm broth or water to loosen it back to a creamy consistency.
Serving Suggestions
This creamy butternut squash risotto is a visual and flavor delight best enjoyed immediately for maximum creaminess. Garnish with a sprinkle of freshly grated Parmesan and toasted pumpkin seeds for a satisfying crunch. Pair it with a crisp green salad dressed with lemon vinaigrette to cut through the richness. For an elegant presentation, serve in shallow bowls with a drizzle of high-quality extra-virgin olive oil and a few fragrant sage leaves atop.

| Nutrient | per Serving |
|---|---|
| Calories | 380 kcal |
| Protein | 9 g |
| Carbohydrates | 54 g |
| Fat | 11 g |
explore how this recipe complements the nuances of autumn flavors by pairing it with perfectly selected wines in our Fall Wine Pairings Guide. For detailed nutrition on butternut squash, visit the Nutrition Value Database.
Q&A
Q&A: Creamy Butternut Squash Risotto – A Fall Flavor Delight
Q1: What makes butternut squash risotto the ultimate fall comfort food?
A1: Butternut squash risotto captures the essence of autumn with its velvety texture and naturally sweet, nutty squash flavor. The rich creaminess of the risotto combined with the earthy depth of roasted butternut squash creates a warm, comforting dish that feels like a cozy hug on a crisp fall day.
Q2: How does butternut squash enhance the traditional risotto flavor profile?
A2: Traditionally, risotto is all about creamy Arborio rice and savory broth. Adding butternut squash introduces a subtle sweetness and vibrant color that elevates the dish. the squash’s mellow, buttery notes contrast beautifully with the tang of parmesan and the slight bite of sautéed onions or shallots, resulting in a harmonious balance of flavors.
Q3: What’s the secret to getting a perfectly creamy risotto texture?
A3: Patience and technique are key. Slowly ladling warm broth into the rice while gently stirring releases the rice’s natural starches, which create that alluring creamy texture. Using medium-grain Arborio rice, never rushing the absorption process, and finishing with a knob of butter and a generous sprinkle of parmesan make the risotto luxuriously smooth.
Q4: can I use fresh butternut squash, or is canned a good alternative?
A4: Fresh is always best for robust flavor and texture. Roasting fresh butternut squash caramelizes its sugars, boosting depth and complexity. While canned squash puree can work in a pinch, it lacks the dimension of roasted cubes and can make the risotto overly soft or mushy. For a truly fall-flavored experience, roasting fresh squash is highly recommended.
Q5: What flavors and herbs pair well with creamy butternut squash risotto?
A5: Sage and thyme are classic fall companions-earthy and fragrant, they complement butternut squash beautifully. A hint of nutmeg adds warmth, while a splash of white wine during cooking introduces brightness. For an added layer, toasted pine nuts or crispy pancetta lend wonderful texture and savory notes.
Q6: Is this dish suitable for vegetarians or vegans?
A6: Absolutely! For vegetarians, just use vegetable broth and omit any meat additions. To make a vegan version, swap parmesan cheese for a plant-based alternative or nutritional yeast, and replace butter with olive oil or vegan margarine. The natural creaminess of the squash and rice makes a rich risotto that everyone can enjoy.
Q7: How can I make this creamy butternut squash risotto a stunning main course?
A7: Serve it alongside a fresh arugula salad sprinkled with toasted walnuts and a crisp vinaigrette for balance. Garnish the risotto with shaved parmesan, a drizzle of truffle oil, or crispy sage leaves for elegance. Pair it with a glass of chilled Chardonnay or a light Pinot Noir to amplify those warm, seasonal flavors.
Indulge in this Creamy Butternut Squash Risotto and let the taste of fall swirl deliciously in every bite!
In Summary
As the golden hues of autumn settle in, few dishes capture the season’s spirit quite like a creamy butternut squash risotto. This comforting bowl marries velvety textures with the naturally sweet, nutty essence of roasted squash, creating a symphony of fall flavors that warms both heart and home. Whether you’re savoring it as a cozy weeknight supper or impressing guests at a festive gathering, this risotto stands as a appetizing reminder that the best meals are those that celebrate the bounty of the season. So, next time the crisp air calls for something comforting yet sophisticated, let your kitchen fill with the inviting aroma of savory squash and creamy Arborio rice-your perfect taste of autumn awaits.
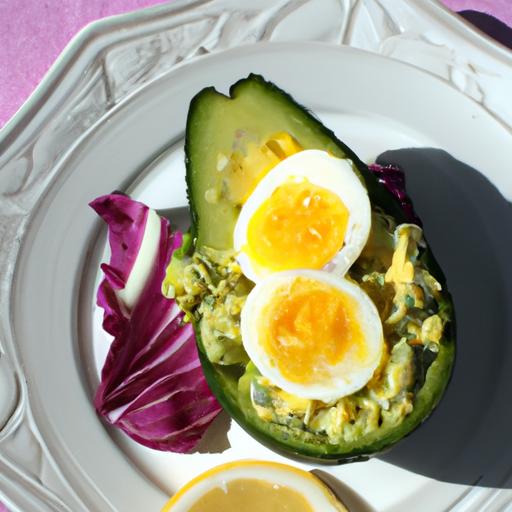
Creamy Avocado Egg Salad brings a brilliant harmony of velvety texture and vibrant freshness that elevates a beloved classic into something truly unforgettable. This nutrient-packed twist blends rich avocado with perfectly cooked eggs, creating a luscious, satisfying dish that’s as wholesome as it is flavorful. whether you’re craving a stunning lunch centerpiece or a swift, healthy snack, this recipe invites you to savor the best of both worlds – indulgence and wellness – in every bite.

Prep and Cook Time
Readiness: 15 minutes | Cooking: 10 minutes | Total: 25 minutes
Yield
Serves 4 people generously
Difficulty Level
Easy – perfect for novice and seasoned home cooks alike
Ingredients
- 6 large eggs, hard-boiled and peeled
- 1 ripe avocado, peeled and pitted
- 3 tablespoons Greek yogurt (or mayonnaise for creamier richness)
- 1 tablespoon fresh lemon juice, to brighten flavors
- 1 teaspoon Dijon mustard, for a subtle tang
- 2 tablespoons fresh chives, finely chopped
- 1 celery stalk, finely diced for crunch
- Salt and fresh cracked black pepper, to taste
- Optional: ½ teaspoon smoked paprika or cayenne pepper, for a mild kick
Instructions
- Prepare the eggs: Carefully slice the hard-boiled eggs into quarters or roughly chop, depending on your preferred texture. Set aside.
- Mash the avocado: In a medium bowl, mash the ripe avocado with a fork until smooth but slightly chunky for texture.
- Combine the creamy base: Add Greek yogurt, lemon juice, and Dijon mustard to the mashed avocado. Mix well until the blend looks uniform and creamy, which ensures every bite is delightfully smooth and fresh.
- Fold in the eggs and veggies: Gently fold in the chopped eggs, celery, and chives. Take care to keep some egg chunks intact to add body to your salad.
- Season your creation: Add salt, freshly cracked pepper, and if desired, a pinch of smoked paprika or cayenne for a gentle warmth. Taste and adjust seasoning to your liking.
- Chill briefly: Cover the salad and refrigerate for at least 15 minutes to let the flavors meld and the texture firm up for the perfect bite.
- Serve with confidence: Spoon the avocado egg salad onto fresh bread, crisp lettuce leaves, or your favorite crackers.
Chef’s Notes and Tips for Success
- Choosing avocados: Select perfectly ripe avocados that yield slightly to gentle pressure – this guarantees that creamy texture without bitterness.
- Egg-boiling hack: Add a teaspoon of vinegar and salt to boiling water to make peeling eggs easier and cleaner.
- Make-ahead magic: This salad holds well covered in the refrigerator for up to 2 days but is best enjoyed fresh to maintain vibrancy.
- Vegan variation: Swap hard-boiled eggs with firm tofu crumbles and use vegan yogurt for a plant-based version.
- Texture play: Add finely chopped pickles or red onion for a sharper crunch and extra zest.
Serving Suggestions and Flavor Enhancements for Every Palate
Elevate your Creamy Avocado Egg Salad by serving it on toasted whole grain bread or nestled in buttery croissants. For a low-carb option, use crisp romaine or butter lettuce cups. Garnish with fresh herbs like dill or parsley and sprinkle with toasted sesame seeds or crushed nuts for added texture and an elegant finish. A drizzle of extra virgin olive oil or a dash of hot sauce can awaken the flavors further for those who favor bold profiles.
Pair this lush salad with a light, crisp white wine such as Sauvignon blanc or a sparkling mineral water infused with citrus for refreshing contrast. It also makes an excellent filling for wraps or a flavorful topping for a baked sweet potato.
| Nutrient | Per Serving | Daily Value |
|---|---|---|
| Calories | 220 kcal | 11% |
| Protein | 12 g | 24% |
| Carbohydrates | 8 g | 3% |
| Fat | 16 g | 25% |
| Fiber | 5 g | 20% |
Discover more creative spin-offs for your favorite egg dishes in our Healthy Egg Recipes Collection. For deeper insights into avocado’s heart-healthy benefits, visit the American Heart association’s guide.
Q&A
Q&A: Creamy Avocado Egg Salad - A nutritious Twist on Classic
Q1: What inspired the creation of the creamy avocado egg salad?
A1: The idea was to reinvent the traditional egg salad by swapping out heavy mayonnaise for ripe, creamy avocado. Not only does this add a rich, buttery texture, but it also boosts the nutritional profile with healthy fats, fiber, and essential vitamins.
Q2: How does avocado change the flavor and texture of classic egg salad?
A2: Avocado imparts a subtle nuttiness and silky smoothness that elevates the familiar egg salad experience. Instead of the tangy creaminess from mayo, you get a luscious, earthy base that blends beautifully with the savory eggs and spices.
Q3: Is this avocado egg salad healthier than the traditional version?
A3: Absolutely! Avocado is packed with monounsaturated fats-heart-healthy and cholesterol-lowering-plus fiber, potassium, and vitamins E and C. This makes the salad not only tastier but also better for your heart and digestion compared to the mayo-laden original.
Q4: Can I customize the avocado egg salad with other ingredients?
A4: Definitely! This salad is a flexible canvas. Try adding a hint of fresh dill, a sprinkle of smoked paprika, chopped green onions, or even a squeeze of lime for a zesty punch. The creamy avocado pairs well with many herbs and spices, so feel free to experiment.
Q5: How should I store avocado egg salad to keep it fresh and vibrant?
A5: Since avocado browns quickly when exposed to air, cover the salad tightly with plastic wrap or store it in an airtight container. Pressing a little plastic wrap directly on the surface helps minimize oxidation. Using fresh lime or lemon juice in the salad also slows browning.
Q6: Is this recipe suitable for people following special diets?
A6: Yes! The creamy avocado egg salad fits perfectly into gluten-free, paleo, keto, and vegetarian diets. Just be mindful of any add-ins if you’re catering to specific dietary needs.
Q7: What’s the best way to enjoy this avocado egg salad?
A7: Spread it on whole-grain toast for breakfast, stuff it into a lettuce wrap for lunch, or serve as a colorful dip alongside crisp veggies. Its creamy richness makes it a versatile and delightful addition to any meal or snack.
Q8: Any tips for choosing the perfect avocado for this salad?
A8: Look for avocados that yield slightly to gentle pressure-ripe but not mushy. This ensures they’ll blend smoothly, providing that signature creamy texture without overpowering the eggs. Avoid overly firm or overly soft fruit for the best balance.
By blending creamy avocado with classic boiled eggs, this nutritious twist on the beloved egg salad offers a fresh, flavorful way to enjoy a time-honored favorite-healthier, tastier, and irresistibly creamy!
The Conclusion
In a world where classic recipes meet modern nourishment, this creamy avocado egg salad stands out as a delicious harmony of taste and health. By swapping traditional mayo for the buttery richness of avocado, you not only elevate the flavor but also infuse each bite with wholesome fats and essential nutrients. Whether enjoyed as a satisfying lunch, a vibrant sandwich filling, or a colorful side dish, this twist on a timeless favorite invites you to savor every creamy, protein-packed spoonful guilt-free. so next time you’re craving comfort food with a nutritious punch, remember: sometimes, the best upgrades come from nature’s own green goodness.
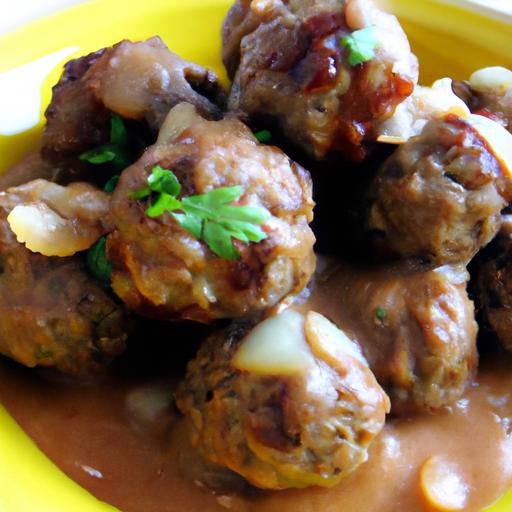
Slow-Cooker Swedish Meatballs invite you on a warm, comforting journey straight to traditional Scandinavian kitchens. This easy, creamy comfort recipe transforms humble ingredients into luscious, melt-in-your-mouth meatballs bathed in a velvety sauce that speaks of home-cooked love. Originating from Sweden’s rich culinary heritage, these meatballs have captivated taste buds worldwide for their tender texture and harmonious balance of spices, elevated perfectly by a slow-cooker method that promises effortless depth of flavor and convenience.

Prep and Cook Time
- Planning: 20 minutes
- Cooking: 4 hours (slow cooker)
- Total: 4 hours 20 minutes
Yield
Serves 6 generous portions, ideal for family dinners or cozy gatherings.
Difficulty Level
Easy – Perfect for both seasoned cooks and those new to Swedish cuisine.
Ingredients
- 1 lb (450g) ground beef – choose 80/20 for optimal fat balance and juiciness
- 1/2 lb (225g) ground pork – adds tender texture and rich flavor
- 1 small yellow onion, finely minced
- 2 cloves garlic, minced
- 3/4 cup fresh breadcrumbs (preferably from day-old white bread)
- 1/4 cup whole milk, warmed
- 1 large egg, beaten
- 1 tsp salt
- 1/2 tsp freshly ground black pepper
- 1/2 tsp ground allspice – quintessential Scandinavian spice offering warmth
- 1/4 tsp ground nutmeg – adds subtle earthiness
- 2 tbsp unsalted butter (for browning)
- 2 tbsp all-purpose flour (for sauce thickening)
- 2 cups beef broth (preferably low sodium)
- 1 cup heavy cream or full-fat crème fraîche for the authentic creamy finish
- 1 tbsp Worcestershire sauce - boosts savory depth
- 1 tsp Dijon mustard – adds subtle tang
- Fresh chopped parsley (for garnish)
instructions
- Prepare the Meatball Mixture: In a large bowl, soak the breadcrumbs in warmed milk until fully absorbed, about 5 minutes. Add ground beef, ground pork, minced onion, garlic, egg, salt, pepper, allspice, and nutmeg. Gently mix with your hands or a spatula until just combined-avoid overworking to keep meatballs tender.
- shape into Meatballs: Roll the mixture into uniform balls about 1 to 1¼ inches in diameter. Placing them on a parchment-lined tray helps prevent sticking.
- Browning: Heat butter in a large skillet over medium heat. brown meatballs in batches, turning carefully until all sides are golden and caramelized, about 5 minutes per batch. Don’t overcrowd the pan to retain that beautiful crust.
- Transfer and Assemble: Place browned meatballs into the slow cooker. Pour in beef broth, Worcestershire sauce, and Dijon mustard, gently stirring to combine flavors without breaking the meatballs.
- Cook: Cover and cook on low for 4 hours. During cooking, the slow simmer tenderizes meatballs perfectly while melding flavors.
- Make the Cream Sauce: In a small saucepan, melt butter over medium heat. Whisk in flour and cook for 1-2 minutes, forming a roux. Gradually whisk in heavy cream until smooth and thickened. Pour this luscious sauce over meatballs in the slow cooker, stirring gently.
- Final Touch: Cook uncovered for an additional 15-20 minutes to let the sauce thicken slightly and coat meatballs in creamy richness.
- Serve: Garnish generously with fresh parsley for a pop of color and fresh brightness.
Tips for Success
- Choosing the Meat: Balanced fat content in ground beef and pork is critical for juicy meatballs. If you prefer leaner options, add a small splash of olive oil to compensate.
- Browning Matters: Don’t skip browning-this step not only locks in juices but infuses the dish with deep, roasted flavor and caramelized notes that elevate the final plate.
- Breadcrumbs: Use fresh day-old bread to achieve tender, springy meatballs. Store-bought breadcrumbs can also work but may slightly alter texture.
- Make-Ahead: Meatballs can be shaped and browned a day ahead. Store in the fridge, then assemble and slow cook just before serving for ultimate convenience.
- Gluten-Free Variation: substitute gluten-free flour and breadcrumbs to adapt this recipe seamlessly.
Serving Suggestions and Tips to Elevate Your Meal Experience
These slow-cooker Swedish meatballs shine brilliantly when paired with buttery mashed potatoes or fluffy buttered egg noodles that soak up the creamy sauce beautifully. For a traditional Nordic touch, serve alongside lingonberry jam – the tart sweetness cuts through the richness, offering a perfect contrast. A crisp green salad with a light vinaigrette also adds brightness and balances the plate. Garnish with fresh parsley or thyme leaves to introduce fresh herbal notes and a vibrant splash of color.
For a more modern spin, try serving these meatballs tucked into toasted brioche buns with a spoonful of dill pickles for a comforting meatball slider option. Leftovers reheat wonderfully, making them a practical favorite for meal prep.

| Nutrient | Per Serving (6 Servings) |
|---|---|
| Calories | 460 kcal |
| Protein | 28 g |
| Carbohydrates | 15 g |
| Fat | 32 g |
For complementary Swedish recipes that pair impeccably with this dish, check out our traditional Swedish Potato Recipes. Discover more authentic culinary insights at Swedish Food, a trusted resource for Scandinavian cuisine.
Q&A
Q&A on Slow-Cooker Swedish Meatballs: Easy, Creamy Comfort Recipe
Q: what makes Swedish meatballs so special compared to regular meatballs?
A: Swedish meatballs are a comforting twist on the classic meatball, characterized by their tender texture and a creamy, savory sauce made with sour cream or heavy cream. Unlike the typical tomato-based sauce, these meatballs are simmered in a luscious gravy that’s both rich and smooth-perfect for cozy nights in.
Q: Why use a slow cooker for Swedish meatballs?
A: The slow cooker is a game-changer for this dish! It allows the meatballs to gently cook and soak up all those flavorful flavors over several hours, resulting in ultra-tender meat and a sauce that’s deeply infused with warmth and creaminess. Plus, its hands-off cooking-just set it, forget it, and come back to a comforting meal.
Q: Can I customize the recipe to fit my dietary preferences?
A: Absolutely! The traditional Swedish meatballs use beef and pork, but you can experiment with ground turkey, chicken, or even plant-based alternatives. For the sauce, swapping sour cream with Greek yogurt works well for a tangier twist, or use dairy-free cream options if you’re vegan or lactose-intolerant. Just keep the balance of creaminess and seasoning for that authentic flair.
Q: What sides pair best with slow-cooker Swedish meatballs?
A: Creamy mashed potatoes are a classic companion, soaking up every bit of the savory sauce. Egg noodles or buttered rice also make excellent beds for these meatballs. For a lighter touch, steamed green beans or roasted root vegetables add a fresh and earthy contrast to the richness.
Q: How can I ensure the meatballs stay tender and don’t fall apart in the slow cooker?
A: The secret lies in the mixture and a brief browning step. Using a combination of breadcrumbs soaked in milk or cream, an egg to bind, and gently browning the meatballs beforehand helps them hold together during slow cooking. This step builds flavor, too! Once in the slow cooker, keep the heat low and resist stirring too vigorously to prevent breaking them up.
Q: Is it possible to freeze leftover Swedish meatballs?
A: Yes! These meatballs freeze beautifully. Let them cool completely with the sauce, then portion and freeze in airtight containers. When ready to eat, thaw overnight in the fridge and gently reheat on the stovetop or in the slow cooker until warmed through. It’s a perfect make-ahead meal for busy days craving a comfort fix.
Q: What’s the easiest way to thicken the sauce if it’s too runny?
A: If your sauce isn’t as thick as you’d like, stir in a slurry of cornstarch and cold water and cook on high for another 15-30 minutes. This fast trick will transform your creamy gravy from cozy to luscious, perfect for coating every bite of those meatballs.
Concluding Remarks
Whether you’re seeking a cozy meal to brighten a chilly evening or a fuss-free dinner that delivers big on flavor, these Slow-Cooker Swedish Meatballs offer the perfect blend of creamy comfort and effortless cooking. With tender, savory meatballs simmered gently in a rich, velvety sauce, this recipe transforms simple ingredients into a heartwarming tradition. So, next time you crave that classic Scandinavian indulgence without the hassle, let your slow cooker do the work-and savor every delicious, soul-soothing bite.
Unlocking the science behind luxuriously smooth textures is the key to elevating everyday dishes into culinary masterpieces. Whether you’re crafting a velvety cheesecake, an ultra-creamy risotto, or a decadent custard, understanding how ingredients and techniques marry to create indulgent softness will transform your cooking. This recipe post dives deep into the essential elements and tools that turn texture into creamy perfection, making every bite irresistibly smooth and unforgettable.
Prep and Cook Time
- Planning: 20 minutes
- Cooking: 35 minutes
- Total Time: 55 minutes
Yield
Serves 6 luxurious portions
Difficulty Level
Medium – Ideal for cooks ready to master textural finesse
Ingredients
- 2 cups whole milk, warmed
- 1 cup heavy cream, chilled
- 3 tbsp unsalted butter, softened
- 1/3 cup granulated sugar, finely ground
- 1/4 cup cornstarch, sifted for smoothness
- 3 large egg yolks, room temperature
- 1 tsp pure vanilla extract
- Pinch of fine sea salt
Instructions
- Warm the milk gently in a saucepan over medium heat until it reaches about 110°F (warm to the touch). This prepares the milk for smooth incorporation with egg yolks without curdling.
- in a separate bowl, whisk together egg yolks, sugar, cornstarch, and salt until the mixture is pale and silky-this ensures a creamy custard base without lumps.
- Slowly pour the warm milk into the egg mixture in a thin, steady stream while continuously whisking to temper the eggs and prevent scrambling.
- Return the combined mixture to the saucepan and cook over medium-low heat, whisking constantly to avoid sticking and achieve even thickening. Cook until it thickens to a luxurious pudding-like consistency, about 8-10 minutes.
- Remove from heat and immediately whisk in the butter and vanilla. The butter’s fat content is essential for a smooth mouthfeel, while vanilla adds aromatic depth.
- Transfer the custard to a clean bowl, cover with plastic wrap pressed directly against the surface to prevent a skin from forming, and chill for at least 2 hours until fully set and creamy.
- Before serving, whip the chilled heavy cream to soft peaks and gently fold it into the custard base to introduce lightness and an unmatched airy softness.
Tips for Success: Expert Insights for Creamy Perfection
- Ingredient temperature matters: Room temperature eggs and chilled cream help the emulsion stabilize,preventing graininess.
- Gentle heat is your ally: Excessive heat can cause curdling; always cook custards low and slow.
- Use cornstarch wisely: Sifting the cornstarch ensures no clumps, giving you a flawless base.
- Butter adds richness: Introducing soft butter off the heat seals in smoothness and silkiness.
- Make ahead: This dish tastes better after chilling overnight - allowing flavors and texture to harmonize.
- Substitutions: For dairy-free, swap milk and cream with oat or almond-based alternatives but maintain temperatures carefully to mimic creaminess.
Serving Suggestions
Present your creamy creation in chilled glass bowls for an elegant touch. Garnish with fresh berries, a sprig of mint, or a delicate dusting of cinnamon or cocoa powder to complement the rich texture. A drizzle of homemade caramel or a sprinkle of toasted nuts introduces contrast and heightens the sensory experience. Serve alongside lightly crisped buttery cookies or thin almond tuile for delightful texture interplay.

| Nutrition per Serving | Amount |
|---|---|
| Calories | 320 kcal |
| Protein | 7 g |
| Carbohydrates | 28 g |
| Fat | 20 g |
For further ideas on texture mastery, explore our detailed classic custard techniques guide. Also, delve into the science behind dairy emulsification at ResearchGate’s Dairy Science Publications to deepen your understanding of texture transformation.
Q&A
Q&A: Discover the Secrets of Smooth and Creamy Texture Magic
Q1: What exactly is meant by ”smooth and creamy texture” in food?
A1: Smooth and creamy texture refers to the delightful mouthfeel that’s velvety, rich, and free of lumps or grittiness. It’s that luxurious sensation you get when somthing melts effortlessly on your tongue-think silky custards, luscious ice creams, or perfectly blended soups.
Q2: Why is texture so significant in cooking and food enjoyment?
A2: Texture plays a starring role in how we experience food. It complements flavor and aroma by engaging our sense of touch inside the mouth. A smooth, creamy texture can elevate simple ingredients into indulgent bites, making dishes feel more comforting and satisfying.
Q3: What are the key ingredients that contribute to smooth and creamy textures?
A3: Dairy like cream, milk, and butter are classic heroes, but plant-based alternatives such as coconut cream or cashew paste work wonders too. Emulsifiers, starches, and gelatin can also enhance creaminess by binding ingredients and creating that luscious consistency.
Q4: How does technique influence the creation of creamy textures?
A4: Technique is the magician’s wand! Slow heating, careful stirring, and precise blending all coax ingredients into silky harmony. For example,tempering eggs gently or whisking vigorously can transform a chunky mixture into a smooth masterpiece.
Q5: Can you create creamy textures without dairy?
A5: Absolutely! Nuts (like cashews or almonds), avocados, silken tofu, and soaked oats can be blended into smooth, creamy bases. Plant-based milks combined with thickeners such as agar or arrowroot starch help replicate that luxurious mouthfeel.
Q6: What common mistakes prevent achieving smooth and creamy textures?
A6: Overheating, under-blending, or rushing the process can all sabotage creaminess. High heat can cause curdling or graininess, while insufficient blending leaves lumps behind. Patience and gentle handling ensure a silky final product.Q7: Are there any secret tools that help create perfect creaminess?
A7: A high-powered blender or food processor is a game-changer! Immersion blenders also shine for soups and sauces. Additionally, fine sieves or chinois strainers help achieve ultra-smooth results by removing any lingering bits.
Q8: How can I apply these secrets to everyday cooking?
A8: Start simple: try making your own creamy salad dressings, velvety mashed potatoes, or luscious smoothies using careful blending and the right ingredients. With practice, you’ll begin to sense the magic of texture and transform ordinary dishes into remarkable experiences.
Q9: Is there a science behind why creamy textures are so appealing?
A9: Yes! Creamy textures stimulate fat receptors and coat the palate in a way that triggers pleasure centers in the brain. This sensory trick makes food feel indulgent and satisfying, often associated with comfort and luxury.
Q10: Where can I learn more about mastering texture magic?
A10: dive into cookbooks focused on sauces and desserts, watch culinary tutorials, or experiment in your kitchen with diffrent ingredients and methods. Each dish you create is a step closer to unlocking the secrets of smooth and creamy texture magic!
in Retrospect
As you embark on your own culinary adventures, remember that the magic of smooth and creamy textures lies not just in ingredients, but in the delicate dance of technique and timing. Whether it’s a velvety sauce, a luscious dessert, or a perfectly blended smoothie, mastering these secrets transforms ordinary dishes into unforgettable experiences. So, embrace the art behind the creaminess, experiment boldly, and let your creations captivate the senses with every silky, dreamy bite. The secret’s out-now it’s your turn to stir up some texture magic in the kitchen!
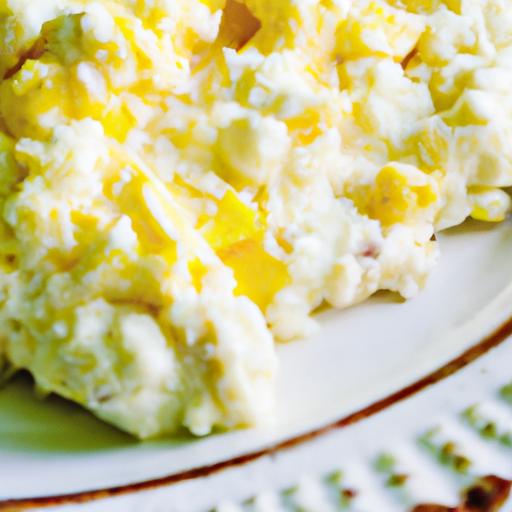
The creamy twist of adding cottage cheese to scrambled eggs is a culinary revelation that transforms a simple breakfast staple into a velvety indulgence. This technique blends the rich, tangy creaminess of cottage cheese with the tender fluffiness of eggs, creating a luxurious texture that elevates each bite. Originating from classic European dairy traditions, this fusion now captivates home cooks seeking an easy way to inject moisture and protein without adding heavy cream or butter.

Prep and Cook Time
- Readiness: 5 minutes
- Cooking: 7 minutes
- Total Time: 12 minutes
Yield
Serves 2 hearty portions
Difficulty Level
Easy – perfect for beginners and busy mornings
Ingredients
- 4 large eggs, lightly beaten
- ½ cup small-curd cottage cheese, drained
- 1 tablespoon unsalted butter
- Salt and freshly ground black pepper, to taste
- 1 tablespoon fresh chives, finely chopped (optional)
- Pinch of garlic powder or smoked paprika (optional)
Step-by-Step Guide to Creamy Cottage Cheese Scrambled Eggs
- Prepare the eggs: In a medium bowl, gently whisk the eggs until the yolks and whites are fully combined but not frothy. Add a pinch of salt and pepper.
- incorporate cottage cheese: Fold the drained cottage cheese into the beaten eggs. The small curds will melt gently during cooking, creating a creamy texture.
- Heat your pan: Place a non-stick skillet over medium-low heat and melt the butter until it foams but dose not brown.
- Cook the eggs: Pour the egg and cottage cheese mixture into the pan.Let it sit undisturbed for 30 seconds to begin setting at the bottom.
- Gently scramble: Using a silicone spatula, slowly push the eggs from the edges toward the center. Scrape the bottom continuously but gently to form soft curds.
- Control heat and texture: Continue cooking over low heat, stirring occasionally, until eggs are just barely set and still glossy-about 5-6 minutes. Remember, cottage cheese adds moisture, so the eggs hold extra creaminess.
- Season and finish: Remove from heat slightly before fully cooked as residual heat will finish them off. Sprinkle with fresh chives and a dash of garlic powder or smoked paprika for an aromatic lift.
Choosing the Perfect cottage Cheese for a Silky Texture
When aiming for that smooth, creamy mouthfeel, small-curd cottage cheese is your best friend. The smaller curds blend effortlessly into eggs, melting gently to create ribbons of creaminess without overwhelming the delicate egg flavor. Opt for low-moisture cottage cheese to avoid watery scrambled eggs. If you prefer an ultra-smooth result, briefly pulse the cottage cheese in a food processor before mixing. This simple adjustment yields an almost custard-like indulgence that will impress any breakfast aficionado.
Flavor Enhancements and Serving Suggestions for a Gourmet Breakfast
Enhance the creamy twist by layering in flavors and textures. A handful of sautéed spinach or finely diced sun-dried tomatoes add vibrant color and earthiness. Crisp bacon or smoked salmon provide savory contrast, while a sprinkle of freshly cracked black pepper and a zest of lemon can brighten the dish. Serve atop toasted sourdough or a warm English muffin, garnished with microgreens or edible flowers for a visually stunning plate.
Chef’s Notes: Tips for Success
- Use gentle heat to prevent curdling-low and slow is key when cooking eggs with cottage cheese.
- if curds seem too large or lumpy, whisk the cottage cheese with eggs slightly longer before cooking.
- For extra protein and creaminess, try mixing in a tablespoon of crème fraîche or Greek yogurt along with cottage cheese.
- Make ahead: Prepare the egg mixture and refrigerate for up to 6 hours. Stir gently before cooking for consistent texture.
Serving Suggestions
serve your creamy cottage cheese scrambled eggs with a side of roasted cherry tomatoes or grilled asparagus. Garnish with fresh herbs like dill or basil for an herbal lift. Drizzle a little extra virgin olive oil or truffle oil for a luxurious finish. Pair with a fresh-pressed juice or a perfectly brewed cup of coffee for a nourishing, restaurant-quality start to your day.

| Nutrient | Amount per Serving |
|---|---|
| Calories | 240 kcal |
| Protein | 20 g |
| Carbohydrates | 3 g |
| Fat | 17 g |
For more delightful breakfast inspiration, explore our Avocado Toast Recipes. To deepen your understanding of cottage cheese’s nutritional benefits, check out this extensive guide from Healthline.
Q&A
Q&A: Creamy Twist – Elevate Your Scrambled Eggs with Cottage Cheese
Q1: Why add cottage cheese to scrambled eggs?
A1: Cottage cheese is the secret ingredient that transforms ordinary scrambled eggs into a luxuriously creamy delight. Its mild, tangy flavor and velvety texture melt into the eggs, creating a richer mouthfeel and a subtle hint of freshness that elevates the whole dish.
Q2: How does cottage cheese change the texture of scrambled eggs?
A2: When folded into eggs, cottage cheese adds pockets of creamy, slightly curdled goodness that make each bite smooth and luscious. It prevents overcooking by adding moisture, resulting in soft, tender curds instead of dry, rubbery eggs.
Q3: Can I use any type of cottage cheese?
A3: For best results, go with small-curd cottage cheese and opt for a low-fat or regular version depending on your preference. Small curds blend more seamlessly, while large curds add a pleasant chew. Avoid flavored or heavily salted varieties to keep the balance subtle and fresh.
Q4: How much cottage cheese should I add to scrambled eggs?
A4: A good rule of thumb is to add about 2 tablespoons of cottage cheese per 2 eggs. You can adjust based on your desired creaminess-more for a richer scramble, less for a subtle twist.
Q5: When should I add the cottage cheese during cooking?
A5: For the perfect melding, whisk the cottage cheese directly into the beaten eggs before cooking. This way, the cheese blends evenly, acting as a creamy binder and ensuring an indulgent texture throughout.
Q6: Are scrambled eggs with cottage cheese healthier than classic scrambled eggs?
A6: Absolutely! cottage cheese is packed with protein and calcium, making your breakfast not only creamier but more nutritious. It also adds fewer calories and less saturated fat than many cheese alternatives, making it a smart choice for health-conscious foodies.
Q7: Any tips for seasoning scrambled eggs with cottage cheese?
A7: Keep it simple to let the cottage cheese shine. A pinch of salt, freshly cracked black pepper, and a sprinkle of fresh herbs-think chives, dill, or parsley-complement the creamy texture beautifully. For a savory kick, add a dash of smoked paprika or a hint of garlic powder.
Q8: can I customize this recipe with other add-ins?
A8: Definitely! the creamy base of eggs and cottage cheese pairs wonderfully with sautéed mushrooms, diced tomatoes, spinach, or crispy bacon. Just fold in your favorite ingredients towards the end of cooking for a personalized breakfast masterpiece.
Q9: How should I serve scrambled eggs with cottage cheese?
A9: serve them piping hot on toasted sourdough or a buttery English muffin. Add a side of fresh fruit or avocado slices for contrast. The creamy eggs also make a fantastic filling for breakfast burritos or a savory crepe.
Q10: Any last words for those ready to try the creamy twist?
A10: Embrace cottage cheese as your new breakfast ally! This simple ingredient unlocks a whole new realm of flavor and texture, turning your everyday scrambled eggs into a gourmet experience. Once you try it, you’ll wonder how you ever scrambled eggs without it.
Closing Remarks
As you’ve discovered, adding a dollop of cottage cheese to your scrambled eggs isn’t just a tweak-it’s a conversion. This creamy twist enriches texture, boosts protein, and brings a subtle tang that elevates the humble scramble to a new level of breakfast brilliance. Whether you’re seeking a wholesome start or a simple way to impress your morning guests, cottage cheese offers a deliciously unexpected companion to your eggs. So next time you crack those shells, remember: sometimes the smallest ingredient can make the biggest difference. Happy scramblin’!
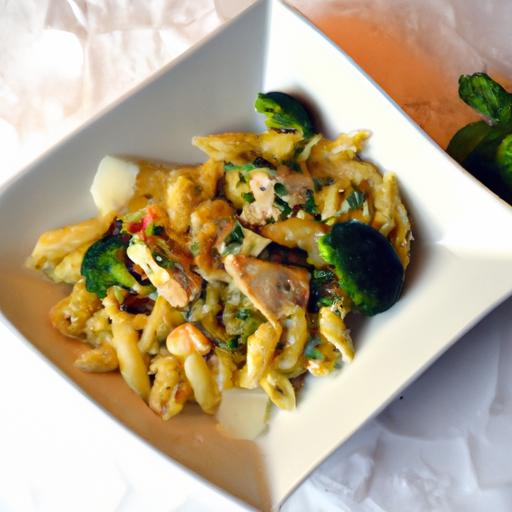
Deliciously Creamy Pesto Chicken Pasta shines as a comforting yet vibrant dish that celebrates the perfect harmony of tender chicken, fresh basil pesto, and al dente pasta. Rooted in Italian culinary traditions but elevated with a luscious, creamy twist, this recipe is a testament to the magic of simplicity done flawlessly. Whether you’re crafting a weeknight dinner or an remarkable centerpiece for guests, paying close attention to each ingredient elevates this dish from ordinary to unforgettable.

Prep and Cook Time
- Preparation: 15 minutes
- Cooking: 20 minutes
- Total Time: 35 minutes
Yield
Serves 4 generous portions
Difficulty Level
Easy to Medium – Perfect for home cooks seeking an impressive yet accessible meal
Ingredients
- 2 large chicken breasts, boneless and skinless
- 12 oz fettuccine or penne pasta
- 1 ½ cups fresh basil leaves, packed
- ¼ cup pine nuts, toasted
- 3 garlic cloves, peeled
- ½ cup extra virgin olive oil
- ¾ cup freshly grated Parmesan cheese
- ½ cup heavy cream
- Salt and freshly ground black pepper, to taste
- 1 tablespoon unsalted butter
- Optional: Zest of 1 lemon for brightness
- Fresh basil leaves and additional parmesan, for garnish
Instructions
- Prepare the Chicken: Pat the chicken breasts dry and season generously with salt and pepper on both sides. Heat a large skillet over medium heat with the 1 tablespoon butter and a drizzle of olive oil. Sear the chicken until golden brown and cooked through-approximately 6-7 minutes per side depending on thickness. Remove from heat and let rest before slicing into tender strips.
- Cook the Pasta: Bring a large pot of salted water to a boil. Add fettuccine or penne pasta and cook until al dente according to package directions (usually 10-12 minutes).Reserve ½ cup of pasta water, then drain and set aside.
- Make the Creamy Pesto Sauce: In a food processor, combine basil leaves, toasted pine nuts, garlic, and Parmesan cheese. Pulse until finely chopped. With the processor running, slowly drizzle in olive oil to create a smooth pesto paste.
- Transfer the pesto to a saucepan over low heat and stir in the heavy cream. Warm gently, stirring constantly, until the mixture is velvety and heated through-avoid boiling to keep vibrant color and flavor intact.
- Toss Pasta and Sauce: Add the drained pasta to the creamy pesto sauce. If the sauce feels too thick, incorporate reserved pasta water a tablespoon at a time until it reaches your desired consistency. Gently fold in sliced chicken strips until everything is evenly coated and steaming.
- Plate and Garnish: Serve immediately, garnished with fresh basil leaves, a sprinkle of Parmesan, and a pinch of freshly ground black pepper. Optionally, add a zest of lemon for a refreshing burst.
Tips for Success
- For the richest flavor, toast pine nuts lightly in a dry skillet over medium heat until golden and fragrant.
- Use room temperature ingredients when blending pesto to ensure even emulsification and a luminous green color.
- Let the chicken rest after cooking; this keeps it juicy and tender when sliced.
- If you prefer a lighter sauce, substitute half-and-half for heavy cream.
- Make pesto in advance and store in an airtight container with a thin layer of olive oil on top to preserve freshness.
Serving Suggestions
This deliciously creamy pesto chicken pasta pairs beautifully with a crisp, green salad and crusty garlic bread for a complete Italian-inspired meal. Garnish plates with a sprig of fresh basil and a light drizzle of extra virgin olive oil for added depth and shine. For a festive touch, sprinkle toasted pine nuts over the top just before serving to add crunch and nuttiness.

| Nutritional Info (per serving) | Amount |
|---|---|
| Calories | 620 kcal |
| Protein | 45 g |
| Carbohydrates | 52 g |
| Fat | 28 g |
For those wanting to explore more pasta perfection, check out our Ultimate Creamy Alfredo Pasta Guide. To understand the science behind emulsifying sauces like pesto, visit Serious Eats for expert culinary insights.
Q&A
Q&A: deliciously Creamy Pesto Chicken Pasta – A Flavorful Guide
Q1: What makes pesto chicken pasta “deliciously creamy” compared to regular pesto pasta?
A1: The magic lies in the addition of cream or a creamy substitute-such as half-and-half, mascarpone, or even a splash of coconut milk-which transforms the bright, herbaceous notes of conventional pesto into a luscious, velvety sauce. This creamy element balances the fresh basil and sharp Parmesan, turning each bite into a rich, indulgent experience rather than a purely fresh and oily one.
Q2: Can I use store-bought pesto, or is homemade pesto essential for this recipe?
A2: While homemade pesto offers the freshest flavor and allows you to customize ingredients, high-quality store-bought pesto can certainly do the trick for a swift weekday meal. Just be sure to taste and adjust-sometimes, thinning it with a bit of cream or olive oil helps integrate it more smoothly into the pasta and enhance that creamy texture.
Q3: What type of chicken works best for this pasta dish?
A3: Tender, juicy chicken breasts or thighs both shine here-breasts for a lean, clean bite and thighs for extra moisture and richness. The key is to season well and cook just until done to avoid rubbery texture. Slicing the chicken into bite-sized pieces or strips helps it weave seamlessly through noodles and sauce for balanced spoonfuls.
Q4: Which pasta shapes complement creamy pesto chicken pasta?
A4: pasta shapes that hold sauce well are ideal. Think fusilli, farfalle, or penne-shapes with folds and ridges to trap the creamy pesto and chicken morsels. Long, thin noodles like fettuccine or linguine also work beautifully, creating a silky, comforting mouthfeel when coated thoroughly.
Q5: How can I make this dish healthier without sacrificing creaminess?
A5: Swap heavy cream for Greek yogurt or a blend of low-fat cream cheese and milk to lighten the sauce without losing lusciousness. Incorporate plenty of fresh veggies like spinach, cherry tomatoes, or zucchini to boost fiber and color. Using whole grain or legume-based pasta adds extra protein and nutrients, turning this indulgent meal into a balanced, wholesome delight.
Q6: any special tips to elevate flavor beyond basic pesto chicken pasta?
A6: Absolutely! Toasted pine nuts sprinkled on top add a buttery crunch; a squeeze of fresh lemon brightens the richness; and a sprinkle of freshly cracked black pepper or red chili flakes wakes up your palate. For an herby punch, stir in fresh basil or parsley right before serving to keep the flavors vibrant and fragrant.
Q7: Can this dish be made ahead or frozen?
A7: Cream-based sauces can sometimes separate upon freezing and reheating, but if needed, store cooked pasta and chicken separate from sauce to freeze. When reheating, gently warm the components and combine with a touch of cream or milk to re-emulsify the sauce. For best texture, it’s ideal to prepare fresh or enjoy leftovers within 2-3 days refrigerated.
With these tips and tricks at your fingertips, your next batch of creamy pesto chicken pasta will be a sumptuous party of flavors-a perfect blend of fresh, creamy, and savory all in one bowl!
Closing Remarks
As you twirl your fork through the luscious strands of this creamy pesto chicken pasta, you’re not just enjoying a meal-you’re savoring a symphony of flavors crafted with care and creativity. This dish proves that comfort food can be both simple and complex, bringing together tender chicken, vibrant pesto, and rich cream in perfect harmony. Whether you’re cooking for a quick weeknight dinner or impressing guests with a homemade Italian-inspired feast, this flavorful guide ensures every bite is a delightful experience. So go ahead-dive in, indulge, and let this creamy pesto chicken pasta become a beloved staple in your culinary repertoire.
Creamy cottage cheese boosts flavor in scrambled eggs delight by infusing each bite with a luscious silkiness that elevates this classic breakfast staple beyond the ordinary. The magic lies in how the curds of cottage cheese interact with eggs during cooking, creating a delicate creaminess and added protein that transform texture and taste. This inviting combination not only softens the eggs but also curbs the tendency to overcook, yielding a consistently tender scramble that melts on the tongue. Whether you crave a fast weekday meal or a leisurely brunch centerpiece, this simple ingredient upgrade promises richness, depth, and a fresh twist to your morning ritual.

Prep and Cook Time
- Planning: 5 minutes
- Cooking: 6 minutes
- Total: 11 minutes
Yield
Serves 2 generously
Difficulty Level
Easy
Ingredients
- 4 large eggs, farm-fresh or organic preferred
- 1/2 cup creamy cottage cheese (full-fat for best texture)
- 1 tbsp unsalted butter
- Salt, to taste (preferably flaky sea salt)
- Freshly ground black pepper, to taste
- 1 tbsp fresh chives, finely chopped (optional)
- 1 tbsp whole milk or cream (optional, for extra silkiness)
Instructions
- Crack the eggs into a mixing bowl. Add the creamy cottage cheese, milk (if using), salt, and pepper. Whisk gently until thoroughly combined but still slightly lumpy; these curds add character and creaminess.
- Heat a non-stick skillet over medium-low heat. Add butter and let it melt completely without browning-this ensures a smooth cooking surface and rich flavor.
- Pour the egg mixture into the skillet. Let it sit undisturbed for about 20 seconds until edges just start to set. Using a silicone spatula,gently push the eggs from the edges toward the center,folding rather than stirring.
- Continue folding slowly every 15-20 seconds, allowing soft curds to form. The cottage cheese will soften and partially melt, combining with the eggs to create an irresistible creamy texture. Avoid rushing to let the eggs cook evenly and stay moist.
- When eggs are mostly set but still glossy and tender, remove the pan from heat. The residual warmth will finish cooking the eggs without drying them out.
- Garnish with chopped chives or your favorite fresh herbs for a subtle oniony brightness and visual contrast.
- Serve immediately, spooning the creamy cottage cheese scramble onto warm plates to maintain its soft texture.
Tips for success
- Use full-fat cottage cheese for maximum creaminess; low-fat varieties tend to be watery and less flavorful.
- Drain excess liquid from cottage cheese if it’s overly wet to avoid soggy eggs.
- Cook eggs on low to medium-low heat to prevent curds from drying out and maintain that signature custardy mouthfeel.
- For extra protein punch, try mixing in small cubes of herb-infused cream cheese instead of or alongside cottage cheese.
- Make ahead by prepping the egg mixture and refrigerating for up to 2 hours before cooking-just whisk again before heat.
- Stir gently and infrequently. over-stirring breaks down curds and leads to a more rubbery texture.
Serving Suggestions
pair your creamy scrambled eggs with a slice of toasted sourdough rubbed with garlic and drizzled lightly with olive oil or butter. Fresh baby spinach or arugula tossed in lemon vinaigrette adds brightness and verdant notes. A few halved cherry tomatoes or avocado slices create color and balance the richness. For an indulgent brunch, serve alongside smoked salmon or crisp bacon. A dusting of flaky sea salt and a grind of black pepper finish the dish with flourish.

| Nutrient | Per Serving |
|---|---|
| Calories | 280 kcal |
| Protein | 24 g |
| Carbohydrates | 3 g |
| Fat | 18 g |
For more creative egg recipes that add excitement to your morning table, explore our Ultimate Guide to Eggs. To dive deeper into the science behind dairy and protein interactions in cooking, check out this insightful article from ScienceDaily.
Q&A
Q&A: Creamy Cottage Cheese Boosts Flavor in Scrambled Eggs Delight
Q1: What makes cottage cheese a unique addition to scrambled eggs?
A1: Cottage cheese brings a luscious creaminess and subtle tang that transforms ordinary scrambled eggs into a rich, velvety delight. Unlike butter or cream alone, its curds add a gentle texture contrast while enhancing moisture and flavor, resulting in eggs that are fluffy yet satisfyingly creamy.
Q2: How does adding cottage cheese affect the cooking process?
A2: Incorporating cottage cheese slightly alters the cooking dynamic. Because of its moisture content, it keeps eggs from drying out and encourages a softer, silkier scramble. It’s best folded in gently toward the end of cooking, so the cheese warms through without breaking down completely, preserving its character.
Q3: Is cottage cheese a healthy complement to scrambled eggs?
A3: Absolutely! Cottage cheese is packed with protein, calcium, and beneficial probiotics, which complement the egg’s nutrient profile. This duo not only boosts flavor but also pumps up the dish’s nutritional value, making your breakfast both indulgent and wholesome.
Q4: Can different styles of cottage cheese be used, like low-fat or full-fat?
A4: Yes, both low-fat and full-fat cottage cheese work beautifully. Full-fat varieties contribute a richer mouthfeel, while low-fat options provide creaminess with fewer calories. Choose based on your dietary preferences-either way, your scrambled eggs will gain a delightful flavor lift.
Q5: Are there any tips for pairing cottage cheese with other scrambled egg ingredients?
A5: Definitely! Cottage cheese pairs wonderfully with fresh herbs like chives, dill, or parsley, which brighten its creamy tang. For a savory twist, try adding sautéed mushrooms, tomatoes, or spinach. A sprinkle of cracked black pepper or a dash of smoked paprika can also enhance the flavor profile beautifully.
Q6: How can someone new to using cottage cheese in eggs get started?
A6: Start simple! Whisk together your eggs as usual, then gently fold in a few spoonfuls of cottage cheese before or during the last minute of cooking.Experiment with small batches to find the perfect balance for your taste buds. Once comfortable, feel free to explore with herbs, spices, and veggies.
Q7: Does cottage cheese affect the taste of scrambled eggs considerably?
A7: It does, but in the moast delightful way! Cottage cheese adds a mild tang and creaminess that complement the eggs without overpowering them. The result is a subtly richer, more nuanced flavor that elevates your morning meal from routine to remarkable.
Adding creamy cottage cheese to your scrambled eggs is an easy culinary tweak that unlocks new dimensions of flavor and texture-making each bite a comforting celebration of simple ingredients done brilliantly.
Wrapping Up
the humble addition of creamy cottage cheese transforms your scrambled eggs from ordinary to extraordinary, infusing each bite with a velvety texture and subtle tang that awakens the palate. Whether you’re after a quick breakfast upgrade or a new way to enjoy protein-packed comfort, this simple ingredient offers a tasty twist that’s as nutritious as it is flavorful. So next time you whisk up your morning eggs, remember: a dollop of cottage cheese might just be the secret ingredient that turns your scramble into a delight worth savoring.

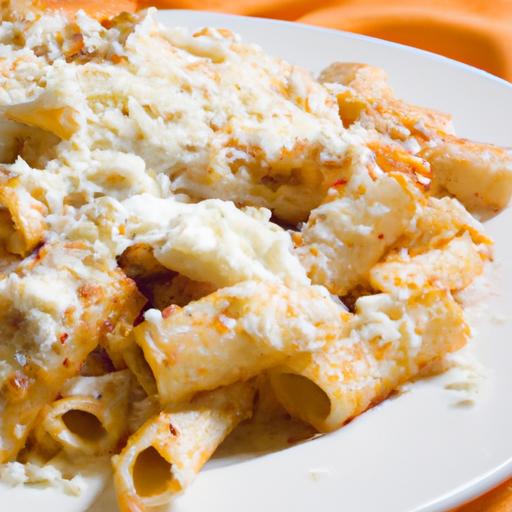
Creamy Baked Ziti with Ricotta: A Comfort Food Classic
Creamy baked ziti with ricotta is the ultimate soul-warming dish that transforms simple ingredients into a luscious, cheesy masterpiece. Originating from Italian-American kitchens, this recipe combines tender pasta, velvety ricotta, and melty mozzarella in a way that satisfies cravings for both comfort and elegance. Whether it’s a family gathering or a cozy night in, this creamy baked ziti with ricotta delivers every time with layers of golden, bubbling goodness.
Prep and Cook Time
- Preparation: 20 minutes
- Cooking: 35 minutes
- Total Time: 55 minutes
Yield
Serves 6 generous portions
Difficulty Level
easy to Medium – perfect for cooks looking to elevate their comfort food repertoire
Ingredients
- 1 pound dried ziti pasta
- 2 cups whole milk ricotta cheese
- 2 cups shredded mozzarella cheese, divided
- 1 cup grated Parmesan cheese, divided
- 4 cups marinara sauce (homemade or high-quality store-bought)
- 2 tablespoons olive oil
- 4 cloves garlic, minced
- 1 medium onion, finely chopped
- 1 teaspoon dried oregano
- ½ teaspoon red pepper flakes (optional)
- Salt and freshly ground black pepper to taste
- Fresh basil leaves for garnish
The Secret to Silky Ricotta That Elevates Every Bite
Choosing the right ricotta is pivotal to creating that creamy, dreamy texture. Opt for whole milk ricotta-its richness lends a silkiness that coats the pasta and melds beautifully with melted cheese layers. To enhance the ricotta’s silkiness, whisk it briefly with a splash of milk or fresh cream before layering it into the dish. This simple step prevents clumping and ensures every forkful melts in your mouth with balanced creaminess. Avoid watery ricotta; drain any excess moisture by placing the cheese in a fine mesh sieve for 15 minutes.
Choosing the Perfect Pasta for Ultimate Creaminess
Ziti’s tubular shape makes it a superstar for baked pasta casseroles. Its firm texture holds up under the heavy cheese and sauce, and the tubes trap marinara and ricotta inside, delivering bursts of flavor in every bite. When cooking, boil the pasta al dente-just shy of fully tender-so it continues cooking in the sauce and cheese while baking. This prevents mushy pasta and maintains that perfect bite, contributing to the luscious creaminess of the final dish.
Layering Techniques for a Golden, Gooey Ziti Bake
Layering is where magic happens. Start by spreading a thin layer of marinara sauce on the bottom of your baking dish; this prevents sticking and infuses flavor right from the base. Next, add a portion of the al dente ziti, evenly dollop spoonfuls of the whipped ricotta, then sprinkle mozzarella and Parmesan. Repeat layers until ingredients are used, finishing with a generous topping of mozzarella and Parmesan-this final crowning creates a golden, bubbly crust that seals in moisture and flavor.
Expert Tips for Baking and Serving Your Comfort Dish
Cover the baking dish with foil for the first 25 minutes to trap steam and keep the cheese moist. Remove the foil in the last 10 minutes to let the crust turn golden and slightly crisp. Letting the baked ziti rest for 10 minutes before serving helps it set, making portions clean and easier to serve.
Instructions
- Preheat the oven to 375°F (190°C). Lightly grease a 9×13-inch baking dish with olive oil.
- Cook the ziti in a large pot of salted boiling water until just al dente, about 1-2 minutes less than package directions. Drain and set aside.
- In a large pan, heat olive oil over medium heat. Add chopped onions and sauté until translucent, about 5 minutes.
- Add garlic, oregano, and red pepper flakes (if using), and cook for another 1-2 minutes, stirring frequently to avoid burning.
- Pour in marinara sauce and simmer over low heat for 10 minutes, stirring occasionally. Season with salt and pepper to taste.
- In a bowl, gently whisk ricotta with a splash of milk to create a silky texture.
- layering: Spread a thin layer of marinara sauce on the bottom of the baking dish. Add half the cooked ziti evenly over the sauce.
- Drop spoonfuls of ricotta across the pasta, then sprinkle half the mozzarella and Parmesan cheese over the top.
- Repeat with remaining pasta, ricotta, and cheeses. finish with a final sprinkle of mozzarella and parmesan to create that golden crust.
- Cover the dish with foil and bake for 25 minutes. Remove foil and bake uncovered for an additional 10 minutes to brown the cheese.
- Remove from oven and let rest for 10 minutes before serving. Garnish with fresh basil leaves.
Chef’s Notes: Tips for Success
- Make it ahead: Assemble the casserole and refrigerate up to 24 hours before baking; add an extra 5 minutes to baking time if cold from the fridge.
- Ricotta alternatives: Substitute part of the ricotta with mascarpone for an even creamier texture.
- Spice it up: Add cooked Italian sausage or sautéed mushrooms to the sauce for heartier variations.
- Prevent dryness: If your sauce is too thick, swirl in a little pasta water or broth before layering-it helps maintain a creamy bake.
- Cheese layering: Combine Parmesan with Pecorino Romano for a tangier finish.
Serving Suggestions
Serve your creamy baked ziti with a crisp green salad tossed in a lemon vinaigrette to cut through the richness. Complement the meal with warm, garlicky breadsticks or a simple bruschetta. For a final flourish, sprinkle freshly chopped basil or a pinch of crushed red pepper flakes atop each serving. Pair this comforting dish with a glass of medium-bodied red wine such as Chianti or Sangiovese for an authentic Italian dining experience.

Nutritional Information (per serving)
| Calories | Protein | Carbohydrates | Fat |
|---|---|---|---|
| 480 kcal | 28 g | 45 g | 18 g |
For further inspiration on pasta classics, explore our Best Pasta Bakes collection. To deepen your knowledge on ricotta’s role in Italian cuisine, visit Eataly’s comprehensive guide.
Q&A
Q&A: Creamy baked Ziti with Ricotta – A Comfort Food Classic
Q1: What makes baked ziti with ricotta so comforting?
A1: Baked ziti with ricotta is the epitome of cozy, heartwarming food. Its luscious layers of tender pasta, silky ricotta cheese, bubbling marinara, and melted mozzarella create a harmony of textures and flavors that hug you from the inside out. The creamy richness of the ricotta cuts through the acidity of the tomato sauce, resulting in a perfectly balanced dish that feels like a comforting embrace.
Q2: How does ricotta elevate the conventional baked ziti recipe?
A2: Ricotta adds a dreamy creaminess and subtle tang, transforming baked ziti from a simple pasta bake into a velvety masterpiece. Unlike heavier cheeses, ricotta brings a light, fluffy texture that melds effortlessly with pasta, giving each bite a smooth and luscious mouthfeel. It’s the secret ingredient that turns everyday ingredients into something indulgently special.
Q3: Can I make baked ziti with ricotta ahead of time?
A3: Absolutely! Baked ziti is a superstar when it comes to make-ahead meals. You can assemble the dish a day in advance and refrigerate it, letting the flavors deepen overnight. When you’re ready, simply pop it into the oven until the cheese is golden and bubbly. It’s a perfect solution for busy weeknights or entertaining guests without stress.
Q4: Is it possible to make this dish vegetarian or gluten-free?
A4: Definitely! To keep it vegetarian, just use a tomato sauce without meat or opt for a hearty vegetable marinara. For gluten-free, substitute traditional ziti with gluten-free pasta varieties made from rice, corn, or chickpeas-these hold up beautifully in the bake. Either way, you won’t lose the creamy, comforting essence that makes baked ziti so beloved.
Q5: What are some creative twists to personalize creamy baked ziti with ricotta?
A5: There’s plenty of room to get playful! Try adding sautéed spinach or roasted mushrooms for extra earthiness, a sprinkle of fresh herbs like basil or oregano for aromatic brightness, or a dash of red pepper flakes for a gentle kick. For meat lovers, Italian sausage or browned ground beef can deepen the flavor profile without overshadowing the creamy ricotta.
Q6: How can I ensure the baked ziti turns out perfectly creamy and not dry?
A6: The key lies in balancing moisture and cheese ratios. Be sure to cook your pasta just shy of al dente as it will continue absorbing sauce during baking. use plenty of good-quality marinara and don’t skimp on the ricotta and shredded mozzarella. Covering the dish with foil for most of the baking time helps lock in steam, and removing it toward the end encourages that irresistible golden crust.
Q7: Why has baked ziti with ricotta become a classic comfort food?
A7: This dish taps into nostalgic memories of family meals and shared gatherings-its simplicity combined with rich flavors feels timeless. It’s both humble and indulgent, filling kitchens with irresistible aromas and hearts with warmth. Creamy baked ziti with ricotta is more than just food; it’s a appetizing tradition that turns any day into a cozy party.
To Conclude
In the heart of every comforting meal lies a dish that feels like a warm embrace-and creamy baked ziti with ricotta fits that role perfectly. Its layers of tender pasta, rich tomato sauce, and luscious ricotta create a symphony of flavors that soothe the soul and satisfy the appetite. Whether it’s a weeknight dinner or a special gathering, this classic Italian-American favorite continues to bring people together, one cheesy, bubbly bite at a time. So next time you crave a meal that’s both simple and soul-stirring, remember: sometimes, all you need is a little baked ziti love to turn an ordinary day into something truly delicious.
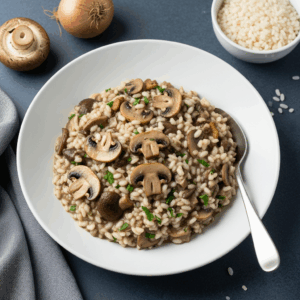
Savor the Creamy delight of mushroom risotto begins with selecting the right ingredients and mastering the technique that transforms humble rice and wild mushrooms into a luxuriously creamy, earthy dish. This recipe draws inspiration from traditional Northern Italian cooking, where risotto is not just a meal but an art form-an experience defined by patience and attention to texture. Whether you’re cozying up on a cool evening or impressing guests with complex flavors, this mushroom risotto will captivate your palate and elevate your culinary confidence.
Prep and Cook time
- Preparation: 15 minutes
- Cooking: 40 minutes
- Total Time: 55 minutes
Yield
Serves 4 generous portions
Difficulty Level
Medium – Perfect for home cooks ready to hone their technique
Ingredients
- 1 ½ cups Arborio rice (Italian short-grain rice, essential for creamy risotto)
- 4 cups low-sodium chicken or vegetable broth, kept warm
- 1 cup mixed mushrooms (cremini, shiitake, and porcini rehydrated), sliced
- 3 tbsp unsalted butter, divided
- 2 tbsp extra virgin olive oil
- 1 small onion, finely diced
- 3 garlic cloves, minced
- ½ cup dry white wine (such as Pinot Grigio or Sauvignon Blanc)
- ½ cup freshly grated Parmesan cheese
- 2 tbsp chopped fresh parsley
- 1 tsp fresh thyme leaves
- Salt and freshly ground black pepper, to taste
- Optional: 1 tbsp truffle oil for finishing
Instructions
- Prepare the mushrooms: In a large skillet, heat 1 tbsp olive oil over medium heat. Add the sliced mushrooms and sauté until golden brown and fragrant, about 7 minutes, stirring occasionally. Season lightly with salt and set aside.
- Sauté the aromatics: In a heavy-bottomed saucepan or deep skillet,melt 2 tbsp butter with 1 tbsp olive oil over medium heat. add the diced onion and cook until translucent, about 5 minutes. Stir in the minced garlic and thyme leaves,cooking until aromatic,about 1 minute.
- Toast the rice: Add the arborio rice to the pan and stir to coat the grains evenly in the butter and onion mixture. Toast the rice for 2-3 minutes until the edges turn translucent but the centre remains opaque.This step begins building the creamy texture by controlling starch release.
- deglaze with wine: Pour in the white wine, stirring constantly until nearly all the liquid has evaporated. This unlocks acidity and depth while ensuring the rice absorbs the nuanced flavors.
- Add broth gradually: Begin adding the warm broth, one ladle at a time, stirring frequently. Wait until the liquid is almost absorbed before adding the next ladle. This gentle stirring encourages the rice to release its starch, developing the signature velvety texture.
- Incorporate mushrooms: Halfway through the broth addition, fold the sautéed mushrooms gently into the risotto, allowing their earthy aroma to infuse the mixture.
- Finish cooking: Continue adding broth and stirring until the rice is tender with a slight bite to the center (al dente), about 18-20 minutes total. The risotto should be creamy and slightly flowing, not dry or clumpy.
- Final enrichment: Remove the risotto from heat. Stir in the remaining 1 tbsp butter,freshly grated Parmesan,and chopped parsley.Season generously with salt and black pepper. For an elevated finish, drizzle with truffle oil if desired.
- Rest and serve: Let the risotto rest for 1-2 minutes before plating. This helps meld the flavors and perfects the texture.
Chef’s Notes and Tips for Success
- Rice matters: Arborio rice is the classic choice for creamy risotto due to its high starch content. Carnaroli or Vialone Nano are excellent alternatives if you can find them.
- Mushroom mix: Combining wild and cultivated mushrooms adds complexity – try dried porcini rehydrated in warm broth for an intense umami punch.
- Stirring technique: Frequent gentle stirring-not vigorous agitation-helps release starch without breaking the grains, fostering that signature creaminess.
- Broth temperature: Keep broth warm to avoid interrupting the cooking process and to maintain creamy consistency.
- Make-ahead: Prepare the stock and mushrooms a day before to save time. Risotto is best served fresh but can be gently reheated with a splash of broth.
Serving Suggestions
Serve your rich mushroom risotto in wide, warmed bowls to showcase its creamy texture. Garnish with a sprinkle of fresh parsley, a dusting of Parmesan, and freshly cracked black pepper for a vibrant, inviting finish. Pair it with a glass of chilled Sauvignon Blanc or Chardonnay to complement the dish’s earthiness and delicate acidity. For a touch of indulgence, drizzle a little truffle oil or add a side of garlic-roasted asparagus or a crisp mixed green salad.

| Nutritional Info (per serving) | Calories | Protein | Carbs | Fat |
|---|---|---|---|---|
| Mushroom Risotto | 380 kcal | 12 g | 58 g | 10 g |
For more tips on selecting the freshest mushrooms and perfecting classic Italian dishes, check out our Ultimate Guide to Italian Cooking. Discover why using quality ingredients at every step truly makes all the difference.
To deepen your understanding of rice varieties and cooking methods, visit Britannica’s risotto overview, a trusted resource on the heritage and science behind this beloved dish.
Q&A
Q&A: Savor the Creamy Delight – Mastering Mushroom Risotto Magic
Q1: What makes mushroom risotto so irresistibly creamy and delicious?
A1: The magic lies in the marriage of Arborio rice’s starchy embrace and the slow, loving addition of warm broth. As the rice cooks, it releases starch, creating a luxuriously creamy texture that coats each grain. Add to that the earthy,umami-rich punch of sautéed mushrooms,and you’ve got a velvety symphony of flavors that melts in your mouth.
Q2: Why is Arborio rice the star ingredient for mushroom risotto?
A2: Arborio rice is specially prized for its high starch content, which is the key to achieving risotto’s signature creaminess. Its short, plump grains absorb liquid without losing their shape, allowing a perfect balance between a tender bite and that luscious, silky sauce that defines a flawless risotto.
Q3: can I use any type of mushrooms, or are some better than others?
A3: While button mushrooms are a good start, wild mushrooms like cremini, shiitake, or porcini elevate the dish with deeper, earthier flavors. Dried porcini, especially, add a smoky intensity when rehydrated in warm broth, infusing the risotto with an unforgettable mushroom magic.
Q4: What’s the secret to getting the perfect risotto texture?
A4: patience is your best ally. gradually ladling warm broth, stirring gently but consistently, encourages the rice to release its starch slowly – creating creamy cohesion rather than mush. Aim for rice that is tender yet slightly firm to the bite, with a rich, silky sauce binding everything together.
Q5: Why is stirring so notable during the cooking process?
A5: Stirring awakens the rice’s starch grains and helps distribute the liquid evenly. It’s a rhythmic dance that prevents the rice from sticking or clumping and ensures every spoonful is consistently creamy. Think of stirring as coaxing the risotto’s personality to shine.
Q6: Can I make mushroom risotto ahead of time?
A6: Risotto is at its peak right off the stove when creamy and luscious. It can be reheated gently with a splash of broth to refresh its texture, but quality risks drop with time. If serving ahead, keep broth and sautéed mushrooms separate and combine just before serving for best results.
Q7: How can I add a personal twist to classic mushroom risotto?
A7: experimentation unlocks endless possibilities. Try finishing with a drizzle of truffle oil for an earthy perfume, sprinkle toasted pine nuts for crunch, or fold in fresh herbs like thyme or parsley for brightness. A squeeze of lemon zest can also brighten the richness with a zesty lift.
Q8: What wine pairs beautifully with mushroom risotto?
A8: Mushroom risotto’s earthy creaminess pairs wonderfully with a glass of medium-bodied white wine like Chardonnay, which complements the rich texture. Alternatively, a light Pinot Noir’s subtle fruitiness and earth tones create a harmonious dance with the mushroom’s umami depth.
Embark on your risotto adventure armed with these tips and tricks, and soon you’ll be stirring up bowls of mushroom magic that delight every sense. Savor the creamy, dreamy delight of perfectly mastered mushroom risotto!
Closing Remarks
As the final spoonful of your mushroom risotto melts on the tongue, you’ll understand why this humble dish has enchanted kitchens and hearts alike. Mastering the art of risotto is more than just following a recipe-it’s about embracing patience, technique, and a love for transformative flavors. With each creamy bite, you savor not only the rich earthiness of mushrooms but the timeless magic of culinary craftsmanship. So, roll up your sleeves, gather your ingredients, and let your kitchen become the stage where mushroom risotto dreams come deliciously to life.
No-Bake Pumpkin Pie is the ultimate autumn indulgence that brings the rich warmth of fall spices together with a luxuriously creamy texture, all without needing to fire up your oven. This dessert captures the essence of pumpkin pie’s classic flavors with a smooth, velvety filling that sets perfectly in the fridge, making it ideal for busy days or last-minute gatherings. Inspired by the desire for simplicity without sacrificing taste, this no-bake rendition invites you to enjoy the harvest season’s best in foolproof style.

Prep and cook Time
- Planning: 15 minutes
- Chilling: 4 hours (or overnight)
- Total Time: Approximately 4 hours 15 minutes
Yield
Serves 8 generous slices
Difficulty Level
Easy – perfect for beginner bakers and those short on time
Choosing the Creamiest Ingredients for a Silky Texture
Achieving the silkiest texture in a no-bake pumpkin pie depends largely on your selection of ingredients. Use full-fat cream cheese blended until smooth for richness and stability. Incorporate heavy cream whipped to soft peaks for a light, airy quality that balances the dense pumpkin puree. For the pumpkin component, canned pumpkin puree offers consistent flavor and moisture, but for a more rustic feel, homemade purée can elevate the freshness. Sweetened condensed milk lends a natural caramelized sweetness while contributing to the creamy finish. Using spices like cinnamon, nutmeg, and clove fresh-ground or freshly measured ensures an aromatic punch that’s unmistakably autumnal.
Ingredients
- 1 ½ cups graham cracker crumbs
- 5 tbsp unsalted butter, melted
- 8 oz cream cheese, softened
- 1 cup canned pumpkin puree
- 1 can (14 oz) sweetened condensed milk
- 1 ½ tsp ground cinnamon
- ½ tsp ground ginger
- ¼ tsp ground nutmeg
- ½ tsp vanilla extract
- 1 cup heavy cream, cold
- 2 tbsp powdered sugar (optional, for whipping cream)
Step by Step Guide to Preparing Your No Bake Pumpkin Pie
- Make the crust: Combine graham cracker crumbs and melted butter in a medium bowl. Press evenly into the bottom and up the sides of a 9-inch springform or pie pan. Chill in the refrigerator to set while you prepare the filling.
- Prepare the filling: In a large bowl, beat softened cream cheese with an electric mixer until smooth and fluffy, about 2-3 minutes. Gradually add the pumpkin puree, sweetened condensed milk, vanilla extract, and spices. Beat until fully incorporated and creamy.
- Whip the cream: In a separate chilled bowl, whip the heavy cream with powdered sugar (if using) to soft peaks. This lightens the filling and adds luscious texture.
- Fold it together: Gently fold the whipped cream into the pumpkin mixture using a rubber spatula, maintaining the airy texture. Incorporate until just combined for a smooth, silky finish.
- Assemble and chill: Pour the filling evenly over the prepared crust. Smooth the top with a spatula. Cover with plastic wrap and refrigerate for at least 4 hours, preferably overnight, to allow the filling to set entirely.
- Serve and enjoy: Carefully release the pie from the springform (if used) or slice directly. Add your favorite toppings immediately before serving for best presentation and flavor.
Creative Topping Ideas to Elevate Your Fall Dessert Experience
Transform your no-bake pumpkin pie into an unforgettable centerpiece with toppings that entice both the eyes and the palate. Classic dollops of lightly sweetened whipped cream sprinkled with freshly grated nutmeg evoke cozy comforts. For a crunchy contrast, scatter toasted pecans or candied walnuts along the edges. Drizzle warm caramel sauce or maple syrup for a luscious sheen that echoes the golden colors of autumn. For a festive flair, add pomegranate seeds or dried cranberries that pop with radiant color and subtle tartness. Even a dusting of crushed ginger snaps can add a delightful spice crunch. These thoughtful accents not only elevate flavor but also create an inviting textural variety that’s ideal for fall gatherings.
Tips for Success
- Room temperature cream cheese is key to a lump-free filling. Beat it until perfectly creamy before adding other ingredients.
- Don’t skip chilling the crust; it helps maintain structure against the soft filling.
- If the filling feels too loose, add a little more cream cheese or chill longer to set firmly.
- For an extra depth, stir in a tablespoon of bourbon or vanilla bean paste.
- Prepare the pie a day ahead; chilling overnight enhances flavor melding.
Serving Suggestions
Serve chilled slices on rustic ceramic plates to highlight the golden orange filling. Accent each piece with a fresh sprig of rosemary or thyme for an aromatic touch. accompany with a side of cinnamon-spiced whipped cream or a small scoop of vanilla bean ice cream for a comforting contrast. pair this dessert with a warm cup of chai tea or freshly brewed coffee to complete the cozy autumn vibe. This no-bake pumpkin pie also makes a stunning addition to holiday spreads or potluck events, impressing guests with ease and elegance.
| Nutritional Info (per serving) | Amount |
|---|---|
| Calories | 320 kcal |
| Protein | 5 g |
| Carbohydrates | 34 g |
| Fat | 18 g |
Explore more creamy pumpkin desserts that capture fall’s flavors. For food safety and nutritional info about pumpkin, visit the USDA Food and Nutrition Service.

Q&A
Q&A: No-Bake Pumpkin Pie – Easy, Creamy Fall Dessert Delight
Q1: What makes a no-bake pumpkin pie different from the customary baked version?
A: Unlike the classic pumpkin pie that requires hours in the oven, the no-bake pumpkin pie skips the heat altogether. It’s a luscious, creamy dessert that sets in the fridge, blending rich pumpkin flavor with smooth, velvety textures - perfect for those who want all the fall flavors without turning on the oven.
Q2: How can I achieve a creamy texture without baking?
A: The magic lies in the ingredients! Cream cheese or whipped cream stabilizes the filling, while instant pudding or gelatin can definitely help it set firm yet creamy. the pumpkin puree adds natural moisture and flavor, and a touch of spices like cinnamon and nutmeg bring that iconic autumn charm. Chill it long enough, and you’ll get a luscious pie that’s slice-ready.
Q3: Do I need a special pie crust for a no-bake pumpkin pie?
A: Not at all! most no-bake pumpkin pies use a simple graham cracker crust or even crushed gingersnaps mixed with melted butter. These crusts don’t require baking and add just the right crunch and sweetness to complement the creamy filling.
Q4: How long should I refrigerate the no-bake pumpkin pie?
A: Patience pays off hear. For the perfect texture, chill your pie for at least 4 hours-though overnight is ideal. This resting time lets the flavors meld and the filling firm up to creamy perfection without the need for baking.
Q5: Can I customize the recipe to make it vegan or gluten-free?
A: Absolutely! Swap the cream cheese for a plant-based alternative, use coconut cream instead of dairy whipped cream, and ensure the crust is made from gluten-free cookies. with a few tweaks, anyone can enjoy this cozy autumn dessert.
Q6: What’s the best way to serve no-bake pumpkin pie?
A: Serve it chilled, straight from the fridge, topped with a generous dollop of whipped cream and a sprinkle of cinnamon or toasted pecans. A cup of hot apple cider or spiced tea makes the perfect pairing, enhancing the warm, comforting vibes of fall.
Q7: Is this dessert suitable for holiday gatherings?
A: Definitely! Its simplicity makes it a stress-free option for Thanksgiving or any autumn party. Plus, it offers a refreshing alternative to the traditional baked pies, impressing guests with its creamy texture and robust pumpkin spice flavor-no oven required.
To Conclude
As the crisp autumn air nudges us toward cozy comforts, this no-bake pumpkin pie emerges as the quintessential fall treat-effortless to make, yet indulgently creamy and bursting with seasonal warmth. Whether you’re a seasoned baker looking for a quick twist or a beginner craving a foolproof dessert, this pie promises to delight every palate without turning on the oven. so next time the pumpkin spice craving strikes, remember: flavorful autumn bliss is just a no-bake slice away. Embrace the ease, savor the flavor, and let this creamy fall favorite become your new seasonal staple.