In this article, we’ll delve into the rich heritage of the classic German apple cake recipe, exploring its origins, variations, and the secrets that make it a beloved staple on tables across Germany-and beyond. Whether you’re a seasoned baker or a curious foodie, prepare to uncover the magic behind this iconic slice of German culture.
Discover the classic German apple cake recipe tradition through a journey steeped in history, warm family gatherings, and soulful flavors that capture the essence of German baking. Originating in the heart of Germany’s orchard-rich regions, this cake is far more than dessert – it’s a cultural emblem reflecting the season’s bounty and centuries of celebrated craftsmanship in the kitchen.

Prep and Cook Time
- Planning: 25 minutes
- Cooking: 45 minutes
- Total Time: 1 hour 10 minutes
Yield
Serves 8-10 slices
difficulty Level
Medium – approachable for confident home bakers
key Ingredients That define Traditional Flavors and Textures
- 4 large tart apples (preferably Braeburn or granny Smith, peeled, cored, and sliced)
- 1 ½ cups all-purpose flour, sifted
- ¾ cup granulated sugar
- 1 teaspoon baking powder
- ½ teaspoon ground cinnamon
- 2 large eggs, at room temperature
- ⅔ cup unsalted butter, softened
- ¼ cup whole milk
- 1 teaspoon pure vanilla extract
- A pinch of salt
- Powdered sugar for dusting
- Optional: toasted almonds or crushed hazelnuts for topping
step-by-Step Baking Techniques for Authentic Results
- Preheat your oven to 350°F (175°C). Grease a 9-inch springform pan and dust lightly with flour to prevent sticking.
- Prepare the apples: Peel, core, and slice them evenly, about ¼-inch thick. Toss with half a teaspoon of cinnamon and a teaspoon of sugar to enhance natural sweetness.
- Make the batter: In a large bowl, cream the softened butter with the granulated sugar until fluffy-this should take about 3-4 minutes with a hand mixer on medium speed.
- Add the eggs one at a time, beating well after each addition to incorporate air and ensure a light, moist crumb.
- Combine dry ingredients: In a separate bowl, whisk together the sifted flour, baking powder, remaining cinnamon, and salt.
- Alternate adding the flour mixture and milk to the butter mixture, starting and ending with flour. Mix gently until just combined-overmixing will toughen the cake.
- Fold in the vanilla extract carefully, ensuring it’s evenly distributed.
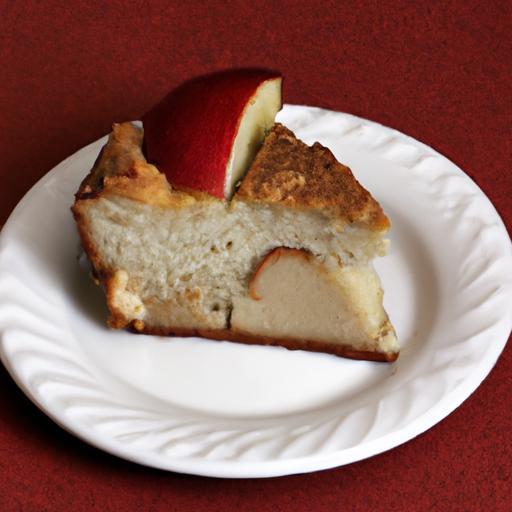
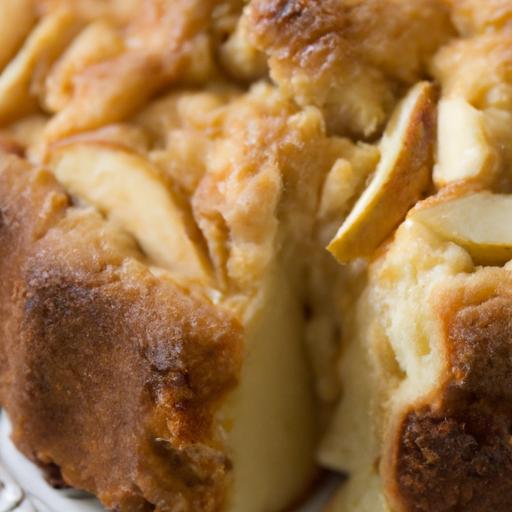
- Pour half of the batter into the prepared pan. Arrange half of the apple slices in an even layer over the batter. Repeat with the remaining batter and apples, pressing slices gently into the top.
- Optional: Sprinkle toasted nuts over the top for added texture and visual appeal.
- Bake in the center of the oven for 40-45 minutes, or until a toothpick inserted into the center comes out clean and the top is golden brown.
- Cool in the pan on a wire rack for at least 20 minutes before removing the springform ring.
- Dust generously with powdered sugar before serving for that classic, elegant finish.
Expert Tips for Perfect Presentation and Serving Suggestions
- Serve warm or at room temperature; this cake pairs beautifully with a dollop of freshly whipped cream or a scoop of vanilla ice cream to balance its tender crumb and slightly tangy apple slices.
- Garnish thoughtfully: Add a sprig of fresh mint or a light drizzle of caramel sauce for a sophisticated look and extra flavor dimension.
- Slice carefully using a serrated knife to maintain the apple layers without crushing the delicate crumb.
- For a rustic touch, serve alongside a cup of spiced tea or freshly brewed coffee, embracing the comforting traditions of German fall festivities.
Chef’s Notes: Tips for Success
- Apple variety matters: Braeburn, Granny smith, or Boskoop apples hold their shape well and provide the ideal balance of tartness and sweetness.
- Room temperature ingredients encourage even mixing and help the batter rise more consistently.
- Don’t overmix the batter; gentle folding prevents a dense texture and keeps the crumb light.
- Make ahead: this cake improves in flavor after a few hours or even overnight, making it perfect for preparing in advance of celebrations.
- storage: Keep covered at room temperature for up to 2 days or refrigerated for 4 days; warm slices briefly in the oven before serving to revive softness.
| Nutritional Info (1 slice) | Amount |
|---|---|
| Calories | 320 kcal |
| Protein | 4 g |
| carbohydrates | 45 g |
| Fat | 13 g |
For additional inspiration on German desserts, explore our complete guide to traditional German sweets. To deepen your appreciation of apple varieties and baking science, visit the Encyclopaedia Britannica’s detailed apple fruit entry.
Q&A
Q&A: Discover the Classic German Apple Cake Recipe Tradition
Q1: What makes German apple cake different from other apple cakes?
A1: German apple cake, or “Apfelkuchen,” stands out as of its rustic charm and simplicity. Unlike heavily spiced or frosted apple cakes found elsewhere, the classic German version highlights tender, tart apples layered atop a buttery, often shortcrust or sponge base. It’s less about overwhelming sweetness and more about celebrating the natural apple flavors with a subtle hint of cinnamon or vanilla.
Q2: Is there a single traditional recipe, or does it vary by region?
A2: while the core elements-apples, cake base, and occasionally a crumble topping-remain consistent, German apple cake recipes vary widely across regions. In some areas, the cake is made with yeast dough for a bread-like texture; elsewhere, a buttery shortcrust is preferred. some recipes include sour cream or quark for moisture, while others opt for a simple streusel topping. This regional diversity reflects Germany’s rich culinary heritage.
Q3: What types of apples are best for making a classic German apple cake?
A3: Tart and firm apples like Braeburn, Granny Smith, or traditional german varieties such as Boskoop are ideal. These apples hold their shape during baking and provide a pleasant balance of sweetness and tang that complements the cake’s mild flavors perfectly.
Q4: How far back does the tradition of German apple cake go?
A4: Apple cakes have been a staple in German households for centuries, dating back to when apples were a widely available fruit throughout Europe’s autumn harvest. Early recipes appeared in 19th-century cookbooks, often passed down through families, symbolizing warmth and home. The cake’s enduring popularity speaks to its comforting flavor and adaptability.
Q5: Are there any special baking techniques that contribute to the cake’s texture?
A5: absolutely! Many traditional recipes rely on gently folding whipped egg whites into the batter, resulting in a light, airy crumb. Others use a yeast dough base, which requires time for rising but yields a soft, bread-like texture. The layering of thinly sliced apples ensures even baking and a pleasant tender bite without sogginess.
Q6: Can this cake be enjoyed year-round or is it more seasonal?
A6: while German apple cake shines best in the fall during apple harvest season, it’s beloved year-round. Thanks to modern storage and availability of apples,many families enjoy it anytime,especially with a dusting of powdered sugar or a dollop of whipped cream to brighten the experience.
Q7: How has this traditional recipe influenced modern baking trends?
A7: The timeless appeal of apfelkuchen inspired contemporary bakers to experiment with healthier ingredients,gluten-free crusts,and creative toppings like nuts or caramel drizzle. Yet, the essence remains: celebrating fresh apples and simple, wholesome ingredients that pay homage to centuries-old culinary traditions.
Q8: What’s the best way to serve German apple cake?
A8: Traditionally, it’s served slightly warm with a sprinkle of powdered sugar. Many Germans enjoy it alongside a cup of coffee or tea in the afternoon-part of the cherished “Kaffeeklatsch” ritual. Some add a scoop of vanilla ice cream or a spoonful of crème fraîche for extra indulgence.
Q9: Can beginners dive into making classic German apple cake at home?
A9: Definitely! The recipe’s straightforward nature makes it accessible for bakers of all skill levels. With fresh apples,pantry basics,and a little patience,anyone can capture a slice of German culinary tradition in their own kitchen.
Q10: Where can I find authentic German apple cake recipes to try?
A10: Start with classic cookbooks dedicated to German baking or visit traditional family blogs and food websites. Many share lovingly tested recipes that honor the original methods and ingredients, frequently enough accompanied by beautiful photos and historical tidbits to enrich your baking journey.
In Summary
As the warm aroma of cinnamon and baked apples lingers in your kitchen, you’ve just stepped into a timeless tradition that has delighted German homes for generations. The classic German apple cake isn’t merely a dessert; it’s a appetizing bridge connecting past and present, a sweet story told slice by slice. Whether you savor it with a dusting of powdered sugar or a dollop of whipped cream, this cake invites you to celebrate the simple joys of seasonal harvests and heartfelt baking. So next time autumn leaves start to fall, embrace the heritage of the German apple cake and let its comforting flavors become a cherished chapter in your own culinary story.
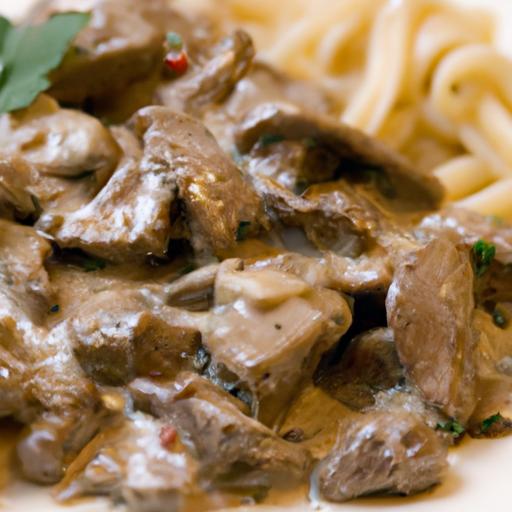
Betty Crocker’s Beef Stroganoff serves as the quintessential comfort food-its rich, velvety sauce and tender beef strips instantly conjure feelings of home, warmth, and satisfaction. Rooted in classic Russian cuisine, this beloved American adaptation transforms simple ingredients into a hearty dish that’s perfect for both weeknight dinners and special occasions. The secret to mastering this timeless recipe lies not just in technique but in understanding how each element contributes to its creamy, luscious texture and deep flavor.

Prep and Cook Time
readiness: 15 minutes
Cooking: 30 minutes
Total Time: 45 minutes
Yield
Serves 4 hearty portions
Difficulty Level
Easy to Medium – perfect for home cooks seeking classic comfort without fuss
Ingredients
- 1 lb beef sirloin or tenderloin, thinly sliced into strips
- 2 tablespoons unsalted butter
- 1 medium yellow onion, finely chopped
- 8 oz cremini mushrooms, sliced
- 2 cloves garlic, minced
- 1½ cups beef broth (preferably low sodium)
- 1 cup sour cream, full-fat for richness
- 2 teaspoons Dijon mustard
- 2 tablespoons all-purpose flour, sifted
- Salt and freshly ground black pepper, to taste
- 2 tablespoons fresh parsley, chopped (for garnish)
- Cooked egg noodles, for serving
Instructions
- Prepare the beef: Pat the beef strips dry with paper towels to ensure even browning. Season lightly with salt and pepper.
- sear the beef: in a large skillet or heavy-bottomed pan, melt 1 tablespoon of butter over medium-high heat. add beef strips in a single layer and sauté untill browned but not cooked through, about 2-3 minutes per side. Remove beef and set aside.
- Sauté aromatics and mushrooms: In the same pan, reduce heat to medium and add remaining butter. Add chopped onions and cook until translucent, about 4 minutes. Stir in sliced mushrooms and minced garlic, sautéing until mushrooms release moisture and develop a golden hue, about 5 minutes.
- Build the sauce base: Sprinkle the flour over the mushroom mixture.Stir constantly for 1-2 minutes to cook out the raw flour taste, creating a roux-like base that will thicken the sauce beautifully.
- Add beef broth: Gradually pour in the beef broth while stirring, allowing the sauce to thicken and become smooth. Simmer gently for 5 minutes to meld flavors.
- Finish the sauce: Lower heat and whisk in the sour cream and Dijon mustard. Avoid boiling after adding sour cream to prevent curdling; stir until sauce is smooth and creamy.
- Return beef to pan: Nestle the seared beef strips back into the sauce and warm through for an additional 3-4 minutes. Taste and adjust seasoning with salt and pepper.
- Serve: Spoon over warm egg noodles and garnish generously with chopped fresh parsley to add a pop of color and fresh flavor.
Tips for Success
- Choosing the right cut: Sirloin and tenderloin offer tenderness and flavor; avoid tougher cuts like chuck unless slow-cooked separately.
- Drying the beef: Ensures a proper sear, which locks in juices and develops the deeply satisfying browned crust essential for flavor.
- Sour cream caution: Stir into the sauce at the end on low heat to prevent curdling; alternatively, use crème fraîche for superior creaminess and stability.
- Make-ahead tip: Prepare the beef and mushroom mixture ahead and refrigerate. Gently reheat, stirring in fresh sour cream just before serving for freshness.
- One-pot shortcut: Brown the beef and cook vegetables in the same skillet to enhance depth of flavor and reduce cleanup, embracing Betty Crocker’s convenience ethos.
Serving Suggestions
Present Betty Crocker’s Beef Stroganoff nestled atop a bed of buttery egg noodles or creamy mashed potatoes, allowing the rich sauce to mingle with soft starches. Garnish with a sprinkle of fresh parsley or a hint of paprika for visual warmth. Pair with a crisp green salad and a glass of medium-bodied red wine like Pinot Noir to balance the richness. For a cozy twist, serve alongside roasted seasonal vegetables or crusty bread to soak up every last bite of the luscious sauce.
| Nutrient | Per Serving (Approx.) |
|---|---|
| Calories | 520 kcal |
| Protein | 38 g |
| Carbohydrates | 25 g |
| Fat | 28 g |

For further inspiration and variations on classic beef dishes, explore our Ultimate Beef Recipes Collection. For a deep dive into the history and science of sour cream in cooking, visit Serious Eats.
Q&A
Q&A: betty Crocker’s Beef Stroganoff – Classic Comfort Made Easy
Q1: What makes Betty Crocker’s Beef Stroganoff a timeless comfort food?
A1: Betty Crocker’s Beef Stroganoff captures the essence of hearty, creamy comfort food with minimal fuss. Its rich, savory sauce mingles tender strips of beef with tender egg noodles, delivering that soul-soothing flavor reminiscent of home-cooked goodness. The recipe balances simplicity with authentic taste, making it a go-to meal for cozy nights.
Q2: How does Betty Crocker simplify the customary Beef stroganoff recipe?
A2: Classic stroganoff frequently enough calls for multiple steps and ingredients, including sour cream and mushrooms. Betty Crocker streamlines the process by using a cake mix-style sauce base that blends easily with beef and onions, cutting down prep time but preserving the creamy, tangy profile that fans love. The result? A speedy, delicious dish that feels gourmet without the hassle.
Q3: Can this recipe be adapted for a quicker weeknight dinner?
A3: Absolutely! Betty Crocker’s recipe is designed for convenience. You can boost the ease factor by using pre-sliced beef or even ground beef, alongside ready-to-use egg noodles. By prepping ingredients ahead or doubling the sauce, you can whip up leftovers or even freeze portions for busy evenings.
Q4: What are some tips for enhancing the flavor of Betty Crocker’s Beef Stroganoff?
A4: To elevate the classic base, try sautéing fresh mushrooms and garlic before adding the beef for a richer depth. A splash of Worcestershire sauce or Dijon mustard can add a subtle zing that brightens the creamy sauce. Garnishing with fresh parsley or chives adds color and a fresh, herbal note to the dish.
Q5: Is Betty Crocker’s Beef Stroganoff suitable for family meals and entertaining?
A5: Definetely! Its crowd-pleasing flavors and straightforward preparation make it ideal for weeknight family dinners or casual gatherings. Pair it with a crisp green salad or steamed vegetables for a balanced meal that’s both comforting and satisfying. Plus, it’s a dish that even picky eaters tend to love!
Q6: How does this recipe honor the origins of Beef Stroganoff?
A6: While rooted in Russian tradition, Betty crocker’s version respects the core of stroganoff: tender beef in a creamy sauce served over noodles. Though it modernizes the method for today’s home cook, it preserves that nostalgic taste and texture that make Beef Stroganoff an enduring classic worldwide.
Q7: Where can I find the Betty crocker Beef Stroganoff recipe?
A7: You can discover the full recipe on the official Betty Crocker website or in their classic cookbooks. It’s a reliable recipe that brings the charm of traditional cooking into a fast-paced kitchen, perfect for those craving comfort without complication.
Betty Crocker’s Beef Stroganoff is a comforting hug on a plate – simple enough for everyday dining,yet rich enough to quell any craving for classic,creamy goodness. Whether you’re new to stroganoff or a longtime lover of this Russian-inspired delight,this recipe makes classic comfort effortlessly achievable.
To sum up
Betty Crocker’s Beef Stroganoff proves that delicious comfort food doesn’t have to be complicated. With its rich, creamy sauce and tender beef, this classic dish brings a warm, nostalgic hug to your dinner table-made effortless for today’s busy cook. Whether you’re a seasoned kitchen pro or just begining your culinary journey, this recipe invites you to savor tradition with ease. So go ahead, roll up your sleeves, and let Betty Crocker guide you to a timeless meal that’s as simple as it is satisfying. Classic comfort truly is just a bowl away.
Wholesome oatmeal cake has long been a comforting staple, melding humble ingredients into a moist, flavorful slice that warms the soul and pleases the palate. Rooted in rustic baking traditions, this cake offers a delightful twist by balancing flavor and nutrition without sacrificing taste-infused with hearty oats, natural sweeteners, and enriching spices that elevate every bite. Whether you’re seeking a nourishing breakfast treat or an indulgent yet guilt-free dessert, this recipe invites you to embrace wholesome ingredients that transform a classic into a modern favorite.

Prep and Cook Time
- Planning: 15 minutes
- Cooking: 35-40 minutes
- Cooling: 20 minutes
Yield
- 8 generous servings
Difficulty level
- Easy to Medium - perfect for home bakers of all levels
Ingredients
- 1 cup rolled oats (old-fashioned, not instant)
- 1 cup boiling water
- 1 cup whole wheat flour, sifted
- 1/2 cup all-purpose flour, sifted
- 1 teaspoon baking soda
- 1 teaspoon ground cinnamon
- 1/2 teaspoon freshly grated nutmeg
- 1/4 teaspoon salt
- 1/2 cup coconut sugar or packed light brown sugar
- 1/2 cup unsweetened applesauce (for natural moisture)
- 1/3 cup extra virgin olive oil or melted coconut oil
- 2 large eggs, at room temperature
- 1 teaspoon pure vanilla extract
- 1/2 cup chopped walnuts or pecans (optional)
- 1/3 cup raisins or chopped dried apricots (optional)
Instructions
- Soak the oats: Pour the boiling water over the rolled oats in a medium bowl. Let them soak for 15 minutes until soft and slightly gelled-this step ensures a tender crumb.
- Preheat your oven: Set to 350°F (175°C). Lightly grease and flour an 8-inch round cake pan or line it with parchment paper for easy removal.
- Mix dry ingredients: In a seperate large bowl, whisk together whole wheat flour, all-purpose flour, baking soda, cinnamon, nutmeg, and salt. This combination provides both texture and aromatic warmth.
- Combine wet ingredients: In another bowl, beat the eggs gently, then whisk in the coconut sugar, applesauce, olive oil, and vanilla extract until smooth and slightly frothy.
- Integrate oats and wet mix: Add the soaked oats (including any remaining liquid) to the wet ingredients and stir until combined.
- Combine all elements: Gradually fold the dry mixture into the wet mixture, stirring lightly just until everything is incorporated. Avoid overmixing, which can make the cake dense.
- Add nuts and dried fruit: Fold in chopped walnuts and raisins for a delightful chew and added nutrition; feel free to skip if you prefer a nut-free cake.
- Bake to perfection: Pour the batter into your prepared cake pan,smoothing the top with a spatula. Bake in the preheated oven for 35-40 minutes, or until a toothpick inserted into the center comes out clean.
- Cool properly: Let the cake cool in the pan for 10 minutes, then transfer to a wire rack to cool completely. This prevents sogginess and helps maintain moisture balance.
- Serve confidently: Slice and enjoy as is or with your favorite healthy toppings.
Tips for success
- Flour options: Substitute spelt or oat flour for whole wheat if you desire a lighter texture, but maintain the total flour ratio to preserve crumb structure.
- Sweetener swaps: Honey or maple syrup provide a lovely flavor but reduce the liquid slightly when substituting liquid sweeteners.
- Boost moisture: If you prefer extra moistness, fold in 1/4 cup of Greek yogurt or a mashed ripe banana alongside the applesauce.
- Make-ahead: Store cooled cake in an airtight container at room temperature for 2 days or refrigerate up to 5 days. It also freezes beautifully-wrap tightly and thaw overnight.
- Mix-ins & extras: Toasted coconut flakes, dark chocolate chips, or fresh shredded coconut can add texture and flavor complexity.
Serving Suggestions
To elevate this wholesome oatmeal cake into a memorable treat, try pairing slices with a dollop of Greek yogurt sweetened with a drizzle of wildflower honey and a sprinkle of toasted pecans. Fresh berries, such as blueberries or raspberries, create a vibrant, tangy contrast that beautifully balances the cake’s natural sweetness and warm spices. For a more indulgent option,spread almond butter or a light cream cheese frosting infused with citrus zest. Serve alongside a cup of robust chai tea or freshly brewed coffee to enjoy a truly comforting experience.

Nutrition at a Glance
| Per Serving (1 slice) | Calories | Protein | Carbs | Fat |
|---|---|---|---|---|
| Energy | 220 kcal | 5 g | 30 g | 9 g |
For those interested in expanding their wholesome baking repertoire, explore our Healthy Breakfast Muffins for more nutrient-packed delights. To understand the unbelievable benefits of oats and whole grains in heart health, consider reviewing the insights from the American Heart Association.
Q&A
Q&A: Wholesome Oatmeal Cake – A Classic Treat with a Healthy Twist
Q1: What makes oatmeal cake a “wholesome” dessert?
A1: oatmeal cake earns its wholesome badge by blending the nutritional goodness of oats with the comforting sweetness of a classic cake.Oats are packed with fiber, vitamins, and minerals that support digestion and heart health. When combined with natural sweeteners and wholesome ingredients like applesauce, nuts, or whole wheat flour, this cake transforms into a treat that’s both nourishing and appetizing.
Q2: How does oatmeal cake differ from other cakes?
A2: Unlike traditional cakes that rely heavily on refined flour and sugar, oatmeal cake incorporates oats for texture and nutrition, frequently enough paired with ingredients like cinnamon, nutmeg, and sometimes fruit or nuts for depth of flavor. Its crumb tends to be denser and heartier, offering a satisfying bite that feels like a cozy hug in dessert form.
Q3: Can oatmeal cake be made healthier without sacrificing taste?
A3: Absolutely! Swapping out white flour for whole wheat or oat flour increases fiber content,while replacing refined sugars with maple syrup,honey,or mashed bananas adds natural sweetness. Using yogurt or applesauce instead of oil or butter reduces fat but keeps the cake moist. These simple tweaks turn oatmeal cake into a guilt-free indulgence.
Q4: Is oatmeal cake suitable for special dietary needs?
A4: yes, oatmeal cake is versatile! With some ingredient substitutions, it can be adapted for gluten-free diets using certified gluten-free oats and gluten-free flour blends.Plant-based milk, flaxseed or chia egg replacers make it vegan-kind. Plus, tweaking sweeteners and add-ins can definitely help accommodate diabetic or low-sugar diets.
Q5: What flavors pair best with oatmeal cake?
A5: Oatmeal cake loves cozy flavors like cinnamon, nutmeg, cloves, and vanilla. Adding chopped nuts, raisins, dried cranberries, or shredded coconut can add delightful texture.For a fresh twist,swirl in applesauce or mashed bananas,or top with a light cream cheese frosting or a drizzle of honey for extra warmth.
Q6: When is the best occasion to serve oatmeal cake?
A6: Oatmeal cake is perfect for morning brunches, afternoon tea, or as a wholesome dessert after dinner. Its balanced sweetness and hearty texture make it a comforting way to celebrate casual gatherings or simply savor quiet moments with a cup of coffee or chai.
Q7: How can I store oatmeal cake to keep it fresh?
A7: Store cooled oatmeal cake in an airtight container at room temperature for up to 3 days. For longer freshness, refrigerate it for up to a week, or freeze individual slices wrapped tightly to enjoy within a month. When ready to eat, warm it slightly to revive its soft, cozy texture.
With its seamless blend of comfort and nutrition, wholesome oatmeal cake invites you to indulge without compromise-classic, cozy, and lovingly crafted for today’s mindful sweet tooth.
Future Outlook
the wholesome oatmeal cake stands as a delightful bridge between indulgence and nourishment-a classic treat reinvented with a healthy twist. Its warm, comforting flavors evoke cherished memories, while its nourishing ingredients invite you to savor each bite without guilt.Whether enjoyed with a morning cup of tea or as an afternoon pick-me-up,this cake reminds us that wholesome can also mean delicious. So next time you crave something sweet, reach for a slice of oatmeal cake-a timeless recipe that nourishes both body and soul.

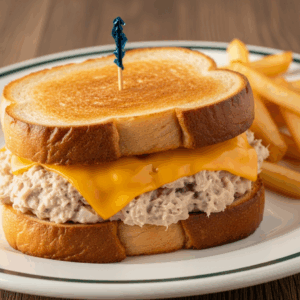
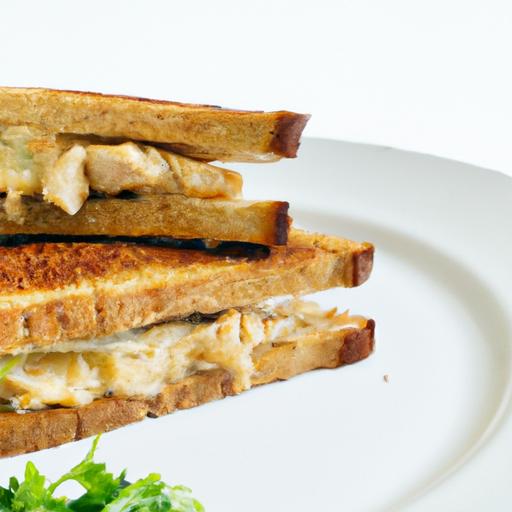
The Tuna Melt Sandwich is more than just a quick meal; it’s an artful blend of creamy, savory textures and golden, crispy layers that comfort the soul with every bite. Rooted in classic American diner culture, this beloved sandwich combines the richness of perfectly mixed tuna salad with the indulgent melt of premium cheese, all hugged by the warmth of expertly toasted bread. Every element works in harmony to create a flavor experience that feels nostalgic yet luxurious.
Prep and Cook Time
- Planning: 15 minutes
- Cooking: 10 minutes
- Total Time: 25 minutes
Yield
- Serves 2 generously or 4 smaller portions
Difficulty Level
- Easy to Medium – perfect for home cooks eager to craft a gourmet twist on a classic
Ingredients
- 1 can (5 oz) solid white tuna, drained and flaked
- 1/4 cup celery, finely diced for crunch
- 2 tbsp red onion, finely chopped
- 3 tbsp mayonnaise, preferably a high-quality or homemade version
- 1 tsp Dijon mustard for a subtle kick
- Salt and freshly ground black pepper, to taste
- 4 slices of thick-cut sourdough bread for the perfect chewy base
- 4 slices sharp cheddar cheese or a smoky Gruyère for deep flavor
- 2 tbsp unsalted butter, softened for toasting
- Optional: pickle slices or tomato slices, for added brightness
Instructions
- Prepare the tuna filling: In a medium bowl, combine the flaked tuna, diced celery, red onion, mayonnaise, and Dijon mustard. Season generously with salt and black pepper, then stir gently until all ingredients are evenly incorporated. Set aside for the flavors to meld.
- Assemble the sandwich: Butter one side of each slice of bread thinly but completely. Place two slices butter-side-down on a clean surface.
- Layer the filling: Evenly spoon the tuna mixture onto the unbuttered side of each slice. Top with two slices of cheese per sandwich, ensuring generous coverage edge to edge. optionally, add tomato or pickle slices atop the filling for contrast.
- Close and toast: Place the remaining bread slices butter-side-up over the fillings, forming sandwiches.
- Toast and melt: Heat a large skillet or griddle over medium heat. Carefully place sandwiches in the pan. Press down gently with a spatula and cook for 3-4 minutes, until the bottom is golden and crunchy. Flip carefully, then cook another 3-4 minutes until the second side is golden and the cheese is fully melted and gooey.
- Rest and slice: Remove sandwiches from heat and let rest for 2 minutes to set the filling and avoid runaway cheese. Slice diagonally for maximum appeal and easy handling.
Tips for toasting and Melting to Achieve a Golden Crunch
The secret to the perfect tuna melt filling starts with the toast. Butter your bread thinly yet consistently – too little means dry bread, too much can lead to sogginess. Medium heat is critical; too hot and you risk burning, too cool and the cheese won’t melt properly. Use a heavy pan or even a sandwich press for even heat distribution. If your cheese isn’t melting quickly enough, cover the pan briefly with a lid to trap heat and steam the cheese gently.
Chef’s Notes
- Cheese variations: Besides cheddar and Gruyère, try provolone, Swiss, or mozzarella for different flavor profiles.
- Make-ahead tip: Prepare the tuna filling up to 24 hours in advance; keep chilled tightly covered to preserve freshness.
- Bread alternatives: Rye or a hearty multigrain loaf works beautifully, each lending unique textures and taste.
- Avoid sogginess: Drain tuna well and avoid overdressing the salad. Toast bread just before serving.
Serving Suggestions and Complementary Sides to Elevate Your tuna Melt Experience
Present your Tuna Melt Sandwich on a rustic wooden board or a brightly colored ceramic plate to highlight the sandwich’s golden hues. A crisp, peppery salad with arugula and lemon vinaigrette brightens the rich sandwich beautifully. Classic pickles or tangy coleslaw add textural contrast and palate-cleansing acidity.
For a cozy twist, serve alongside a bowl of tomato bisque or creamy potato chips for that diner-style charm. Garnish with a sprig of fresh thyme or parsley for a pop of natural color and fragrance.

| Nutrient | Amount Per Serving |
|---|---|
| Calories | 420 kcal |
| Protein | 28 g |
| Carbohydrates | 30 g |
| Fat | 22 g |
For more inspiring sandwich recipes, check out our Ultimate Grilled Cheese guide. To understand the health benefits of tuna, visit the FDA’s mercury and fish safety page.
Q&A
Q&A: Tuna Melt Sandwich – A Classic Blend of Flavors and Comfort
Q1: What makes the tuna melt sandwich a timeless classic?
A1: The tuna melt sandwich marries the hearty savor of tuna salad with the luxurious melt of gooey cheese, all nestled between toasted bread. This combination balances textures and flavors-a creamy, tangy tuna filling contrasted by warm, melted cheese and a crispy bread exterior. It’s comfort food at its finest, evoking nostalgia while satisfying modern cravings.
Q2: How did the tuna melt originate?
A2: While the exact origin is a bit murky, the tuna melt rose to popularity in mid-20th century America, coinciding with the widespread availability of canned tuna and processed cheeses. It became a diner staple and home kitchen favorite thanks to its simplicity and satisfying taste-a quick yet indulgent meal that matched the era’s fast-paced lifestyle.
Q3: What are the essential ingredients in a classic tuna melt?
A3: At its core, a classic tuna melt features canned tuna mixed with mayonnaise, finely chopped celery or onion for crunch, a hint of mustard or lemon juice for brightness, slices of melting cheese like cheddar or Swiss, and sturdy bread such as rye or sourdough. Butter or mayo is frequently enough spread on the bread to achieve that golden, crispy finish during grilling.
Q4: Can the tuna melt be customized for different tastes or dietary needs?
A4: Absolutely! The tuna melt is incredibly adaptable. For a healthier twist, you can swap mayo for Greek yogurt or avocado. cheese varieties can range from sharp cheddar to creamy mozzarella or pepper jack for a spicy kick. Gluten-free bread or lettuce wraps can accommodate gluten sensitivities. Adding extras like tomato slices, pickles, or fresh herbs allows further personalization.
Q5: what is the best method to prepare a tuna melt sandwich?
A5: the magic is in the melt. After assembling the sandwich, it’s pan-grilled or broiled until the cheese is perfectly melted and the bread crisps to a golden brown. Low and slow heating ensures the tuna mixture stays moist while the cheese melts smoothly, creating that irresistible gooey texture that defines a perfect tuna melt.
Q6: Why does the tuna melt hold a special place in comfort food culture?
A6: The tuna melt hits several comfort-food notes: it’s warm, cheesy, savory, and easy to prepare. It combines familiar, simple ingredients into a fulfilling, nostalgic dish that reminds many of home-cooked meals and casual diner experiences. It’s a little indulgence that brings a sense of soothing satisfaction to the soul.
Q7: Any tips for elevating the classic tuna melt?
A7: Elevate your tuna melt by using premium ingredients-freshly toasted artisan bread, high-quality cheese, and tuna packed in oil rather than water for richer flavor. Experiment with spice blends like smoked paprika or a dash of hot sauce in the tuna mix. Serve it alongside a crisp pickle or a fresh salad to balance the sandwich’s richness.
Q8: Where can I enjoy the best tuna melts today?
A8: From classic American diners to trendy cafés, the tuna melt remains a menu favorite. Look for spots that emphasize house-made tuna salad and artisanal breads. Of course, nothing beats crafting your own at home, where you can tailor every bite exactly to your liking!
The Conclusion
In the world of comfort foods, the tuna melt sandwich stands out as a timeless favorite-a harmonious marriage of flaky tuna, melted cheese, and perfectly toasted bread. Its simple ingredients belie the depth of flavor and satisfying texture that have made it a beloved staple in kitchens and diners alike. Whether enjoyed as a quick lunch or a cozy dinner, the tuna melt continues to charm with its classic appeal and versatile nature. So next time you crave a warm, savory treat that feels like a gentle hug on a plate, remember that the humble tuna melt is always ready to deliver comfort in every bite.
Campbell’s Classic Grilled Cheese & Tomato Soup: Comfort Perfected captures a timeless duo that’s woven into the fabric of cozy afternoons and nostalgic family moments. This iconic pairing elevates simple, wholesome ingredients into a harmonious blend of creamy melted cheese and rich, tangy tomato soup – a ritual that warms the soul and ignites joy with every bite. Whether it’s an impromptu lunch or a comforting dinner, this dish offers both ease and indulgence, making it a staple for every home cook.

Prep and Cook Time
Prep Time: 10 minutes
Cook Time: 15 minutes
total Time: 25 minutes
Yield
Serves 4 hearty portions
Difficulty Level
Easy – perfect for cooks of all skill levels looking to recreate a classic!
Ingredients
- 8 slices sourdough bread, crusts on or off per preference
- 6 tablespoons unsalted butter, softened
- 8 slices sharp cheddar cheese
- 1 (condensed) can Campbell’s Classic Tomato Soup
- 1 ½ cups whole milk (for soup planning)
- Fresh cracked black pepper, to taste
- Fresh basil leaves for garnish (optional)
- Cherry tomatoes, halved, for garnish (optional)
Instructions
- Prepare the soup: Pour Campbell’s Classic Tomato Soup into a medium saucepan. Stir in 1 ½ cups of whole milk to bring it to the perfect creamy consistency. Heat gently over medium heat until warm and slightly bubbling, stirring occasionally. Add a pinch of fresh cracked black pepper to enhance the flavor.
- Butter the bread: Spread a generous layer of softened butter evenly on one side of each bread slice. This will create that irresistibly golden crust and prevent sticking.
- Assemble the sandwiches: Place 2 slices of cheddar cheese between two slices of bread, buttered sides facing out – this ensures even toasting and gooey cheese melt.
- Cook the grilled cheese: heat a large non-stick skillet over medium heat. Place one sandwich in the pan, cooking for 3-4 minutes on each side or until both sides are golden brown and the cheese has melted completely. Press lightly with a spatula to promote even browning. Repeat for remaining sandwiches.
- Serve immediately: Ladle the rich tomato soup into bowls. Cut sandwiches in halves or triangles and place alongside. Garnish soup with fresh basil leaves and halved cherry tomatoes for a pop of color and fresh flavor.
- Optional extra touch: For a smoky twist, sprinkle a pinch of smoked paprika into the soup while heating or add crispy bacon strips inside your grilled cheese for added texture and flavor.
Tips for Success
- Cheese Choice: Sharp cheddar is classic for its robust flavor, but feel free to blend with mozzarella or gouda for a creamier melt.
- Butter Alternatives: mayonnaise spread on bread results in a perfectly crispy crust for an easy variation.
- Prevent Soggy Bread: Ensure the soup is served on the side – dipping is delightful, but soaking the bread too long can cause sogginess.
- Make-Ahead: Assemble sandwiches and keep them wrapped in parchment paper in the fridge for up to 4 hours before cooking.
- Soup Enhancements: Swirl a dollop of cream or pesto into the tomato soup to customize for special occasions.
Serving Suggestions
Serve your Campbell’s Classic Grilled Cheese & Tomato Soup: Comfort Perfected with a vibrant green salad of arugula or baby spinach dressed with a light vinaigrette to balance the richness. Add a side of crunchy dill pickles or kettle-cooked potato chips for textural contrast. For an inviting presentation, place the grilled cheese on a rustic wooden board with the tomato soup in a bright ceramic bowl. Garnishing the soup with fresh basil leaves, halved cherry tomatoes, or a drizzle of extra virgin olive oil elevates the visual appeal and flavor complexity.

| Nutrient | Per Serving |
|---|---|
| Calories | 420 kcal |
| Protein | 18 g |
| Carbohydrates | 38 g |
| Fat | 20 g |
For those eager to explore more warm and inviting comfort foods, be sure to check out our homemade mac and cheese recipe, a perfect companion recipe that also celebrates cheesy goodness. Additionally, learn more about tomato nutrition and heart-healthy benefits from the American Heart Association.
Q&A
Q&A: Campbell’s Classic Grilled Cheese & Tomato Soup – Comfort Perfected
Q1: What makes Campbell’s Classic Grilled Cheese & Tomato Soup a timeless comfort combo?
A1: It’s the ultimate culinary hug-Campbell’s rich, velvety tomato soup pairs flawlessly with the golden, crispy embrace of a perfectly grilled cheese. Together, they create a nostalgic duo that warms both heart and soul, evoking memories of cozy afternoons and simple joys.
Q2: How does Campbell’s tomato soup stand out from other brands?
A2: Campbell’s tomato soup boasts a rich, full-bodied flavor crafted from vine-ripened tomatoes and a carefully balanced blend of herbs and spices. Its silky texture and natural sweetness make each spoonful both comforting and indulgent, unlike any ordinary canned soup.
Q3: Is there a secret to crafting the perfect grilled cheese to accompany Campbell’s soup?
A3: Absolutely! Start with quality bread-think buttery brioche or rustic sourdough-and a generous layer of melty cheese like sharp cheddar or creamy American. Grill slowly on medium heat to achieve that crispy, golden crust while ensuring gooey, luscious cheese inside. The key is patience; rush, and you lose the magic.
Q4: Can Campbell’s Classic Grilled cheese & Tomato Soup be customized for modern tastes?
A4: Definitely. Add a dash of smoked paprika or a swirl of cream to the tomato soup for extra depth. Toss in some fresh basil or a sprinkle of parmesan on top. For the grilled cheese, try mixing cheeses or adding extras like caramelized onions, bacon, or sliced tomatoes to elevate this classic duo to a gourmet level.
Q5: Why is this combo considered the epitome of comfort food?
A5: Because it’s more than just nourishment-it’s a sensory experience. The warmth of the soup, the crunch of bread, and the melt of cheese create harmony that soothes stress and sparks memories. Campbell’s Classic Grilled Cheese & Tomato Soup taps into global feelings of home, care, and pure satisfaction, turning any meal into an act of self-love.
Q6: How convenient is Campbell’s tomato soup for busy lifestyles?
A6: It’s incredibly convenient! Ready in minutes, Campbell’s tomato soup offers a wholesome, flavorful meal option for those hectic days when you crave comfort without the fuss. Pair it with a quick grilled cheese, and you have a hearty, satisfying meal that never compromises on flavor or warmth.
Q7: What occasions are perfect for enjoying Campbell’s Classic Grilled Cheese & Tomato Soup?
A7: This duo shines any time comfort is called for-rainy days, chilly evenings, or a casual lunch break. It’s also a crowd-pleaser at family gatherings, game nights, or when you simply want to indulge in something familiar and fulfilling.
experience Campbell’s Classic Grilled Cheese & Tomato Soup-a delicious little ritual that transforms everyday moments into comforting memories. Because sometimes, comfort perfected is just a spoonful and a bite away.
Concluding Remarks
Campbell’s Classic Grilled Cheese & Tomato Soup isn’t just a meal-it’s a warm embrace in a bowl and between two golden slices of bread. This timeless duo captures the essence of comfort food, effortlessly blending creamy, tangy tomato soup with melty, buttery grilled cheese to create a harmonious taste experience. Whether you’re seeking a quick lunch, a nostalgic treat, or a cozy companion on a chilly day, Campbell’s has perfected the art of simple indulgence. So next time hunger calls for something familiar and fulfilling, remember that comfort is just a spoon and a sandwich away.


Honey-Stung Pizza: A Sweet Twist on a Classic Slice
Honey-stung pizza is not just another slice-it’s a dazzling journey into the world where sweet and savory flavors unite in perfect harmony. Drawing inspiration from Mediterranean street food and artisanal pizzerias, this recipe celebrates the luscious, floral notes of honey balanced by smoky cheeses and vibrant toppings. I remember the first time I drizzled a drizzle of buckwheat honey over a hot, fresh slice; the warm sweetness melted into the crisp crust, creating an unforgettable contrast that transformed a classic dish into a masterpiece.
Prep and Cook Time
- preparation: 15 minutes
- Cooking: 12-15 minutes
- Total: 27-30 minutes
Yield
Serves 4 hungry pizza lovers
Difficulty Level
Medium - Perfect for home cooks looking to elevate their pizza game with a sweet-savory twist
Ingredients
- 1 ball (12 oz) of pizza dough, at room temperature
- ½ cup crumbled gorgonzola cheese (or blue cheese)
- ½ cup shredded mozzarella cheese
- 1 small red onion, thinly sliced and caramelized
- 3 tbsp toasted walnuts, roughly chopped
- 2 tbsp fresh thyme leaves
- 4 tbsp artisanal honey (choose from varietals below)
- 1 tbsp extra virgin olive oil
- fresh arugula, for garnish
- flaky sea salt, to taste
Instructions
- Preheat your oven to 475°F (245°C) with a pizza stone inside, if available, to achieve that perfect crispy base.
- Roll out the pizza dough on a well-floured surface into a 12-inch circle. Transfer onto a pizza peel dusted with cornmeal to prevent sticking.
- Brush the dough lightly with olive oil, ensuring an even coat to create a golden crust.
- Sprinkle mozzarella cheese evenly over the base, then crumble gorgonzola in clusters for that punch of savory bite.
- Scatter caramelized red onions and toasted walnuts over the cheese to bring depth and crunch.
- Slide the pizza onto the hot stone or baking sheet, baking for 12-15 minutes, or until the crust is golden and cheese bubbly and slightly browned.
- Remove the pizza from the oven and immediately drizzle the honey generously over the hot pizza using a spoon or honey dipper-honey melts best when the surface is warm but not scorching.
- Top with fresh arugula and a sprinkle of flaky sea salt for a refreshing peppery contrast.
- Slice and serve promptly to enjoy the interplay of melty cheese, crunchy nuts, sweet honey, and peppery greens.
Choosing the Perfect Honey Varieties to Elevate Your Slice
Not all honeys are created equal when it comes to honey-stung pizza. Buckwheat honey offers a robust, molasses-like sweetness-bold enough to stand up to pungent blue cheese. Lighter honeys like orange blossom or wildflower add delicate floral notes that perk up milder toppings. For an adventurous twist, try manuka honey, known for its earthy depth, perfect with smoky bacon or roasted figs.
Creative Toppings That Complement Honey’s Natural Sweetness
Enhancing honey-stung pizza is all about amplifying contrasts. Consider toppings like prosciutto slices, which provide salty richness that pairs beautifully with honey’s sweetness. Thinly sliced pear or fig offers juicy bursts of fresh fruitiness. Crunchy elements such as toasted pistachios or pine nuts elevate texture and provide subtle nuttiness. Don’t shy away from fresh herbs like rosemary or basil, which add aromatic dimension that balances sugar without overpowering.
Tips for Drizzling Honey Like a Pro Without Overpowering Your Pizza
Applying honey with finesse is the final art in creating honey-stung pizza perfection. Use a warm honey dipper or spoon to drizzle thin streams slowly and evenly-avoid dumping honey all in one spot to prevent sogginess. Drizzle after baking, while the pizza is hot enough to melt but not so hot honey pools and disappears. For added flair, try swirling honey in concentric circles or zig-zags to create a visually appealing, gourmet finish.
Chef’s Notes
- For a gluten-free option, substitute regular dough with your favorite gluten-free pizza crust.
- make caramelized onions ahead and refrigerate for up to 3 days-perfect for quick weeknight pizzas.
- If you prefer a vegan version, swap cheeses for cashew-based vegan cheeses and use a floral honey alternative such as agave nectar.
- Refresh leftover pizza by reheating in a skillet to keep crust crisp; drizzle fresh honey after warming.
Serving Suggestions
Present your honey-stung pizza on a wooden paddle for rustic charm. Garnish with microgreens or edible flowers to heighten visual appeal and freshness. Serve alongside a light arugula salad tossed with lemon vinaigrette to balance richness. pair with a crisp white wine like Sauvignon Blanc or a floral craft beer to complement the honey’s nuances.
| Nutrient | Per Serving |
|---|---|
| Calories | 350 kcal |
| Protein | 14 g |
| Carbohydrates | 38 g |
| Fat | 15 g |

Explore more unique pizza recipes in our Creative Pizza Toppings Guide to continue your culinary journey.
Q&A
Q&A: Honey-Stung Pizza – A Sweet Twist on a Classic Slice
Q1: What exactly is honey-stung pizza?
A1: Imagine your favorite classic pizza kissed by a drizzle of golden honey. Honey-stung pizza combines the savory, cheesy goodness of traditional slices with a subtle, sweet embrace from honey. This delightful fusion elevates flavors, creating a harmonious balance between salty and sweet that surprises and delights the palate.
Q2: How did the idea of adding honey to pizza come about?
A2: The marriage of honey and pizza is inspired by centuries-old culinary traditions that celebrate the contrast of sweet and savory. food innovators sought to reinvent pizza by incorporating honey’s natural sweetness, influenced by recipes like honey-glazed meats and sweet cheese pairings, ultimately crafting a new experience without losing the soul of the classic slice.
Q3: What types of honey pair best with pizza?
A3: Not all honeys are created equal when it comes to pizza. Mild, floral varieties like acacia or orange blossom honey gently complement the cheese and tomato without overpowering them. For a bolder statement, rich and robust honeys such as buckwheat or chestnut add depth and a complex, earthy sweetness, perfect for pizzas topped with spicy meats or sharp cheeses.
Q4: Which pizza toppings work best with honey?
A4: Honey’s sweetness plays beautifully with a range of toppings. Think spicy pepperoni, smoky bacon, or tangy goat cheese-all are elevated by a honey drizzle. Even vegetable lovers can rejoice with caramelized onions, roasted peppers, or fresh arugula enhanced by a touch of honey’s warm glow.
Q5: How should honey be applied to the pizza?
A5: Timing is key! Most chefs recommend drizzling honey just before serving or right after baking, so the honey stays fresh and vibrant rather than baking away its delicate aroma. A light, artful drizzle is enough to awaken the flavors without making the slice sticky.
Q6: Can honey-stung pizza be made at home?
A6: Absolutely! Start with your favorite pizza recipe, bake until perfectly golden, then add a finishing drizzle of high-quality honey. For an extra flair, try infusing the honey with herbs or spices like thyme or chili flakes before drizzling. It’s a simple step that transforms an everyday meal into a gourmet treat.
Q7: Does honey-stung pizza have any nutritional perks?
A7: While pizza remains an indulgence, honey adds a natural sweetness without refined sugars and offers trace antioxidants and minerals. Using honey can reduce the need for extra sugary sauces or artificial sweeteners, making the slice a tad healthier and undeniably tastier.
Q8: Where can I try honey-stung pizza if I’m not making it myself?
A8: Many artisanal pizzerias and trendy eateries are experimenting with honey-drizzled pizzas as part of their seasonal menus. Look for wood-fired pizza places or local gourmet spots that cherish creative flavor combos. You might even find honey-stung pizza featured at food festivals celebrating innovative street food.
Q9: What makes honey-stung pizza stand out in the crowded pizza landscape?
A9: It’s the unexpected harmony of flavors-an artful dance between the familiar and the novel. Honey-stung pizza respects tradition while boldly introducing sweetness that teases the taste buds. It invites both adventurous eaters and purists to rediscover pizza’s unbelievable versatility.
Q10: Any tips for first-timers eager to explore honey on pizza?
A10: Start small-a light drizzle over a simple Margherita or pepperoni slice. Let your taste buds adjust and note what combinations you love. Experiment with different honeys and toppings to find your personal sweet-savory equilibrium. Most importantly, enjoy the playful twist and the new story each slice tells!
To Wrap It Up
As the final drizzle of honey cascades over the golden crust, Honey-Stung Pizza transforms from a familiar favorite into an unexpected harmony of sweet and savory. This inventive twist invites pizza enthusiasts to rethink their slice, proving that a touch of sweetness can unlock new depths of flavor in even the most time-honored recipes. Whether you’re chasing culinary adventure or simply curious, the honey-stung slice offers a delightful journey where tradition meets innovation-one bite at a time. So next time hunger strikes, consider adding a little buzz to your pie and savor the sweet surprise that awaits.


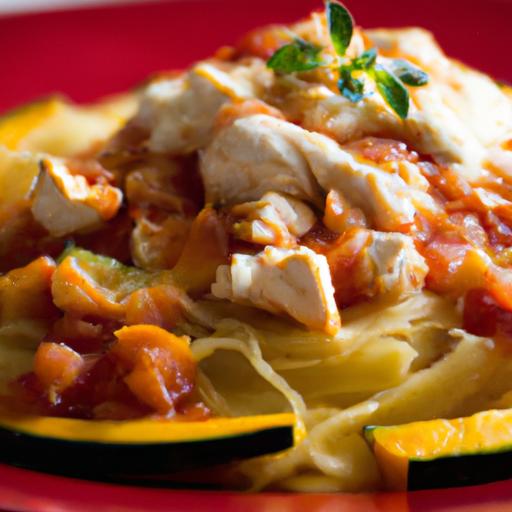
Twist on Classic Pasta: Spaghetti Squash with Chicken & Marinara
Discover a deliciously light and wholesome take on your favorite comfort food with this Twist on Classic Pasta: Spaghetti Squash with Chicken & marinara. This recipe reimagines the traditional pasta dish by substituting spaghetti squash for noodles, perfectly paired with tender chicken and a rich homemade marinara sauce. The result is a vibrant plate bursting with fresh flavors, ideal for those seeking a nutritious yet satisfying meal without compromising on taste.
Prep and Cook time
- Preparation: 20 minutes
- Cooking: 45 minutes
- Total Time: 1 hour 5 minutes
Yield
Serves 4 hearty portions
Difficulty Level
Medium – Perfect for home cooks ready to elevate their culinary skills while embracing wholesome ingredients
Ingredients
- 1 medium spaghetti squash (about 3-4 pounds)
- 1 lb boneless, skinless chicken thighs, trimmed and cut into bite-sized pieces
- 2 tbsp olive oil, divided
- 1 medium onion, finely chopped
- 4 cloves garlic, minced
- 1 (28 oz) can crushed tomatoes
- 1 tbsp tomato paste
- 1 tsp dried oregano
- 1 tsp dried basil
- ½ tsp red pepper flakes (optional, for subtle heat)
- Salt and freshly ground black pepper, to taste
- Fresh basil leaves, for garnish
- Grated Parmesan cheese, for serving
Instructions
- Preheat your oven to 400°F (200°C). Using a sharp knife, carefully cut the spaghetti squash in half lengthwise. Scoop out the seeds and stringy bits with a spoon.
- Drizzle 1 tablespoon olive oil over the cut sides of the squash and season with salt and pepper. Place cut side down on a parchment-lined baking sheet. Roast for 35-40 minutes, or until the flesh easily shreds with a fork.
- while the squash roasts, heat the remaining 1 tablespoon olive oil in a large skillet over medium heat. Add the chopped onion and sauté until softened and translucent, about 5 minutes.
- Add the minced garlic and cook for another minute until fragrant, being careful not to burn it.
- Increase heat to medium-high. Add the chicken pieces and cook, stirring occasionally, until golden brown and cooked through, about 8-10 minutes. Season with salt and pepper as you cook.
- Stir in the tomato paste, dried oregano, basil, and red pepper flakes. Cook for 2 minutes to deepen the flavors.
- Pour in the crushed tomatoes, reduce heat to low, and let the sauce simmer gently while the squash finishes roasting, about 15 minutes. Stir occasionally; season with additional salt and pepper as needed.
- Once the spaghetti squash is cool enough to handle, use a fork to scrape the flesh into long, thin strands, resembling spaghetti. Transfer to serving plates.
- Top the roasted spaghetti squash with the chicken and marinara sauce. Garnish generously with fresh basil leaves and a sprinkle of Parmesan cheese.
Chef’s Notes: Tips for Success
- Choosing chicken cuts: Thighs provide a juicier, more flavorful base than breast meat. For a leaner option, substitute with chicken breasts, but be mindful of shorter cooking times to avoid drying.
- roasting spaghetti squash: For a smoky depth, try roasting with garlic cloves and fresh herbs on the pan. Always test doneness by piercing the flesh with a fork; it should separate effortlessly.
- Make-ahead marinara: This sauce keeps beautifully in the fridge for up to 4 days or freezes well for up to 3 months, making meal prep a breeze.
- Adding extra veggies: Feel free to toss in sautéed mushrooms, bell peppers, or zucchini into the marinara for a vibrant veggie boost.
- For extra richness: Stir a splash of red wine into the sauce during simmering, allowing the alcohol to cook off but infusing complex flavors.
Serving Suggestions
Serve this dish alongside a crisp arugula salad dressed with lemon and shaved Parmesan for a fresh contrast. A side of garlic bread complements the tomato-rich flavors perfectly. For an elegant touch, drizzle a good-quality extra virgin olive oil and sprinkle freshly cracked black pepper right before serving. To satisfy cheese lovers, offer bowls of freshly shredded mozzarella or Pecorino Romano.

| Nutrient | Per Serving |
|---|---|
| Calories | 420 |
| Protein | 38g |
| Carbohydrates | 18g |
| Fat | 15g |
For more wholesome pasta alternatives and healthy recipes, visit our healthy Pasta Alternatives page.
Learn more about the nutritional benefits of spaghetti squash from Medical News today.
Q&A
Q&A: Twist on Classic Pasta – Spaghetti Squash with Chicken & Marinara
Q1: What inspired the idea of using spaghetti squash instead of traditional pasta?
A1: The inspiration came from a desire to blend comfort food with a lighter, nutrient-packed alternative. spaghetti squash naturally separates into pasta-like strands when cooked, offering a fun twist that’s perfect for anyone looking to enjoy the texture and feel of spaghetti without the carbs-and with a boost of vitamins and fiber!
Q2: How does the flavor of spaghetti squash complement the chicken and marinara sauce?
A2: Spaghetti squash has a subtle, slightly sweet flavor that acts like a blank canvas. It soaks up the rich, tangy marinara beautifully, while its mild sweetness balances the hearty, savory notes of seasoned chicken. The combination creates a harmonious medley where no ingredient overshadows the others.
Q3: Can this dish satisfy pasta lovers who might be skeptical of vegetable noodles?
A3: Absolutely! The key is in the preparation. Roasting the spaghetti squash enhances its natural sweetness and gives it a tender, yet slightly crisp bite that mimics al dente pasta. Pairing it with a robust marinara and well-seasoned chicken adds the depth and heartiness that pasta fans crave. It’s comfort food with a fresh, healthful twist.
Q4: is this recipe suitable for people following specific dietary plans?
A4: Yes! This dish is naturally gluten-free, low-carb, and packed with protein and fiber. It fits perfectly into paleo, keto, and whole30 lifestyles when you ensure your marinara sauce is free from added sugars and preservatives. Plus, it’s easily adaptable for dairy-free diets if you skip the cheese or use plant-based alternatives.
Q5: What’s the secret to making the chicken tender and flavorful?
A5: Marinating the chicken beforehand with a blend of garlic, herbs, and a touch of olive oil infuses it with bold flavors. Then, cooking it gently either by sautéing or baking ensures it stays juicy and tender. When combined later with the marinara sauce, the chicken absorbs additional moisture and spices, elevating the entire dish.
Q6: How can one elevate the presentation of spaghetti squash with chicken and marinara for a dinner party?
A6: Presentation is all about layering. Nestle fluffy strands of roasted spaghetti squash onto a plate, spoon the vibrant marinara and tender chicken on top, then garnish with fresh basil leaves and a sprinkle of parmesan or nutritional yeast. Add a drizzle of high-quality olive oil and a crack of black pepper for that restaurant-quality finish that dazzles the eye and palate alike.
Q7: Any tips for cooking spaghetti squash perfectly every time?
A7: Choose a medium-sized squash for even cooking. Slice it carefully, scoop out the seeds, and roast cut-side down on a baking sheet at 400°F (200°C) for about 35-40 minutes. The flesh should be tender enough to shred with a fork easily but not mushy. Don’t overcook, or you lose that delightful spaghetti texture!
Future Outlook
Bringing a fresh twist to a beloved classic, spaghetti squash with chicken and marinara proves that comfort food can be both nourishing and inventive. This dish not only lightens up the traditional pasta experience but also invites your palate to explore new textures and flavors. Whether you’re seeking a healthier alternative or simply craving something different, this recipe highlights how a simple swap can transform a familiar favorite into a vibrant, wholesome meal. So next time you’re in the mood for pasta night, let the spaghetti squash take center stage and enjoy a delightful fusion of tradition and wellness on your plate.

Savory classic Patty Melt: A Timeless Comfort delight
the Savory Classic Patty Melt is a culinary icon that beautifully bridges the worlds of burger and grilled cheese, delivering a nostalgic yet richly satisfying experience. Originating in mid-20th century America, this sandwich has evolved into a beloved comfort food staple, prized for its harmonious layers of succulent beef, melted cheese, and perfectly toasted bread. Whether you’re craving a hearty lunch or a soul-soothing dinner, mastering this timeless delight promises an unforgettable flavor journey.
Prep and Cook time
- Readiness: 15 minutes
- Cooking: 15 minutes
- Total Time: 30 minutes
Yield
Serves 2 generous portions
Difficulty Level
Medium – Perfect for home cooks ready to elevate their sandwich game
The Origins and Evolution of the Classic Patty Melt
The Savory Classic Patty Melt traces its roots back to traditional American diners in the 1940s and 50s, where inventive chefs combined the hearty beef patty with the ooey-gooey appeal of melted cheese, all sandwiched between buttery, griddled rye bread. It was a creative twist on the cheeseburger, adding texture and smoky complexity through caramelized onions and toasted bread. Over the decades, this sandwich has seen numerous iterations-from adding Swiss cheese and sautéed mushrooms to experimenting with different breads-yet the essence remains untouched: simplicity packed with rich, savory comfort.
Choosing the Perfect Bread and Cheese for Ultimate Flavor
To create the Savory Classic Patty Melt with maximum impact, selecting the right bread and cheese is essential. Traditional rye bread, with its subtle tang and firm texture, provides an ideal counterpoint to the juicy beef and melted cheese layers. The bread’s slight heft also holds up beautifully during grilling, creating a crisp, golden exterior. When it comes to cheese, Swiss reigns supreme for its nutty, mellow flavor and excellent melting qualities, weaving smoothly into every bite. Alternatively, a sharp cheddar or white American cheese can be used to inject a different flavor profile or creaminess, but Swiss remains the benchmark for authenticity and balance.
Mastering the Juicy Patty: Tips for Seasoning and Cooking
At the heart of the Savory Classic Patty Melt lies the juicy, flavorful beef patty. For best results, opt for ground beef with a fat content of about 20% (80/20 blend), which ensures moistness and browning. Season simply yet effectively with kosher salt, cracked black pepper, and a touch of garlic powder to enhance the beef’s natural flavor without overpowering. When cooking, preheat a cast-iron skillet to medium-high heat, then gently press patties to form an even thickness around ¾ inch. Cook each side for 3-4 minutes to develop a savory crust while locking in juices. If you prefer, layering thinly sliced caramelized onions atop the patty as it finishes cooking adds a sweet, silky contrast indispensable to the classic experience.
Serving Suggestions and Side Dishes to Elevate Your Patty Melt Experience
The Savory Classic Patty Melt shines when served hot off the griddle, its cheese bubbling and bread crisped to perfection. Present it on a rustic wooden board or classic diner plate to accentuate its nostalgic charm. A light smear of grainy mustard or a swipe of tangy Russian dressing on the bread can elevate the sandwich’s flavor complexity. For sides, crispy shoestring fries, dill pickle spears, or a zesty coleslaw create the perfect textural contrast. A bowl of tomato bisque or a simple mixed greens salad with vinaigrette adds freshness, balancing the sandwich’s richness on the palate.
Ingredients
- 1 lb ground beef (80/20 blend)
- 4 slices rye bread
- 4 slices Swiss cheese
- 1 large yellow onion, thinly sliced
- 2 tbsp unsalted butter, divided
- Salt and freshly cracked black pepper, to taste
- 1/2 tsp garlic powder
- Optional: grainy mustard or Russian dressing for spreading
Instructions
- Caramelize onions: In a large skillet over medium heat, melt 1 tablespoon butter. add sliced onions and a pinch of salt. Sauté until golden brown and soft, about 15 minutes, stirring occasionally to prevent burning.
- Prepare beef patties: Divide ground beef into 2 equal portions, gently shaping each into a patty about ¾ inch thick. Season both sides with salt, pepper, and garlic powder.
- Cook patties: Heat skillet over medium-high heat. Place patties and cook 3-4 minutes per side until crusty and cooked through. Add thinly sliced onions atop each patty during the last minute of cooking.
- Assemble sandwiches: Butter one side of each bread slice. On the unbuttered side, layer one slice of Swiss cheese, a cooked patty topped with onions, and another slice of cheese. top with another bread slice, buttered side out.
- grill sandwiches: Heat pan to medium. Place sandwiches and cook about 3-4 minutes per side until bread is crisp and golden, and cheese is melted. Press gently with a spatula for even toasting.
- Serve hot: slice sandwiches diagonally and serve instantly with your choice of sides.
Tips for Success
- Fat content matters: Use 80/20 ground beef for the perfect balance of juiciness and browning.
- Low and slow for onions: Caramelize onions on medium heat to develop rich sweetness without burning.
- Crispy bread: Butter your bread generously and grill at medium heat to achieve a golden crust without burning.
- Melt-in-mouth cheese: swiss cheese melts perfectly but feel free to experiment with Gruyère or provolone for exciting twists.
- Make-ahead tips: Caramelized onions can be prepared up to 3 days ahead and stored refrigerated to save time.
Serving Suggestions
For an elevated presentation, serve your Savory Classic Patty Melt with a sprinkle of fresh chopped parsley or a light drizzle of tangy sauce alongside crisp shoestring fries and tart dill pickle spears. Add a small bowl of creamy tomato bisque garnished with basil leaves for the ultimate comfort food meal.
| Nutrient | Per Serving |
|---|---|
| Calories | 650 kcal |
| protein | 38 g |
| Carbohydrates | 40 g |
| Fat | 38 g |
Discover more burger recipes and techniques to keep your kitchen inspired. For a deep dive into the rich history of American diner cuisine, visit Smithsonian Magazine.

Q&A
Q&A: Savory Classic Patty Melt – A Timeless comfort Delight
Q1: What exactly is a patty melt?
A patty melt is a mouthwatering hybrid between a burger and a grilled cheese sandwich. It features a juicy, seasoned ground beef patty nestled between slices of buttery toasted rye bread, layered with melted cheese and caramelized onions that create a perfect harmony of savory flavors.
Q2: Why is the patty melt considered a timeless comfort food?
The patty melt embodies nostalgia and simplicity, reminding many of classic diners and late-night cravings. Its combination of hearty beef, melted cheese, and crisp, buttery bread delivers warmth and satisfaction that transcends generations, making it a perennial favorite for comfort seekers.
Q3: How does the classic patty melt differ from a traditional cheeseburger?
While a cheeseburger is typically served on a soft bun with lettuce, tomato, and condiments, a patty melt swaps the bun for grilled rye bread and adds the rich sweetness of caramelized onions. This swap gives the patty melt a distinctive textural crunch and a more robust, smoky flavor profile.
Q4: what types of cheese work best in a patty melt?
Swiss cheese is the traditional choice, prized for its smooth melt and nutty flavor that complements the beef and onions beautifully. However, American cheese, cheddar, or even Gruyère can also be used to tailor the flavor and richness to your liking.
Q5: Can the patty melt be customized for dietary preferences?
Absolutely! For a lighter take, lean beef or turkey patties can replace traditional ground beef. Vegetarian versions might use plant-based patties with caramelized mushrooms in place of onions. Bread options can also be swapped for gluten-free varieties to suit dietary needs without sacrificing the classic essence.
Q6: What’s the secret to the perfect patty melt?
It’s all about layering and balance: caramelize your onions low and slow until golden and sweet, choose quality beef seasoned simply, and toast your rye bread in butter for that irresistible crispiness. Melting the cheese just right ensures every bite is ooey-gooey and decadent.
Q7: When is the best time to enjoy a patty melt?
Anytime hunger strikes! Whether it’s a cozy weekend brunch, a comforting dinner after a long day, or a satisfying late-night snack, the patty melt’s timeless appeal makes it an all-occasion delight.
Q8: How has the patty melt influenced modern comfort cuisine?
The patty melt’s fusion of familiar ingredients showcases creative layering and contrasts, inspiring chefs to experiment with textures and flavors in burgers, sandwiches, and beyond. It’s a reminder that comfort food can be both simple and sophisticated, classic and endlessly adaptable.
Embrace the savory, cheesy, nostalgic magic of the classic patty melt – a true comfort food cornerstone that continues to warm hearts and satisfy cravings across generations.
Concluding remarks
the savory classic patty melt stands as more than just a sandwich-it’s a delicious bridge between nostalgic comfort and timeless indulgence. With its perfect harmony of melted cheese, caramelized onions, and a juicy beef patty nestled between buttery toasted bread, this iconic dish continues to win hearts and satisfy cravings across generations. Whether you’re revisiting a beloved favorite or discovering it anew, the patty melt invites you to savor a bite of comfort that never goes out of style. So next time hunger calls, remember: some classics aren’t just meals-they’re memories waiting to happen.