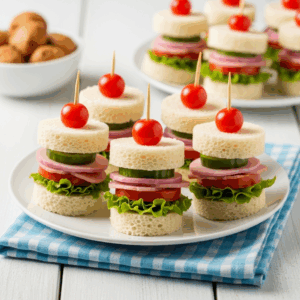
Sandwich Skewers: Fun, bite-sized sandwich twists that mix flavors and colors for a playful, easy-to-enjoy treat. Perfect for parties or quick lunches.
Crafting DIY Sandwich Skewers opens a world of endless creativity, inviting you to experiment with flavors and textures in bite-sized form. Whether inspired by picnic fare or tapas-style appetizers, these skewers transform ordinary sandwiches into a playful, visually stunning experience. The magic begins with selecting the perfect bread – a foundation that defines both texture and complementary flavors, elevating each skewer into an unforgettable taste adventure.
Prep and Cook Time of Sandwich Skewers
- Preparation: 15 minutes
- Assembly: 10 minutes
- Total Time: 25 minutes
Yield
Serves 6 (approximately 18 skewers)
Difficulty Level
Easy – Perfect for cooks of all skill levels, including beginners
Ingredients of Sandwich Skewers
- 12 slices assorted sandwich breads (mini brioche buns, ciabatta, rye, focaccia, and multigrain)
- 6 oz sliced deli meats (turkey, roast beef, or salami), thinly sliced
- 6 oz assorted cheeses (cheddar, mozzarella, gouda), cubed or sliced thinly
- 1 cup fresh veggies (cucumber rounds, cherry tomatoes, bell pepper strips)
- 1/2 cup leafy greens (baby spinach, arugula, or butter lettuce)
- 1/4 cup condiments (mayonnaise, pesto, honey mustard)
- 18 wooden skewers, 6-inch length
- Olive oil, for brushing
- Salt and freshly ground pepper, to taste
Choosing the Perfect Bread for Your Sandwich Skewers
When selecting bread for your sandwich skewers, think beyond the classic white loaf. The ideal bread should balance a firm, structure-holding crumb with a texture that complements your fillings. Sandwich Skewers offer a fun, bite-sized twist on classic sandwiches, perfect for parties or quick lunches. Combine buttery brioche, rustic ciabatta, and tangy rye for the ideal texture and flavor contrast. Slice breads into small cubes or mini rounds to create colorful, easy-to-skewer bites paired with mild cheeses and fresh vegetables.
Exploring Flavor Combinations and Texture Pairings
Layering distinct flavors enhances each bite-imagine the slightly sweet, melt-in-your-mouth brioche paired with sharp cheddar and smoky turkey, contrasted by crisp cucumber slices. Multigrain bread’s nutty aroma pairs wonderfully with creamy gouda and peppery arugula. The texture interplay between crunchy veggies, creamy cheese, and tender meat creates a memorable mouthfeel that’s as engaging to eat as it is to look at.
mastering the Art of Layering Ingredients for Visual Appeal
Alternate colors and textures for a dynamic presentation in sandwich skewers. Start with a bread cube—choose from buttery brioche, rustic ciabatta, or tangy rye—then add a shining green leaf, a fold of glossy meat, a vivid vegetable slice, and finish with a cheese cube. Each ingredient should peek through, creating layers reminiscent of a miniature sandwich tower. Keep elements bite-sized to ensure they stay secure on skewers while inviting the eye to explore every detail.
Creative Presentation Tips to Elevate Your DIY Sandwich Skewers
- Use colorful toothpicks or small bamboo skewers to add a fun, festive flair.
- Arrange skewers standing upright in a rustic wooden box lined with parchment paper for an interactive display.
- Garnish the platter with fresh herbs like rosemary sprigs or edible flowers to enhance visual appeal.
- Serve with small dishes of complementary dips such as herbed aioli or a tangy vinaigrette for dipping variety.
- Include a mix of bread types and fillings on each platter to intrigue guests and encourage tasting.
Instructions
- Prepare Bread Cubes: Using a serrated knife, cut each bread type into roughly 1.5-inch cubes or small rounds. Lightly brush each piece with olive oil and toast them in a 350°F oven for 5-7 minutes or until golden and crisp. This step adds texture and prevents sogginess.
- prepare Ingredients: Slice deli meats thinly, cube cheeses, and rinse your fresh veggies and greens. Pat dry to avoid moisture buildup on skewers.
- Assemble Layers: Begin threading on skewers by pushing a piece of toasted bread first (this anchors the skewer). Follow with a layer of leafy green, a folded slice of meat, a vegetable piece (e.g., cucumber round), and finish with a cheese cube. Alternate the sequence slightly for variety between skewers.
- Season and Garnish: Lightly sprinkle salt and pepper over the completed skewers. Optionally, drizzle a small amount of your chosen condiment before inserting the final ingredient to ensure flavor saturates each bite.
- Serve Immediately or Chill: Place the assembled skewers on a serving platter and garnish with fresh herbs. These can be eaten right away or covered and refrigerated for up to 2 hours prior to serving.
Tips for Success
- Bread Substitutions: Gluten-free bread cubes or sturdy pita triangles work well for dietary preferences.
- make Ahead: Assemble skewers up to 2 hours in advance; keep refrigerated and add fresh garnishes just before serving.
- Prevent Sogginess: Toasting bread ensures firmness and prevents moisture from seeping into the crumb.
- Ingredient Variations: Swap deli meats for grilled chicken, roasted vegetables, or marinated tofu for vegetarian options.
- Presentation Tip: Use alternating skewer lengths for dimension, or thread multiple mini skewers on a larger one for an elegant tower effect.
Serving Suggestions
Present your sandwich skewers on bright platters alongside bowls of colorful dipping sauces like chipotle aioli, balsamic glaze, or spicy mustard. Garnish with edible flowers or microgreens to add sophistication. Pair with chilled white wine or sparkling lemonade for a refreshing complement. These skewers are perfect as party finger food, a light lunch, or an extraordinary picnic treat.
| Nutrient | per Skewer (approx.) |
|---|---|
| Calories | 120 kcal |
| Protein | 7 g |
| Carbohydrates | 9 g |
| Fat | 6 g |
Learn more about bread types and baking at BreadWorld
Discover more bite-sized bread delights

Q&A
Q&A: Crafting DIY Sandwich Skewers – A fun Bread Twist Guide
Q1: What exactly are sandwich skewers, and why should I try making them?
A: Sandwich skewers are bite-sized, visually appealing mini sandwiches threaded onto skewers-think of them as playful, portable snacks perfect for parties, picnics, or a fun family meal. They combine the familiar comfort of a sandwich with a whimsical presentation that encourages creativity and sharing. Plus, they’re a fantastic way to put a twist on your usual sandwich routine!
Q2: How do sandwich skewers differ from conventional sandwiches?
A: Unlike traditional sandwiches, which are usually handheld and layered in a compact form, sandwich skewers break down the sandwich into smaller, delightful chunks. each skewer can showcase multiple ingredients arranged in colorful, alternating layers. This allows for customized flavor combos and an eye-catching food experience that’s both fun to make and eat.
Q3: What types of bread work best for DIY sandwich skewers?
A: The bread you choose sets the foundation for your skewers! Soft breads like brioche, sandwich loaves, and mini rolls are excellent as they hold together well without overpowering the fillings. For a healthier twist, try whole-grain or sourdough slices cut into bite-sized cubes. For extra flair, consider toasting the bread or using flavored flatbreads to introduce new textures and aromas.
Q4: How can I ensure my sandwich skewers don’t fall apart?
A: Stability is key! Start by cutting your bread into uniform, sturdy cubes or shapes that won’t crumble easily. Layer ingredients with contrasting textures-like firm cheese with crisp veggies-to add structure. Thread the skewer straight through the center, alternating bread and fillings snugly but not too tightly. A light spread of condiments can help components stick together. And remember, chilling them briefly before serving can firm them up nicely.
Q5: what creative filling ideas can I use to jazz up my skewers?
A: The sky’s the limit! Try classic combos like turkey, cheddar, and cherry tomatoes or go bold with caprese-style (mozzarella, basil, and cherry tomatoes). For a Mediterranean vibe, use hummus, cucumber slices, and olives. Vegetarian or vegan options might include grilled veggies with pesto or avocado and sprouts. Don’t forget sweet options too-think peanut butter, banana slices, and mini marshmallows for a dessert skewer!
Q6: Are sandwich skewers kid-friendly?
A: Absolutely! Kids love the interactive aspect of sandwich skewers-they can assemble their own, experimenting with ingredients and flavors. Plus, the fun shapes and colors are naturally enticing to little eyes and taste buds. Just be mindful of choking hazards for very young children and adjust ingredient sizes accordingly.
Q7: Can I prepare these sandwich skewers in advance?
A: Yes! Prepare all components ahead of time and assemble the skewers a few hours before serving. To keep bread from drying out, wrap the skewers tightly in plastic wrap and refrigerate. Avoid adding watery vegetables until just before serving to maintain freshness and prevent sogginess.
Q8: What occasions are sandwich skewers perfect for?
A: These quirky mini masterpieces shine at casual gatherings-picnics, birthday parties, potlucks, bridal showers, or game nights. They’re great finger foods that encourage mingling and sharing while adding a splash of creative fun to your menu. They also serve as clever appetizers or kid-friendly snacks during family movie nights.
Q9: Any tips for making sandwich skewers visually stunning?
A: Think color and contrast! Alternate bright veggies, herbs, and vibrant cheeses with your bread to create a kaleidoscope of flavors. Use different bread shapes and textures-round rolls next to square-cut slices or baguette rounds. Garnish the ends with fresh herbs or dips to elevate presentation. Remember, you eat first with your eyes!
Q10: Were can I find inspiration for my next sandwich skewer creation?
A: Experimentation is your best friend here! Explore cookbooks, food blogs, and social media platforms like Pinterest or Instagram for fresh ideas and mouth-watering visuals. Consider seasonal ingredients for timely twists, or delve into world cuisines to borrow exciting flavor combos. Most importantly, have fun and let your imagination guide your edible art!
Insights and Conclusions
With a little creativity and a pinch of imagination, crafting DIY sandwich skewers transforms the humble sandwich into a delightful bite-sized adventure. Whether you’re hosting a casual get-together or simply elevating your everyday lunch, these colorful, flavorful twists bring more than just taste to the table-they add a playful spark that invites everyone to enjoy food in a fresh way. So grab your favorite breads, stack up the layers, and let your skewers tell a story of fun, flavor, and endless possibilities. Happy skewering!