there’s something undeniably satisfying about biting into a mini Heggies pepperoni pizza-crispy edges, melted cheese bubbling atop savory pepperoni, all nestled on a perfectly golden crust. yet, achieving that mouthwatering balance isn’t just about ingredients; it’s an art shaped by precise cooking times. Whether you are a seasoned pizza enthusiast or a busy home cook aiming to elevate yoru snack game, mastering the timing can transform your mini Heggies from good to unforgettable. In this article, we’ll slice through the guesswork and serve up essential tips to perfect the cooking time, ensuring every mini pepperoni pizza emerges from the oven with flawless flavor and texture.
Perfecting Mini Heggies Pepperoni Pizza: cooking Time Tips unlocks the secret to creating irresistibly crispy crusts complemented by the perfect cheese melt. These tiny delights reflect Heggies’ rich tradition of quality dough and savory flavors, making every bite a nostalgic pleasure. Learning to select the ideal dough and cheese, adjust your oven temperature precisely, and time the bake perfectly is what transforms a homemade mini pizza into a bite-sized masterpiece.
Prep and Cook Time
- Readiness: 20 minutes
- Cooking: 12-15 minutes
- Total Time: 35 minutes
Yield
Serves 8 mini pizzas, perfect for parties or snacks.
Difficulty Level
Medium: Requires basic dough handling and attentive oven monitoring.
Ingredients
- 1 cup all-purpose flour, sifted
- 1 tsp active dry yeast
- ½ cup warm water (about 105°F)
- 1 tbsp olive oil, plus extra for coating
- ½ tsp sugar
- ¼ tsp salt
- ¾ cup shredded mozzarella cheese, preferably whole milk
- ¼ cup shredded provolone cheese for depth
- 20 pieces mini pepperoni slices (Heggies brand preferred)
- ¼ cup homemade or store-bought tomato pizza sauce
- Fresh basil leaves for garnish (optional)
Instructions
- Activate the yeast: In a small bowl, combine warm water, sugar, and yeast. Let sit for 5-7 minutes until foamy to ensure the yeast is active. This step guarantees a light, airy dough.
- Mix the dough: In a large bowl, combine sifted flour and salt. Gradually add the yeast mixture and 1 tbsp olive oil, stirring until a rough dough forms. Turn onto a floured surface and knead for 7-10 minutes until the dough is smooth and elastic.
- Proof the dough: lightly oil a bowl, place the dough inside, and cover with a damp cloth. Allow it to rise in a warm spot for 1 hour, or until doubled in size.
- Preheat your oven: Set your oven to 475°F (246°C). For the crispiest crust, position the rack in the lower third of the oven to maximize heat from the bottom element.
- Shape mini bases: Punch down the risen dough and divide it into 8 equal portions. Roll each into a 4-inch circle, about ¼ inch thick. Place on a parchment-lined baking tray or preheated pizza stone.
- Add sauce and toppings: Spread 1½ tablespoons of tomato sauce evenly on each base. Sprinkle a mix of mozzarella and provolone cheeses evenly-this blend gives a perfect gooey yet flavorful melt. top with 2-3 mini pepperoni slices per pizza for a spicy, savory kick.
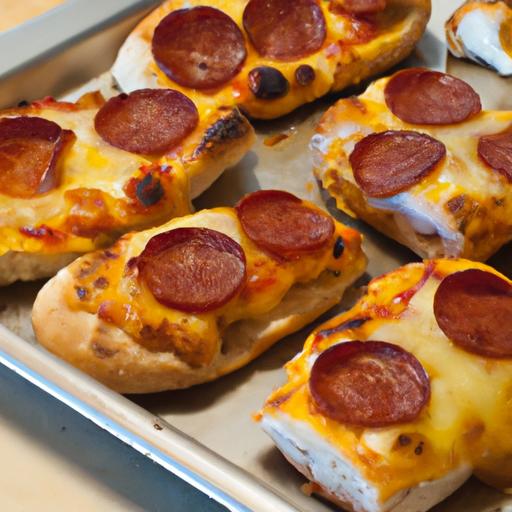
- Bake and monitor: Bake for 12 minutes, keeping an eye on the edges. Around 10 minutes, the cheese should bubble and start to brown slightly, and the pepperoni edges will curl and crisp.
- Final touches: Remove once the crust is golden with a slight char on the bottom and cheese is melting perfectly over the pepperoni. Let cool slightly before garnishing with fresh basil leaves for a pop of color and herbal freshness.
Tips for Success
- The Dough: Choosing high-protein all-purpose flour ensures a chewy crust that’s not overly dense. Avoid too much flour at kneading to keep the texture tender.
- Cheese Blend: The combo of mozzarella’s creamy melt and provolone’s sharpness recreates that authentic Heggies flavor. For a twist, add a sprinkle of parmesan before baking for extra umami.
- Oven Temperatures: A hotter oven is essential. Resist lowering the temperature thinking it might prevent burning; it often leads to soggy crusts. Use a pizza stone if available to evenly distribute heat.
- Timing Tips: Don’t walk away during the final bake-mini pizzas cook fast and can go from perfect to overdone in minutes. Keep an eye for cheese bubbling and slight pepperoni crisping.
- Make-Ahead: Dough can be prepared a day ahead and stored in the fridge, allowing flavors to deepen and speeding up prep the next day.
Serving Suggestions
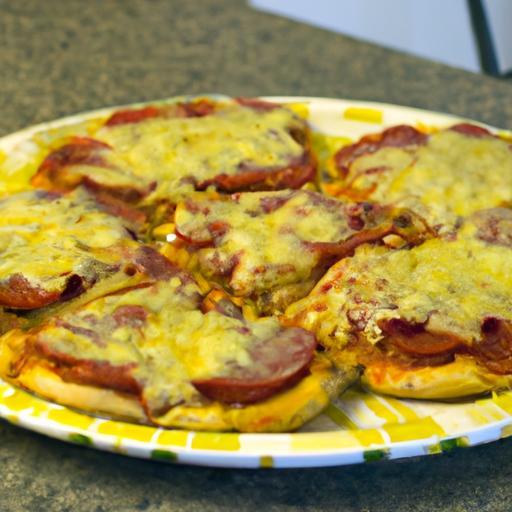
Serve your mini Heggies Pepperoni Pizzas hot, paired with a simple arugula salad tossed in lemon vinaigrette for freshness. Offer dipping sauces like garlic aioli or classic ranch to elevate the snacking experience. Present the mini pizzas on a rustic wooden board, garnished with extra basil and a drizzle of chili oil for a gourmet touch.
| Nutrition | Per Mini Pizza |
|---|---|
| Calories | 180 kcal |
| Protein | 8 g |
| Carbohydrates | 20 g |
| Fat | 7 g |
Learn more about perfect dough handling here and for ingredient insights, visit the Serious Eats pizza science article.

Q&A
Q&A: Perfecting Mini Heggies Pepperoni Pizza – Cooking Time Tips
Q1: What makes Mini Heggies Pepperoni Pizza special?
A1: Mini Heggies stand out because of their perfectly crisp crust, gooey melted cheese, and generous pepperoni topping-all packed into a convenient mini size. Their bite-sized charm makes them perfect for snacking, parties, or a rapid indulgence.
Q2: Why is cooking time crucial for mini Heggies Pepperoni Pizza?
A2: Cooking time strikes the delicate balance between a crispy crust and melted cheese without drying out the pizza. Too short, and the cheese won’t fully melt; too long, and the crust and toppings risk becoming tough or burnt.
Q3: What is the recommended cooking time and temperature?
A3: For best results, preheat your oven to 375°F (190°C). Bake the Mini Heggies on a baking sheet for 12-15 minutes. This timeframe ensures a perfect golden crust and bubbly cheese without sacrificing texture or flavor.
Q4: Can cooking time vary based on the oven type?
A4: Absolutely! Conventional ovens typically follow the 12-15 minute rule, but convection ovens may require slightly less time-around 10-12 minutes-because of better heat circulation. Always keep an eye on them towards the end to avoid burning.
Q5: Should Mini Heggies be cooked from frozen or thawed?
A5: For best texture and flavor, cook Mini Heggies directly from frozen. Thawing can make the crust soggy, whereas frozen mini pizzas maintain their crispiness and bake evenly.
Q6: How can I tell when my Mini Heggies Pepperoni Pizza is perfectly cooked?
A6: Look for cheese that’s fully melted and bubbling with lightly browned edges. The crust should be golden and crisp, and the pepperoni slightly curled with crisp edges-a mouthwatering visual cue that your mini pizza is ready!
Q7: Any extra tips for perfecting the cooking process?
A7: Try placing the Mini Heggies on a preheated baking sheet or pizza stone. This helps achieve a crispier crust by delivering direct heat from below. Also, avoid overcrowding the baking surface to ensure even cooking.
Q8: Can I add extra toppings, and will that affect cooking time?
A8: You can add extra toppings, but keep in mind they might need slightly longer to cook through-add 2-3 minutes if necessary. Just watch carefully so the crust doesn’t overcook while the toppings heat fully.
Q9: What’s the best way to reheat leftover Mini Heggies?
A9: For leftovers, reheat in a toaster oven or conventional oven at 350°F (175°C) for 5-7 minutes. This method restores crispiness better than a microwave, which can make the crust chewy.
With these cooking time tips, you’ll be on your way to perfect Mini Heggies Pepperoni Pizza – a crispy, cheesy mini delight every single time!
In Conclusion
Mastering the art of Mini Heggies Pepperoni Pizza is all about dialing in that perfect cooking time-long enough to achieve a golden, crispy crust and bubbling cheese, but not so long that the pepperoni loses its signature snap. With these timing tips in your culinary toolkit, you’re well on your way to creating bite-sized wonders that deliver big on flavor every single time. So, fire up your oven, trust your timer, and get ready to impress with pizzas that are as perfectly cooked as they are irresistibly delicious. Happy baking!