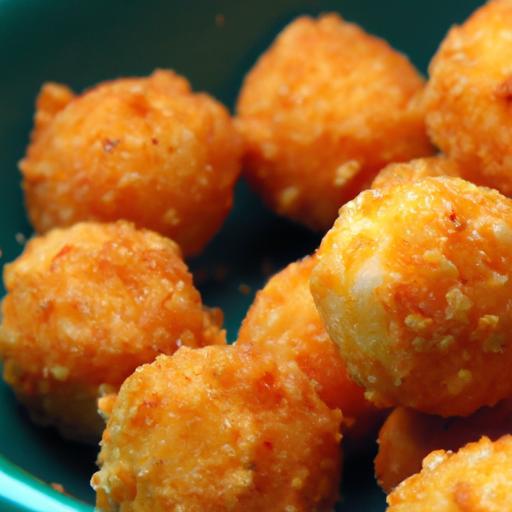

There’s something undeniably magical about a handful of perfectly crispy cheese balls-a snack that marries golden crunch with rich, gooey cheese in every bite. Whether you’re hosting a casual get-together or simply craving a satisfying treat, these delightful morsels hit the spot with effortless charm. In this article, we’ll unravel the secrets behind crafting cheese balls that achieve that ideal crispness without compromising their cheesy heart, guiding you step-by-step toward snack bliss that’s both easy to make and impossible to resist. Get ready to elevate your snacking game with a recipe that’s as simple as it is indeed sensational.

Choosing the Ideal Cheese and ingredients for Maximum Flavor
Perfectly Crispy Cheese Balls begin with selecting the right cheese and complementary ingredients that deliver a powerful punch of flavor and melt-in-your-mouth texture. Opt for cheeses with excellent melting qualities like mozzarella, cheddar, or a combination of both to balance creaminess and sharpness. for an indulgent twist, incorporate Parmesan for its nutty aroma and extra depth.
Complement your cheese with fresh herbs such as chopped parsley or chives to brighten the profile. A pinch of smoked paprika or cayenne pepper adds a subtle heat that enhances the crispy coating without overwhelming the cheese’s richness.
Don’t underestimate the binder-you’ll want to use a sturdy yet tenderizing agent like all-purpose flour and breadcrumbs. For breadcrumbs, choose panko for ultra-crispiness or create your own toasted crumb mix to lock in texture and crunch. Always season your flour and breadcrumbs well with salt, pepper, and dried herbs to infuse every layer with savory goodness.
Mastering the Art of the Crispy Coating for Irresistible Crunch
Achieving the perfect golden crust requires a triple-layer dredge: flour, egg wash, and breadcrumbs. This classic technique ensures the cheese balls hold together firmly while delivering that hypnotic crunch. Begin by dusting each ball evenly with flour-this helps the egg wash stick more effectively. Next, immerse them in beaten eggs enriched with a splash of milk for a silkier coating. roll them thoroughly in the breadcrumb mixture, pressing gently to seal every curve and corner.
For an even bolder crunch, chill the coated balls for at least 30 minutes before frying. This step helps firm up the coating and prevents premature bursting during frying. Hot oil temperature is also crucial-maintain it around 350°F (175°C) for steady cooking that crisps the outside without melting the cheese too quickly inside.
Step by Step Guide to Frying Perfectly Golden Cheese Balls
- Prepare your frying setup: Use a deep, heavy-bottomed pan or a deep fryer filled with vegetable oil to a depth of at least 2 inches. Heat to a steady 350°F (175°C).
- Dredge the cheese balls: As described above, coat each ball first in flour, dip in the egg wash, then coat with breadcrumbs. Place them on a parchment-lined tray and refrigerate for 30 minutes to set.
- Fry in batches: Carefully lower a few cheese balls into the hot oil, ensuring not to overcrowd which lowers oil temperature. Fry for 2-3 minutes, turning gently with a slotted spoon, until golden brown and crisp.
- Drain and rest: Remove the balls with a slotted spoon, place on paper towels to absorb excess oil. Let rest for 2 minutes to firm up slightly-this prevents burning your mouth on molten cheese.
- Repeat: Continue until all balls are fried, allowing oil to return to temperature between batches.
Serving Suggestions and Creative Twists to Elevate Your Snack Game
These cheese balls lend themselves beautifully to countless serving ideas that will wow your friends and family. present them on a rustic wooden board with bowls of garlic aioli, spicy marinara, or a zesty ranch dip layered with fresh herbs. Garnish with a sprinkle of finely chopped parsley or microgreens for a vibrant finish.
For a creative twist, fold finely diced jalapeños or sun-dried tomatoes into your cheese mix before shaping. You can also swap the typical coating with crushed cornflakes or crushed pistachios for a unique texture and flavor variation. Serving alongside pickled vegetables or a tangy slaw balances the richness beautifully and adds a refreshing crunch contrast.
Lastly, don’t hesitate to transform these snack stars into mini appetizers by skewering them with toothpicks and pairing them with grilled meats or charcuterie elements for an elegant party platter.
Prep and Cook Time
- Preparation Time: 20 minutes
- Chilling Time: 30 minutes
- Cooking Time: 15 minutes
Yield
- About 20 cheese balls (serves 4-6 as appetizer/snack)
Difficulty Level
- Easy to Medium – Perfect for beginner cooks looking to impress.
Ingredients
- 2 cups shredded mozzarella cheese
- 1 cup sharp cheddar cheese, shredded
- ½ cup grated Parmesan cheese
- 2 tablespoons fresh parsley, finely chopped
- ½ teaspoon smoked paprika
- Salt and freshly cracked black pepper, to taste
- 1 cup all-purpose flour, sifted
- 2 large eggs
- 3 tablespoons milk
- 2 cups panko breadcrumbs
- Vegetable oil, for deep frying
Instructions
- in a mixing bowl, combine mozzarella, cheddar, Parmesan, parsley, smoked paprika, salt, and pepper. Mix well until evenly incorporated.
- Shape the mixture into small, bite-sized balls (about 1½ inches in diameter). Place on a parchment-lined tray.
- Prepare your dredging stations: Place flour in one shallow dish. In a second dish, whisk eggs with milk. In a third, place panko breadcrumbs.
- Coat each cheese ball: Roll first in flour, tapping off excess, dip into egg mixture, then roll in panko, pressing gently to cover fully.
- Refrigerate the coated balls for at least 30 minutes to set the crust before frying.
- Heat oil in a deep pan or fryer to 350°F (175°C). Carefully lower the cheese balls in batches, frying for about 2-3 minutes until golden and crisp on all sides. Turn gently with a slotted spoon to brown evenly.
- Drain on paper towels, let cool slightly before serving.
Chef’s Notes & Tips for Success
- Prevent leakage: Chill cheese balls well to avoid bursting during frying.
- Cheese choice: Mix semi-soft cheeses for gooey interiors; avoid crumbly cheeses that won’t melt.
- Breading variations: Try crushed cornflakes or seasoned breadcrumbs to change texture.
- Make ahead: Assemble balls and freeze on a tray, then transfer to a bag. Fry straight from frozen-just add 1 minute to cooking time.
- Oil safety: Maintain steady medium-high heat to prevent soggy coating or burnt crust.
Serving Suggestions
Serve warm with vibrant dipping sauces like garlic aioli, spicy marinara, or cool ranch. Garnish with chopped parsley or a sprinkle of Parmesan for a restaurant-worthy presentation. Pair with a crisp white wine or sparkling water with lemon for a refreshing balance.
| nutrition (per 3 balls) | Calories | Protein | carbs | Fat |
|---|---|---|---|---|
| Energy | 280 kcal | 14g | 18g | 16g |

Explore more cheesy snack ideas in our Easy Cheesy Appetizers recipe Collection and turn everyday bites into extraordinary delights.
Q&A
Q&A: Perfectly Crispy Cheese Balls – Easy Recipe for Snack Bliss
Q1: What makes these cheese balls “perfectly crispy”?
A1: The secret to perfectly crispy cheese balls lies in the balance of ingredients and the cooking method. Using a combination of sharp cheeses and a light, crispy breadcrumb coating gives them that golden crunch on the outside while keeping the inside delectably gooey. Frying them at the right temperature ensures they cook evenly without absorbing excess oil.
Q2: Can I use any type of cheese for these cheese balls?
A2: While you can experiment, the best results come from cheeses that melt well and have a bold flavor-think sharp cheddar, mozzarella, or even a touch of parmesan for an umami kick. Mixing cheeses can create a fantastic depth of flavor and ooze that perfect cheese pull.
Q3: How do I keep the cheese balls from bursting open during frying?
A3: To avoid that cheesy escape act, ensure the cheese mixture is well chilled before shaping. Chilling helps the cheese firm up and hold its shape. Also, sealing each ball tightly with a consistent breadcrumb layer creates a sturdy barrier that crisps up beautifully.
Q4: Are these cheese balls suitable for baking, or must they be fried?
A4: While frying yields the crispiest exterior, you can bake these cheese balls for a lighter version. Bake them at 400°F (200°C) on a parchment-lined tray, turning halfway through, until golden and crispy. They’ll still be delicious, just slightly less crunchy than their fried counterparts.
Q5: What dips pair best with these crispy cheese balls?
A5: the crispy, cheesy goodness of these balls pairs wonderfully with tangy or spicy dips. Classic marinara, zesty ranch, or a smoky chipotle aioli can elevate your snack game. For a fresh twist, try a cooling cucumber-yogurt dip or a vibrant pesto.
Q6: Can I prepare these cheese balls ahead of time?
A6: Absolutely! You can shape and coat your cheese balls, then freeze them on a baking sheet before transferring to a sealed bag. When you’re ready to indulge, fry or bake them straight from the freezer-just add a minute or two to the cooking time. Perfect for last-minute snack bliss!
Q7: Are these cheese balls kid-friendly?
A7: Yes! Their comforting cheesy center and fun, bite-sized nature make them a hit with kids. Just keep an eye on the temperature when frying or baking to avoid any mishaps, and consider serving with mild dips like ranch or ketchup for picky eaters.
Q8: How can I add an extra flavor punch to my cheese balls?
A8: Mix in herbs like chives, parsley, or thyme into the cheese filling for fresh notes. You can also add finely chopped jalapeños or a pinch of smoked paprika for a spicy twist. Don’t forget a dash of garlic powder or onion powder for savory depth!
Dive into the crispy, cheesy bliss and let these little golden spheres become your new favorite snack!
In Retrospect
There you have it-a foolproof recipe for perfectly crispy cheese balls that promise a delightful crunch in every bite. Whether you’re hosting a casual get-together or simply craving a savory snack, these golden orbs of cheesy goodness are sure to satisfy. with a balance of melt-in-your-mouth cheese and a crisp, airy exterior, they’re proof that comfort food can be both simple and breathtaking. So next time you need a rapid, crowd-pleasing treat, remember this easy recipe and bring a little snack bliss to your table. Happy munching!