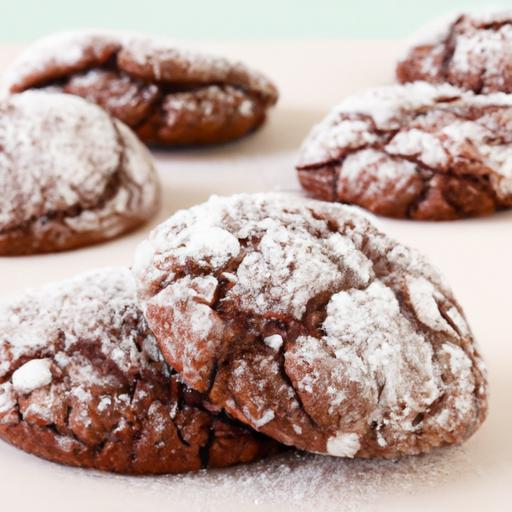
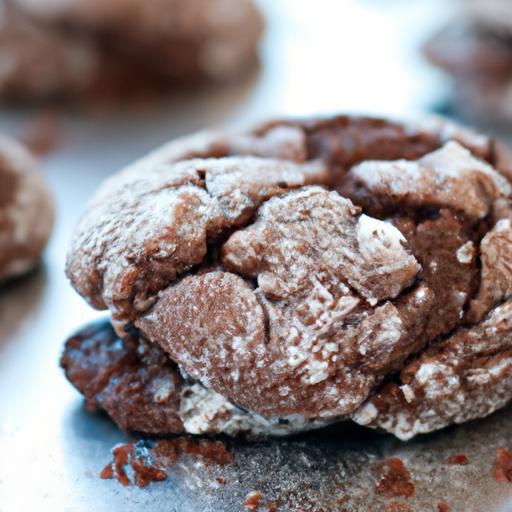
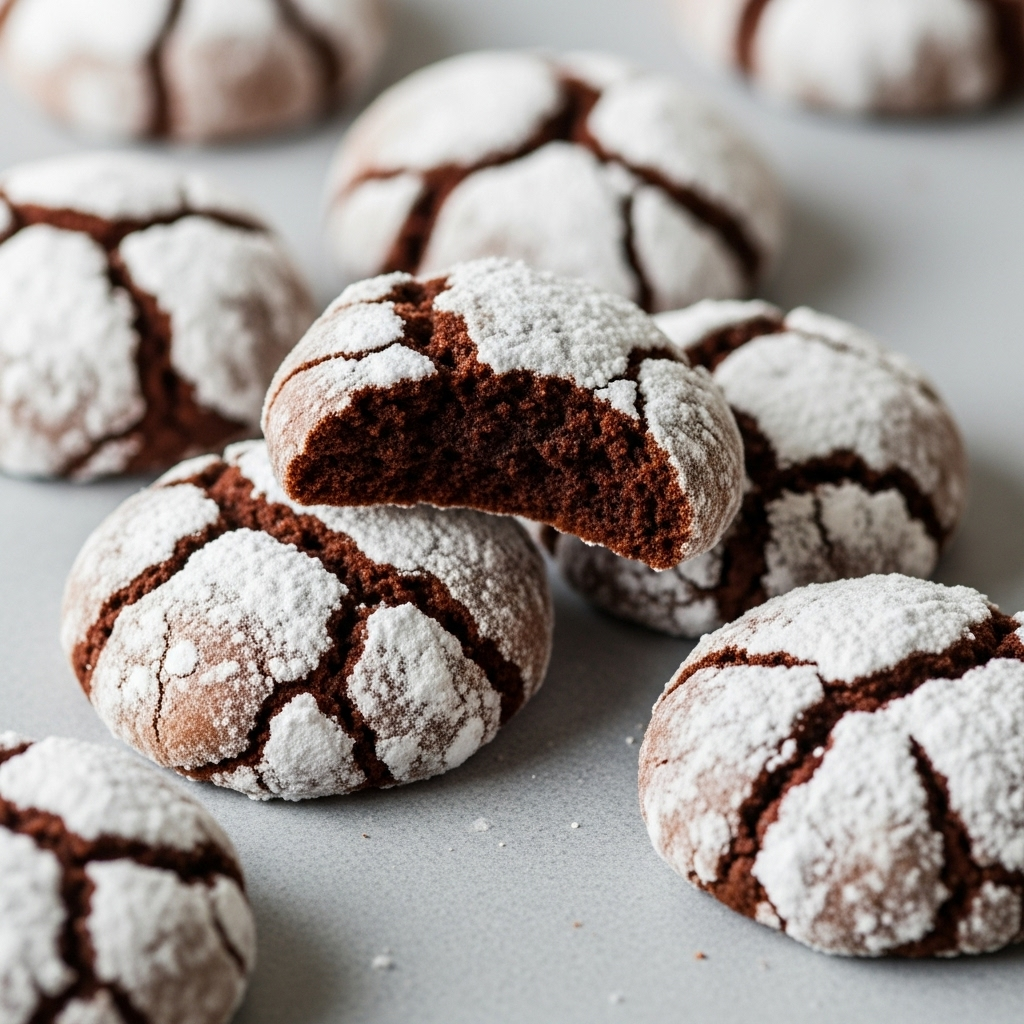
There’s something undeniably magical about the moment when a warm, fudgy chocolate cookie meets a dusting of snowy powdered sugar-creating that signature cracked, crinkled surface that promises decadence in every bite. Chocolate crinkle cookies are the ultimate treat for chocoholics and casual bakers alike: simple to make, yet spectacularly indulgent. In this article, we’ll unwrap the secrets behind these irresistible confections and guide you through an easy, foolproof recipe that transforms basic pantry staples into a batch of melt-in-your-mouth delights. Get ready to fill your kitchen with the rich, comforting aroma of cocoa and experience the joyous satisfaction of baking-and savoring-these classic chocolate crinkle cookies.
Selecting the Finest Ingredients for Rich and chewy Cookies
decadent Delight starts with the very best components to build its unmistakable rich and chewy texture.Choosing high-quality unsweetened cocoa powder plays a pivotal role, offering deep chocolate notes without bitterness. Look for Dutch-processed cocoa for a smoother, more mellow flavor that dissolves beautifully into the dough. For the sweetness base, opt for a mix of granulated sugar and light brown sugar-the latter adds moisture and a subtle caramel complexity to every bite.
Freshness is key: fresh eggs ensure the dough binds properly, while using unsalted butter lets you control the saltiness, enhancing the chocolate’s richness. Don’t overlook the flour; a finely sifted all-purpose flour forms the backbone of the dough, contributing to that perfect balance between tender crumb and sturdy chew.
a pinch of salt sharpens all the flavors,and a splash of vanilla extract rounds out the profile with warm,inviting notes.
Mastering the Perfect Dough Consistency for Flawless Crinkles
The magic behind these chocolate crinkle cookies is in achieving a dough consistency that’s firm enough to hold shape, yet soft enough to properly crack during baking. After combining your wet and dry ingredients, chill the dough for at least 2 hours-this step is essential. Cooling solidifies the butter and allows the flavors to meld, ensuring your cookies don’t spread too thin while baking.
When ready to bake, scoop out dough balls slightly larger then a tablespoon and roll them generously in powdered sugar. this sugary coat not only enhances the look with iconic crackling but also prevents sticking and helps create a delicate crisp crust.
Keep your hands lightly floured or powdered sugar-dusted to manage stickiness and maintain uniform shapes. Ideally, your dough should feel firm but pliable-not sticky or dry.
baking Tips to Achieve That Iconic Crackled surface
Oven temperature and timing are your best friends for perfect crackled surfaces. Bake at a steady 350°F (175°C) for 10-12 minutes, just until the edges set but the centers remain soft.Avoid overbaking, as it will harden the cookies and reduce chewiness.
For even baking, position your baking sheet in the center of the oven and rotate halfway through. Using parchment paper or a silicone baking mat prevents bottoms from burning and keeps the texture uniform.
after removing from the oven, let the cookies cool on the pan for 5 minutes before transferring to a wire rack. This allows residual heat to finish cooking and solidify the crackled finish without cracking too deeply.
Creative Variations to Elevate Your Chocolate Crinkle Experience
Once you’ve mastered this classic recipe, bring your decadence to new heights with some creative twists. Stir in a handful of mini chocolate chips or chunks of dark chocolate before chilling the dough for pockets of melty indulgence. For nut lovers, fold in toasted pecans or walnuts for a buttery crunch that contrasts beautifully with the soft interior.
Looking for a playful flavor? Add a dash of espresso powder to intensify the chocolate depth or a pinch of cinnamon for a cozy warmth. For a festive touch, try rolling dough balls in colored sanding sugar or sprinkle coarse sea salt on top before baking.
If gluten is a concern, substitute with a gluten-free all-purpose blend-but be mindful of tweakable liquid ratios to maintain the right dough consistency.
Prep and Cook Time
- Prep Time: 15 minutes
- Chill Time: 2 hours minimum
- Cook Time: 10-12 minutes
Yield
Approximately 24 cookies
Difficulty Level
easy – Perfect for bakers of all skill levels
Ingredients
- 1 cup (125g) all-purpose flour, sifted
- ½ cup (50g) unsweetened cocoa powder (Dutch-processed recommended)
- 1 teaspoon baking powder
- ¼ teaspoon salt
- ½ cup (115g) unsalted butter, melted and slightly cooled
- 1 cup (200g) granulated sugar
- ¼ cup (50g) light brown sugar, packed
- 2 large eggs, at room temperature
- 2 teaspoons pure vanilla extract
- ½ cup powdered sugar, for rolling
Instructions
- whisk dry ingredients: In a large bowl, sift together the flour, cocoa powder, baking powder, and salt. Set aside.
- Mix wet ingredients: In a separate bowl,combine the melted butter,granulated sugar,and brown sugar. Whisk until smooth.
- Add eggs and vanilla: Beat the eggs into the wet mixture one at a time, followed by the vanilla extract. The batter will be glossy and thick.
- Combine wet and dry: Gradually fold the flour mixture into the wet ingredients with a spatula until just combined.Avoid overmixing to keep cookies tender.
- Chill the dough: Cover the bowl with plastic wrap and refrigerate for at least 2 hours or until firm enough to handle.
- Preheat oven and prepare trays: preheat your oven to 350°F (175°C). Line baking sheets with parchment paper or silicone mats.
- Shape cookies: Scoop tablespoon-sized portions of dough, roll into balls, and then roll each ball generously in powdered sugar until fully coated.
- Bake: Place cookies spaced 2 inches apart on the tray and bake for 10-12 minutes, until the edges are set but centers appear soft and crinkled.
- Cool: Let cookies rest on the baking tray for 5 minutes before transferring them to a wire rack to cool wholly.
Chef’s Notes
- Make-ahead: The dough can be stored in the fridge for up to 48 hours or frozen for 1 month-roll and bake directly from frozen, adding 2 extra minutes to baking time.
- Substitutions: Use coconut oil in place of butter for a dairy-free treat, but expect a slightly different texture.
- Troubleshooting: If cookies spread too much, chill the dough longer or add a teaspoon of cornstarch to the dry mix to help firm them up.
- Texture tip: For extra chewiness, try adding an extra egg yolk or a tablespoon of honey.
Serving Suggestions
present these cookies on a rustic wooden board or a festive platter dusted lightly with powdered sugar for an elegant touch. Pair with a cup of rich espresso, creamy hot chocolate, or even a scoop of vanilla bean ice cream for a decadent dessert experience.
Garnish with a few fresh raspberries or a sprig of mint to brighten the rich chocolate indulgence. These cookies also travel well and make fantastic gifts when wrapped in clear cellophane tied with a satin ribbon.
| Nutrient | Per Cookie |
|---|---|
| Calories | 120 kcal |
| Protein | 2 g |
| Carbohydrates | 18 g |
| Fat | 5 g |
Explore more delicious chocolate recipes like our Ultimate Chocolate Chip Cookies, and expand your baking repertoire.For detailed food science on cocoa and baking chemistry, visit the Crafty Baking Science Hub.
Q&A
Q&A: Decadent Delight – How to Make Easy Chocolate Crinkle Cookies
Q1: What exactly are chocolate crinkle cookies?
A1: Imagine a fudgy, fudgy chocolate dream that’s slightly crisp on the outside but utterly soft and chewy inside.Chocolate crinkle cookies are those heavenly treats, dusted with powdered sugar that cracks and crevices during baking, creating that signature “crinkle” effect. They look as delightful as they taste-almost too pretty to eat (almost)!
Q2: Why are these cookies called “crinkle” cookies?
A2: The name comes from their uniquely cracked surface. As these rich, chocolatey dough balls expand and bake, the powdered sugar coating breaks apart, leaving behind a beautiful network of white lines that resemble tiny crinkles or fractures-a visual masterpiece that signals a perfect bake.
Q3: Are chocolate crinkle cookies difficult to make?
A3: Not at all! Despite their fancy appearance, chocolate crinkle cookies are surprisingly easy to make. With just a handful of simple ingredients and a little patience for chilling the dough, even beginners can whip up a batch that looks bakery-worthy with minimal fuss.
Q4: What ingredients do I need to make chocolate crinkle cookies?
A4: The magic starts with basic pantry staples: cocoa powder, sugar, flour, eggs, butter, baking powder, vanilla extract, and a generous mountain of powdered sugar for rolling. No obscure ingredients-just simple goodness.
Q5: How vital is chilling the dough?
A5: Chilling is the secret to success here. Cooling the dough for at least a couple of hours (or overnight) firms it up, making it easier to handle and helping the cookies hold their shape during baking. It also enhances the flavors, allowing the chocolate to deepen and intensify.
Q6: Can I customize the flavor of chocolate crinkle cookies?
A6: Absolutely! While classic chocolate reigns supreme, you can add a sprinkle of cinnamon, a dash of espresso powder to amplify the cocoa punch, or even mix in chocolate chips or chopped nuts for delightful texture surprises.The canvas is yours to decorate.
Q7: How do I get that perfect balance of crispy outside and chewy inside?
A7: The key is baking just until the edges set and the powdered sugar cracks, but before the center dries out. Taking the cookies out when they still look slightly underbaked at the center ensures a luscious, chewy bite once cooled. Timing is everything!
Q8: What’s the best way to store chocolate crinkle cookies?
A8: Store them in an airtight container at room temperature, and they’ll stay fresh and soft for up to a week. For longer preservation, wrap them tightly and freeze-they thaw beautifully, making them a perfect make-ahead treat.
Q9: Any tips to make the powdered sugar coating perfect?
A9: Don’t skimp on the powdered sugar! Roll each dough ball generously in powdered sugar until fully coated. This thick layer is what creates those dramatic cracks and the cookie’s signature snowy look. Also, handle the dough gently so the sugar sticks well.
Q10: Why should I make chocolate crinkle cookies at home rather of buying them?
A10: As homemade chocolate crinkle cookies aren’t just desserts-they’re little acts of love. They fill your kitchen with intoxicating chocolate aromas, offer a creative baking adventure, and reward you with warm, fresh-from-the-oven morsels that store-bought simply can’t match.Plus, you can tweak the recipe exactly to your taste!
Ready to embark on your decadent journey? Grab your cocoa, roll up your sleeves, and dive into these easy, irresistible chocolate crinkle cookies that promise to sweeten any day!
In Retrospect
There you have it-a simple, scrumptious recipe to transform your kitchen into a haven of chocolatey bliss. These chocolate crinkle cookies are more than just a treat; they’re a celebration of decadence in every bite, effortlessly achieved with a few easy steps.Whether you’re baking for a festive occasion or simply indulging a sweet craving, these cookies promise a melt-in-your-mouth experience that’s as delightful to make as it is to eat. So grab your ingredients, embrace the joyful mess of powdered sugar dust, and let these crinkle cookies become your go-to delight for any day that calls for a little extra sweetness. Happy baking!