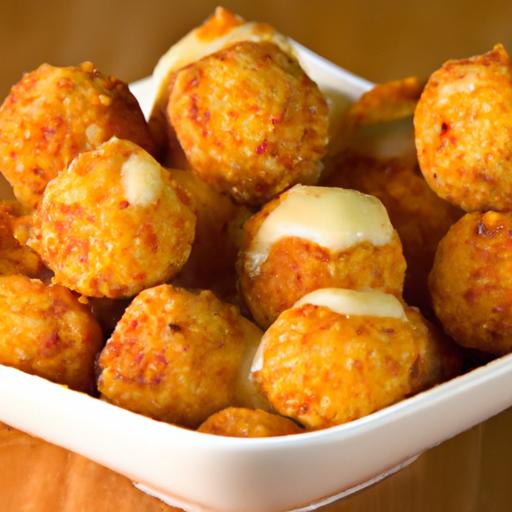
There’s something undeniably magical about cheese balls-the way their crispy, golden exterior gives way to a rich, gooey center that melts effortlessly on your tongue. Whether served as a party appetizer, a movie night snack, or a comforting treat after a long day, cheese balls hold a special place in the hearts of food lovers everywhere. In this article, we’ll dive into a foolproof recipe that transforms simple ingredients into irresistible bites of delight. Get ready to discover how to create perfectly crisp, flavorful cheese balls that promise to be the star of any gathering. Let the baking-and the snacking-begin!

Irresistible Cheese Balls Recipe: Crispy Bites of Delight
Irresistible cheese balls recipe: crispy bites of delight begins with selecting the perfect cheese blend. The harmonious balance of sharp, creamy, and melty cheeses creates a flavor explosion that elevates each crunchy bite to savory perfection. These crispy morsels draw inspiration from classic comfort snacks deeply rooted in both European and American kitchens, where cheese is king and crunch is essential. Whether you’re hosting a gathering or craving a cozy snack, mastering the art of the cheese ball means embracing textures, flavors, and that golden crisp that beckons you back for more.
Prep and Cook Time
- Planning: 20 minutes
- Chilling: 30 minutes
- Frying: 15 minutes
- Total Time: 65 minutes
Yield
About 24 cheese balls (serving 6 as an appetizer or snack)
Difficulty Level
Medium: Requires some finesse in shaping and frying for optimal results
Ingredients
- 1 cup sharp cheddar cheese, shredded
- 1 cup mozzarella cheese, shredded
- ½ cup cream cheese, softened
- 1 tablespoon fresh chives, finely chopped
- ½ teaspoon garlic powder
- ½ teaspoon smoked paprika
- 1 cup all-purpose flour, sifted
- 2 large eggs, beaten
- 1 ½ cups panko breadcrumbs (for extra crunch)
- Vegetable oil, for frying
- Salt and freshly ground black pepper, to taste
Selecting the Perfect Cheese Blend for Ultimate Flavor
The secret to the most irresistible cheese balls recipe lies in the cheese combination. Sharp cheddar provides that unmistakable tang and depth, while mozzarella contributes meltability and a pleasantly stretchy texture. Cream cheese smooths out the mix with its luscious creaminess. Together,these three cheeses create a dynamic interplay-each bite bringing a melty surprise with a subtle richness and a slight tang. Adding fresh chives and a touch of garlic powder complements the cheeses perfectly, introducing a gentle herbaceous brightness and warmth.
Mastering the Crispy Coating for Crunchy Perfection
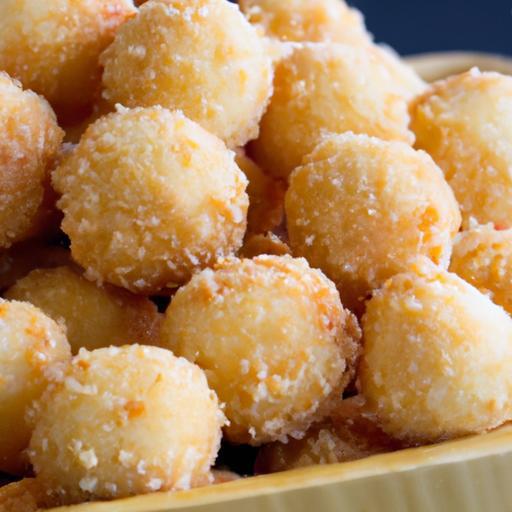
Achieving a golden, crackling exterior starts with a three-stage coating: dusting in flour, an egg wash, than a thick layer of fluffy panko breadcrumbs. The flour lightly coats the cheese balls, helping the egg adhere evenly, and the egg wash ensures the panko sticks firmly. Panko breadcrumbs are crucial-they guarantee a delicate but satisfyingly crunchy shell rather than a dense crust. For even more texture and flavor, lightly season the panko with smoked paprika, salt, and pepper before breading. Using neutral-flavored vegetable oil heated to 350°F (175°C) is ideal to get a crisp finish without soaking or burning.
Step-by-Step Guide to Shaping and Frying Ideal Cheese Balls
- Mix the cheeses and seasonings. In a bowl, combine the shredded cheddar, mozzarella, softened cream cheese, chives, garlic powder, smoked paprika, salt, and pepper. Use a spoon or your hands to create a homogeneous mixture.
- Chill the mixture. Refrigerate for 30 minutes to firm up the mixture, making it easier to shape.
- Shape the balls. Using a tablespoon or small ice cream scoop, portion out the mixture and gently roll between your hands to form smooth spheres about 1½ inches in diameter.
- Coat each ball. Roll the cheese balls in flour, tapping off excess. Next, dip into beaten eggs. coat thoroughly with panko breadcrumbs, pressing gently to ensure full coverage.
- Prepare the frying oil. Pour vegetable oil into a deep pan to a depth of 2-3 inches. Heat on medium to 350°F (175°C). Test readiness by dropping a few breadcrumbs into the oil; they should sizzle immediately.
- Fry carefully. Fry the cheese balls in batches, avoiding overcrowding, for 3-4 minutes or until golden brown and crispy. Use a slotted spoon to turn them occasionally for even color.
- Drain and serve. Remove onto a wire rack or paper towels to drain excess oil. Serve warm.
Serving Suggestions and Flavor Pairings to Elevate Your Snack
Present these crispy bites on a wooden platter or a vibrant ceramic tray to make their golden allure pop. Garnish with fresh herbs like parsley or additional chives for color and fresh aroma. Accompany with dipping sauces that complement and contrast with the cheese’s rich flavor-think tangy marinara, smoky chipotle aioli, or a cooling cucumber-yogurt dip.
Pair your irresistible cheese balls recipe with a chilled glass of sparkling white wine or a light pale ale to refresh the palate. For a fun twist, serve alongside sliced cured meats and crunchy pickles for an elevated snack board experience that’s perfect for sharing.
Tips for Success
- Use fresh, high-quality cheese: Pre-shredded cheese often contains anti-caking agents that hinder melting and texture.
- Do not overfill the pan: Fry in small batches to maintain oil temperature and ensure crispiness.
- Chill thoroughly: Chilling the mixture firms it up, making shaping easier and preventing leaking during frying.
- Maintain oil temperature: Use a deep-fry thermometer for precision; too hot burns the crust, too low causes sogginess.
- Make ahead: Prepare cheese balls up to the coating stage, freeze on a tray, then store in an airtight container until ready to fry.
| Nutritional Info (per 4 cheese balls) | Amount |
|---|---|
| Calories | 280 kcal |
| Protein | 14 g |
| carbohydrates | 18 g |
| Fat | 18 g |
Discover more crowd-pleasing appetizers in our Best Appetizer Recipes collection.
For scientific insight into cheese melting properties, check out this detailed article from Science Daily.

Q&A
Q&A: Irresistible cheese Balls recipe: Crispy Bites of Delight
Q1: What makes these cheese balls truly irresistible?
A1: Its that perfect harmony of creamy, melty cheese encased in a golden, crispy crust that crunches delightfully with every bite. The blend of cheeses, light seasoning, and the frying technique all come together to create a bite-sized explosion of flavor that’s simply hard to resist.
Q2: Which cheeses work best for making crispy cheese balls?
A2: A combination of cheeses with good melting qualities is key. Mozzarella offers that gooey stretch, while cheddar brings sharpness and depth. Some recipes also add parmesan for a savory kick and a slightly nutty aroma. The mix creates both great texture and sensational taste.
Q3: Can I bake the cheese balls instead of frying them?
A3: Absolutely! While frying gives that unbeatable crunch, baking is a healthier choice that still delivers a crispy exterior. Simply place the cheese balls on a greased baking sheet, lightly brush them with oil, and bake at 400°F (200°C) for about 15-20 minutes, turning halfway through for even crispiness.
Q4: How do I prevent the cheese from leaking out during frying?
A4: The secret lies in the coating process. After shaping the cheese balls, dip them in flour, then egg wash, and finally coat with breadcrumbs. For extra security, you can repeat the egg wash and breadcrumb step to create a thicker crust that seals in the cheesy goodness perfectly.
Q5: What dipping sauces pair best with these cheese balls?
A5: The sky’s the limit! Classic marinara sauce adds a tangy contrast, while garlic aioli brings a creamy zing. For those craving a bit of heat, a spicy sriracha mayo or chipotle dip pairs wonderfully. Even a simple ranch or honey mustard can elevate the flavor experience.
Q6: Can I add herbs or spices to the cheese balls?
A6: Definitely. Fresh herbs like parsley, chives, or basil add freshness and color, while spices such as smoked paprika, cayenne pepper, or black pepper introduce a subtle kick. Customize your cheese balls with your favorite flavor accents to make each bite uniquely yours.
Q7: Are cheese balls suitable for vegetarians?
A7: Yes! as long as you use vegetarian-amiable cheese (made without animal rennet) and vegetable-based oils for frying, cheese balls are a splendid vegetarian snack everyone can enjoy.
Q8: How can I store leftovers without losing the crispiness?
A8: Store leftover cheese balls in an airtight container in the refrigerator for up to 2 days. to regain their crispiness before serving, reheat them in a preheated oven or air fryer at 375°F (190°C) for 5-7 minutes rather than microwaving, which tends to make them soggy.
Q9: are these cheese balls suitable for parties and gatherings?
A9: They’re party gold! Bite-sized, easy to eat, and bursting with flavor, cheese balls make excellent appetizers or snacks. Pair them with a range of dips and watch them disappear fast among guests craving that crispy, cheesy delight.
Q10: What’s the easiest way to make shaping and frying cheese balls less messy?
A10: Keep your hands slightly damp to prevent the cheese mixture from sticking when rolling balls. Use a slotted spoon to gently lower the cheese balls into hot oil to avoid splashes. And don’t overcrowd the pan – fry in batches for even cooking and maximum crunch.
Dive into this irresistible cheese balls recipe, and enjoy crispy bites of pure delight every time!
Key Takeaways
Whether you’re hosting a lively gathering or simply craving a savory snack, these irresistible cheese balls promise to deliver crispy bites of pure delight with every mouthful. Their golden, crunchy exterior gives way to a luscious, cheesy center that’s bound to enchant your taste buds and keep you coming back for more. Packed with flavor and easy to make, this recipe is a must-have in your culinary repertoire-ready to transform any occasion into a festivity of comfort and joy. So, roll up your sleeves, gather your ingredients, and prepare to savor the ultimate cheesy indulgence that’s as fun to make as it is to eat!